Garmin GPSMAP 740/740s Owner's Manual - Page 50
Navigation Chart, Stop Navigation
 |
View all Garmin GPSMAP 740/740s manuals
Add to My Manuals
Save this manual to your list of manuals |
Page 50 highlights
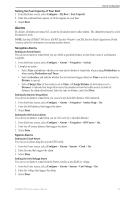
Device Configuration Safe Water Depth and Safe Obstacle Height CAUTION The Safe Depth and Safe Height settings influence how the chartplotter calculates an Auto Guidance line. If an area has an unknown water depth or an unknown obstacle height, the Auto Guidance line is not calculated in that area. If an area at the beginning or the end of an Auto Guidance line is shallower than the safe water depth or lower than the safe obstacle height, the Auto Guidance line is not calculated in that area. On the chart, the course through those areas appears as a gray line. When your boat enters one of those areas, a warning message appears. Setting the Safe Water Depth and the Safe Obstacle Height 1. From the Home screen, select Configure > Navigation > Auto Guidance. 2. Select Safe Depth to set the minimum depth (chart depth datum) the chartplotter uses when calculating an Auto Guidance line. 3. Enter the minimum safe depth. 4. Select Done. 5. Select Safe Height to set the minimum height (chart height datum) of a bridge that your boat can safely travel under. 6. Enter the minimum safe height. 7. Select Done. Shoreline Distance Auto Guidance Setting The Shoreline Distance setting indicates how close to the shore you want the Auto Guidance line to be placed. The Auto Guidance line may move if you change this setting while navigating. Setting the Distance from Shore The available values for the Shoreline Distance setting (Nearest, Near, Normal, Far, or Farthest) are relative, not absolute. To ensure that the Auto Guidance line is placed the appropriate distance from shore, you can assess the placement of the Auto Guidance line using one or more familiar destinations that require navigation through a narrow waterway. 1. Dock your boat or drop anchor. 2. From the Home screen, select Configure > Navigation > Auto Guidance > Shoreline Distance > Normal. 3. From the Home screen, select Charts > Navigation Chart. 4. Select a destination that you have navigated to previously. 5. Select Navigate To > Guide To. 6. Review the placement of the Auto Guidance line. Determine whether the line safely avoids known obstacles, and whether the turns enable efficient travel. 7. Complete an action: • If the placement of the Auto Guidance line is satisfactory, select Menu > Stop Navigation. Proceed to step 11. • If the Auto Guidance line is too close to known obstacles, from the Home screen, select Configure > Navigation > Auto Guidance > Shoreline Distance > Far. • If the turns in the Auto Guidance line are too wide, from the Home screen, select Configure > Navigation > Auto Guidance > Shoreline Distance > Near. 8. If you selected Near or Far in step 7, review the placement of the Auto Guidance line. Determine whether the line safely avoids known obstacles, and whether the turns enable efficient travel. Auto Guidance maintains a wide clearance from obstacles in open water, even if you set the Shoreline Distance setting to Near or Nearest. As a result, the chartplotter may not reposition the Auto Guidance line, unless the destination selected in step 3 requires navigation through a narrow waterway. 46 GPSMAP 700 Series Owner's Manual
-
 1
1 -
2
-
3
-
4
-
5
-
6
-
7
-
8
-
9
-
10
-
11
-
12
-
13
-
14
-
15
-
16
-
17
-
18
-
19
-
20
-
21
-
22
-
23
-
24
-
25
-
26
-
27
-
28
-
29
-
30
-
31
-
32
-
33
-
34
-
35
-
36
-
37
-
38
-
39
-
40
-
41
-
42
-
43
-
44
-
 45
45 -
 46
46 -
 47
47 -
 48
48 -
 49
49 -
 50
50 -
 51
51 -
 52
52 -
 53
53 -
 54
54 -
 55
55 -
56
-
57
-
58
-
59
-
60
-
61
-
62
-
63
-
64
-
65
-
66
-
67
-
68
-
69
-
70
-
71
-
72
-
73
-
74
-
75
-
76
-
77
-
78
-
79
-
80
-
81
-
82
-
83
-
84
-
85
-
86
-
87
-
88
-
89
-
90
-
91
-
92
-
93
-
94
-
95
-
96
-
97
-
98
-
99
-
100
 |
 |
