Garmin GPSMAP 740/740s Owner's Manual - Page 51
Setting the Heading Reference, Coordinate Systems, Configuring the Time, User Mag Var
 |
View all Garmin GPSMAP 740/740s manuals
Add to My Manuals
Save this manual to your list of manuals |
Page 51 highlights
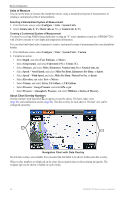
Device Configuration 9. Complete an action: • If the placement of the Auto Guidance line is satisfactory, select Menu > Stop Navigation. Proceed to step 11. • If the Auto Guidance line is too close to known obstacles, from the Home screen, select Configure > Navigation > Auto Guidance > Shoreline Distance > Farthest. • If the turns in the Auto Guidance line are too wide, from the Home screen, select Configure > Navigation > Auto Guidance > Shoreline Distance > Nearest. 10. If you selected Farthest or Nearest in step 9, review the placement of the Auto Guidance line. Determine whether the line safely avoids known obstacles, and whether the turns enable efficient travel. Auto Guidance maintains a wide clearance from obstacles in open water, even if you set the Shoreline Distance setting to Near or Nearest. As a result, the chartplotter may not reposition the Auto Guidance line, unless the destination selected in step 4 requires navigation through a narrow waterway. 11. Repeat steps 1-10 at least once more, using a different destination each time, until you are familiar with the functionality of the Shoreline Distance setting. Setting the Heading Reference You can set the directional reference used in calculating heading information. 1. From the Home screen, select Configure > Units > Heading. 2. Complete an action: • Select Auto Mag Var (automatic magnetic variation) to set the magnetic declination for your location automatically. • Select True to set true north as the heading reference. • Select Grid to set grid north as the heading reference (000º). • Select User Mag Var to set the magnetic variation value manually, enter the magnetic variation, and select Done. Coordinate Systems Setting the Position Format or the Map Datum Coordinate Systems You can set the position format in which a given location reading appears, and the coordinate system on which the map is structured. The default coordinate system is WGS 84. Note: Do not change the position format or the map datum coordinate system unless you are using a map or chart that specifies a different position format. 1. From the Home screen, select Configure > Units. 2. Complete an action: • Select Position Format to set the position format in which a given location reading appears, and select a position format. • Select Map Datum to set the coordinate system on which the map is structured, and select a coordinate system. Configuring the Time 1. From the Home screen, select Configure > Units > Time. 2. Complete an action: • Select Time Format to set a time-keeping standard, and select 12 Hour, 24 Hour, or UTC (universal time coordinate). • Select Time Zone > Auto Time Zone to allow the chartplotter to set the time zone automatically. • Select Time Zone > Custom Time Zone to set the time zone manually, enter the time zone hour adjustment, and select Done. GPSMAP 700 Series Owner's Manual 47
-
 1
1 -
2
-
3
-
4
-
5
-
6
-
7
-
8
-
9
-
10
-
11
-
12
-
13
-
14
-
15
-
16
-
17
-
18
-
19
-
20
-
21
-
22
-
23
-
24
-
25
-
26
-
27
-
28
-
29
-
30
-
31
-
32
-
33
-
34
-
35
-
36
-
37
-
38
-
39
-
40
-
41
-
42
-
43
-
44
-
45
-
 46
46 -
 47
47 -
 48
48 -
 49
49 -
 50
50 -
 51
51 -
 52
52 -
 53
53 -
 54
54 -
 55
55 -
 56
56 -
57
-
58
-
59
-
60
-
61
-
62
-
63
-
64
-
65
-
66
-
67
-
68
-
69
-
70
-
71
-
72
-
73
-
74
-
75
-
76
-
77
-
78
-
79
-
80
-
81
-
82
-
83
-
84
-
85
-
86
-
87
-
88
-
89
-
90
-
91
-
92
-
93
-
94
-
95
-
96
-
97
-
98
-
99
-
100
 |
 |