Garmin GSD 26 CHIRP Professional Sonar Module Installation Instructions
Garmin GSD 26 CHIRP Professional Sonar Module Manual
 |
View all Garmin GSD 26 CHIRP Professional Sonar Module manuals
Add to My Manuals
Save this manual to your list of manuals |
Garmin GSD 26 CHIRP Professional Sonar Module manual content summary:
- Garmin GSD 26 CHIRP Professional Sonar Module | Installation Instructions - Page 1
vary, see your local Garmin dealer or contact Garmin Product Support for more information. Go to www.garmin.com to view a full list of transducers. GSD 24/26 Installation notice The GSD 24/26 must be installed according to the following instructions to get the best possible performance. If you - Garmin GSD 26 CHIRP Professional Sonar Module | Installation Instructions - Page 2
easily. If you are connecting 6-pin transducer to a GSD 24 you must use the included adaptor. Refer to the GSD 24 Transducer Adaptor Installation Instructions included in the package for more information. Before you connect the sounder to the network, power, and the transducer, you must mount the - Garmin GSD 26 CHIRP Professional Sonar Module | Installation Instructions - Page 3
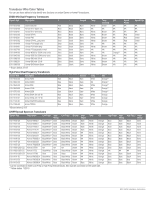
connector. Transducer Wiring Diagrams You can use these diagrams to identify the connection points for your transducer wires on the GSD 26 terminal block. Locate your transducer model in the wiring color tables FREQ XDCR SHIELD LOHWIGHFRFERQEQXDXUDCCERR GSD 24/26 Installation Instructions 3 - Garmin GSD 26 CHIRP Professional Sonar Module | Installation Instructions - Page 4
Bare Blue Bare Blue Bare Blue Bare High Freq - Outer Shield Black Bare Black Bare Black Bare Black Bare Black Bare Black Bare Black Bare Black Bare Black Bare Black Bare NA Bare Black Bare Black Bare Blue Bare Black Bare 4 GSD 24/26 Installation Instructions - Garmin GSD 26 CHIRP Professional Sonar Module | Installation Instructions - Page 5
rmations are not accepted for warranty verification. To obtain warranty service, an original or copy of the sales receipt from the original retailer is required. Garmin will not replace missing components from any package purchased through an online auction. GSD 24/26 Installation Instructions 5 - Garmin GSD 26 CHIRP Professional Sonar Module | Installation Instructions - Page 6
in the content of this manual without obligation to notify any person or organization of such changes or improvements. Go to www.garmin.com for current updates and supplemental information concerning the use of this product. DCG®, Garmin®, and the Garmin logo, are trademarks of Garmin Ltd. or its
-
 1
1 -
 2
2 -
 3
3 -
 4
4 -
 5
5 -
 6
6
 |
 |

GSD
™
24/26 Installation Instructions
To obtain the best performance and to avoid damage to your boat, install the
Garmin
®
GSD 24/26 unit according to the following instructions. Professional
installation of the unit is highly recommended, because specific knowledge of
boat construction is required to properly install the unit.
Read all installation instructions before proceeding with the installation.
If
you experience difficulty during the installation, contact Garmin Product Support.
Registering Your Device
Help us better support you by completing our online registration today.
•
Go to
.
•
Keep the original sales receipt, or a photocopy, in a safe place.
Contacting Garmin Product Support
Contact Garmin Product Support if you have any questions about this product.
•
In the USA, go to
www.garmin.com/support
, or contact Garmin USA by
phone at (913) 397.8200 or (800) 800.1020.
•
In the UK, contact Garmin (Europe) Ltd. by phone at 0808 2380000.
•
In Europe, go to
www.garmin.com/support
and click
Contact Support
for
in-country support.
Important Safety Information
WARNING
You are responsible for the safe and prudent operation of your vessel. Sonar is
a tool that will enhance your awareness of the water beneath your boat. It does
not relieve you from the responsibility of observing the water around your boat
as you navigate.
When drilling or cutting, always check the opposite side of the surface. Be aware
of fuel tanks, electrical cables, and hydraulic hoses.
CAUTION
Failure to install and maintain this equipment in accordance with these
instructions could result in damage or injury.
Always wear safety goggles, ear protection, and a dust mask when drilling,
cutting, or sanding.
Notice
This equipment must be installed by a qualified marine installer.
Transducers
A transducer is required to send and receive the sonar signal from the
GSD 24/26. Proper transducer selection and installation are critical to the
operation of the GSD 24/26. Because mounting locations vary, see your local
Garmin dealer or contact Garmin Product Support for more information. Go to
www.garmin.com
to view a full list of transducers.
GSD 24/26 Installation
Notice
The GSD 24/26 must be installed according to the following instructions to get
the best possible performance. If you experience difficulty with the installation,
contact Garmin Product Support.
Because every boat is different, you must carefully plan the GSD 24/26 sounder
installation.
1
Select a mounting location (
page 1
).
2
Mount the sounder (
page 1
).
3
Connect the sounder to the Garmin Marine Network and to power
(
page 2
).
4
Connect the sounder to the transducer (
page 2
).
Tools Needed
NOTE:
If you are not using the mounting hardware included in the kit, use the
most appropriate tool for securing that hardware.
•
Drill
•
#8 (5 mm) drill bit appropriate for mounting surface
•
1
1
/
4
in. (32 mm) paddle drill bit or hole saw appropriate for mounting surface
•
#2 Phillips screwdriver
•
3 mm flat screwdriver
•
Cable ties (optional)
•
Wire cutter
•
Wire stripper
•
1 in. (24 mm) and
19
/
32
in. (15 mm) wrenches
•
Marine sealant (optional)
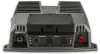
Mounting the Sounder
Mounting Location Considerations
•
The sounder dimensions and mounting hole locations can be reviewed on
the templates included in the sounder package.
•
The sounder must be mounted in a location where it cannot be submerged.
•
The sounder must be mounted in a location with adequate ventilation where
it will not be exposed to extreme temperatures.
•
The sounder should be mounted in such a way that the LED is visible.
•
The sounder should be mounted so that the power and network cables can
be easily connected.
•
The sounder should be mounted so that the transducer cable can be
connected. If required, transducer extension cables up to 20 ft. (6 m) are
available through your Garmin dealer.
Mounting the Sounder
1
After you select a mounting location (
page 1
), determine the mounting
hardware needed for the surface.
Mounting hardware is included with the sounder, but it may not be suitable
for the mounting surface.
2
If necessary, purchase the mounting hardware.
3
Complete an action:
•
Hold the sounder in the intended mounting location and mark the
locations of the mounting holes in the mounting surface, using the
sounder as a template.
•
Use the template included with your sounder to mark the locations of the
mounting holes.
4
Drill the mounting holes through the mounting surface.
5
Secure the sounder to the mounting surface using the selected mounting
hardware.
October 2011
190-00789-02_0C
Printed in Taiwan