Garmin Group Ride Radio 5.5" Instructions
Garmin Group Ride Radio 5.5" Manual
 |
View all Garmin Group Ride Radio 5.5" manuals
Add to My Manuals
Save this manual to your list of manuals |
Garmin Group Ride Radio 5.5" manual content summary:
- Garmin Group Ride Radio 5.5" | Instructions - Page 1
GROUP RIDE INSTRUCTIONS Mounting the Antenna NOTE: The mounted antenna must be at least 4 cm (1.57 in.) away from the nearest roll in your vehicle, and secure it using the included zip ties. 2 Tighten the collar around the connected cable. March 2021 GUID-94D95904-F3F7-4AAA-85EE-67751184A60C v2 - Garmin Group Ride Radio 5.5" | Instructions - Page 2
voice dial feature on your connected Bluetooth headset. TIP: You can press the pause or stop button to manually close the radio. NOTE: You must enable the Push to Talk with Headset setting to use this feature. up to 30 min. For more information, go to www.garmin.com/waterrating. support.garmin.com
-
 1
1 -
 2
2
 |
 |

GROUP
RIDE
INSTRUCTIONS
Mounting the Antenna
NOTE:
The mounted antenna must be at least 4 cm (1.57 in.)
away from the nearest roll bar or metal surface to avoid radio
interference.
You can use the external antenna mount to mount your antenna
in a more suitable location for your vehicle, such as a roll bar at
the rear of your vehicle, to receive better radio reception. For the
best results, use this method for vehicles that have a roll cage.
1
Screw down and tighten the antenna cable
onto the Group
Ride mount
.
2
Find a suitable location for the antenna.
3
Using a flat head screwdriver or
5
/
16
in. (8 mm) nut driver,
loosen the bolt
on the external antenna mount until the
ring separates.
4
Place the mount around the roll bar.
5
Tighten the bolt on the mount until the ring is secure.
6
Screw down and tighten the antenna
onto the external
antenna mount plate.
7
Route the antenna cable along a suitable path in your
vehicle, and secure it using the included zip ties.
Installing the Antenna on the Group Ride
Mount
NOTE:
The mounted antenna must be at least 4 cm (1.57 in.)
away from the nearest roll bar or metal surface to avoid radio
interference.
For the best range performance, use the external antenna
mount. You can mount the antenna directly onto the Group Ride
mount when it is not possible to use the external antenna mount.
Screw down and tighten the antenna onto the Group Ride
mount.
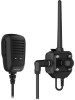
Installing the Fist Microphone and Mount
Before you can attach the fist microphone mount to your
dashboard, you must select a suitable location on the
dashboard.
WARNING
It is your responsibility to ensure the mounting location complies
with all applicable laws and ordinances, and does not block your
view of the road during the safe operation of your vehicle.
NOTICE
Avoid wires, gauges, air bags, air bag covers, HVAC, and other
items when drilling pilot holes and attaching the mount to the
vehicle. Garmin
®
is not responsible for any damages or
consequences arising from the installation.
NOTE:
This feature is not available on all product models.
1
Align and insert the connector on the fist microphone onto the
Group Ride mount.
2
Tighten the collar around the connected cable.
GUID-94D95904-F3F7-4AAA-85EE-67751184A60C v2
March 2021