Garmin VIRB Instructions
Garmin VIRB Manual
 |
View all Garmin VIRB manuals
Add to My Manuals
Save this manual to your list of manuals |
Garmin VIRB manual content summary:
- Garmin VIRB | Instructions - Page 1
VIRB™ Remote Instructions...2 Instructions de la télécommande VIRB 4 VIRB™ Istruzioni del telecomando...6 VIRB™ Fernbedienung - Anweisungen 8 VIRB™ Instrucciones del mando a distancia 10 Instruções do controlo remoto VIRB 12 Garmin® and the Garmin logo are trademarks of Garmin Ltd. or its - Garmin VIRB | Instructions - Page 2
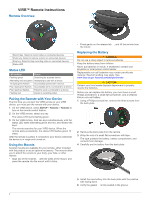
VIRB™ Remote Instructions Mounts Several mounts are available for your remote, either included with the product or as an optional accessory. The mounts mount. Replacing the Battery WARNING Do not use a sharp object to remove batteries. Keep the battery away from children. Never put batteries - Garmin VIRB | Instructions - Page 3
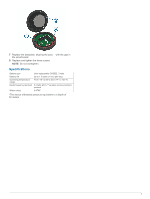
post  with the gap in the circuit board Ã. 8 Replace and tighten the three screws. NOTE: Do not overtighten. Specifications Battery type User-replaceable CR2032, 3 volts Battery life Up to 1. 5 years (1 hour per day) Operating temperature From -10° to 50°C (from 14° to 122°F) range Radio - Garmin VIRB | Instructions - Page 4
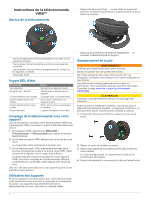
Instructions de la télécommande VIRB™ Aperçu de la télécommande • Alignez les deux encoches À sur les côtés du support et enfoncez la télécommande dans le support votre déchetterie locale pour le recyclage des batteries. Avant de pouvoir remplacer la batterie, vous devez avoir à disposition les élé - Garmin VIRB | Instructions - Page 5
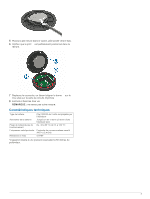
de circuits imprimés Ã. 8 Fermez et fixez les trois vis. REMARQUE : ne serrez pas outre mesure. Caractéristiques techniques Type de batterie Autonomie de la batterie Plage de températures de fonctionnement Fréquences radio/protocole Résistance à l'eau Pile CR2032 de 3 volts remplaçable par - Garmin VIRB | Instructions - Page 6
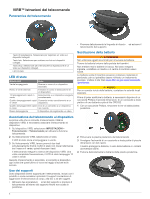
Per un corretto riciclo delle batterie, contattare le autorità locali tasti. Il telecomando esegue la ricerca del dispositivo VIRB. Una volta completata l'associazione, il LED di il telecomando, inclusi con il prodotto o come accessori opzionali. Il supporti consentono di agganciare il - Garmin VIRB | Instructions - Page 7
5 Installare la nuova batteria nella piastra posteriore con il lato positivo rivolto verso il basso. 6 Verificare che la guarnizione Á sia inserita completamente nella scanalatura. 7 Riposizionare la piastra posteriore, allineando la guida  al foro nella scheda dei circuiti Ã. 8 Riposizionare e - Garmin VIRB | Instructions - Page 8
VIRB™ Fernbedienung - Anweisungen Übersicht über die Fernbedienung • Drück leicht auf die Entriegelung Á, und nimm die Fernbedienung aus der Halterung. Auswechseln der Batterie À Aufnahmetaste. Wähle die Taste, um Video auf verbundenen Geräten aufzunehmen. Á Fototaste. Wähle die Taste, um ein - Garmin VIRB | Instructions - Page 9
an. HINWEIS: Ziehe sie nicht zu fest an. Technische Daten Batterietyp Batterielaufzeit Betriebstemperatur Funkfrequenz/Protokoll Wasserdichtigkeit Auswechselbare CR2032-Batterie, 3 Volt Bis zu 1,5 Jahre (1 Stunde pro Tag) -10 bis 50 °C (14 bis 122 °F) ANT + Funkübertragungsprotokoll, 2,4 GHz - Garmin VIRB | Instructions - Page 10
simultáneamente hasta que el LED de estado empiece a alternar entre verde y rojo. A continuación, suéltalos. El mando a distancia buscará tu dispositivo VIRB. Cuando se haya vinculado el mando a distancia correctamente, el LED de estado parpadeará de color verde 12 veces. Una vez vinculado, el - Garmin VIRB | Instructions - Page 11
5 Coloca la nueva pila en la placa posterior con el lado positivo hacia abajo. 6 Comprueba que la junta Á está totalmente asentada en la ranura. 7 Vuelve a colocar la placa posterior alineando el borne  con el hueco del cuadro de circuito Ã. 8 Vuelve a colocar los tres tornillos y fíjalos. - Garmin VIRB | Instructions - Page 12
o LED de estado começar a piscar alternadamente a verde e vermelho e, em seguida, solte as teclas. O controlo remoto começa a procurar o dispositivo VIRB. Quando o controlo remoto fizer o emparelhamento com sucesso, o LED de estado pisca 12 vezes a verde. Depois de emparelhado, o controlo remoto - Garmin VIRB | Instructions - Page 13
6 Verifique se a junta Á está completamente introduzida na ranhura. 7 Substitua a tampa posterior, alinhando a extremidade  com o orifício correspondente na placa de circuitos Ã. 8 Substitua e aperte os três parafusos. NOTA: não aperte demasiado. Especificações Tipo de bateria Vida útil da - Garmin VIRB | Instructions - Page 14
© 2014 Garmin Ltd. or its subsidiaries www.garmin.com/support
-
 1
1 -
 2
2 -
 3
3 -
 4
4 -
 5
5 -
 6
6 -
 7
7 -
8
-
9
-
10
-
11
-
12
-
13
-
14
 |
 |
VIRB™ Remote Instructions
..............................................................................................................
2
Instructions de la télécommande VIRB™
..........................................................................................
4
VIRB™ Istruzioni del telecomando
....................................................................................................
6
VIRB™ Fernbedienung – Anweisungen
............................................................................................
8
VIRB™ Instrucciones del mando a distancia
...................................................................................
10
Instruções do controlo remoto VIRB™
............................................................................................
12
Garmin
®
and the Garmin logo are trademarks of Garmin Ltd. or its subsidiaries, registered in the USA and other countries. VIRB™ and ANT+™ are trademarks of Garmin Ltd. or its subsidiaries. These
trademarks may not be used without the express permission of Garmin.
This product is ANT+™ certified. Visit
www.thisisant.com/directory
for a list of compatible products and apps.
July 2014
190-01627-90_0D
Printed in Taiwan
TA-2013/2179
TRA
REGISTERED No:
ER0127480/14
DEALER No:
DA0061884/11