Garmin eTrex 20 Owner's Manual
Garmin eTrex 20 Manual
 |
View all Garmin eTrex 20 manuals
Add to My Manuals
Save this manual to your list of manuals |
Garmin eTrex 20 manual content summary:
- Garmin eTrex 20 | Owner's Manual - Page 1
eTrex® owner's manual for use with models 10, 20, 30 - Garmin eTrex 20 | Owner's Manual - Page 2
changes in the content of this manual without obligation to notify any person or organization of such changes or improvements. Go to www.garmin.com for current updates and supplemental information concerning the use of this product. Garmin®, the Garmin logo, eTrex®, BlueChart®, and City Navigator - Garmin eTrex 20 | Owner's Manual - Page 3
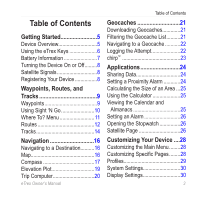
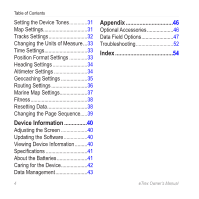
9 Waypoints 9 Using Sight 'N Go 10 Where To? Menu 11 Routes 12 Tracks 14 Navigation 16 Navigating to a Destination..........16 Map 16 Compass 17 Elevation Plot 19 Trip Computer 20 eTrex Owner's Manual Table of Contents Geocaches 21 Downloading Geocaches 21 Filtering the Geocache List - Garmin eTrex 20 | Owner's Manual - Page 4
40 Adjusting the Screen 40 Updating the Software 40 Viewing Device Information..........40 Specifications 41 About the Batteries 41 Caring for the Device 42 Data Management 43 Appendix 46 Optional Accessories 46 Data Field Options 47 Troubleshooting 52 Index 54 4 eTrex Owner's Manual - Garmin eTrex 20 | Owner's Manual - Page 5
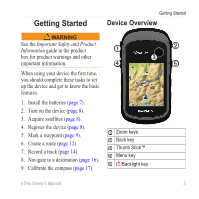
(page 8). 4. Register the device (page 8). 5. Mark a waypoint (page 9). 6. Create a route (page 12). 7. Record a track (page 14). 8. Navigate to a destination (page 16). 9. Calibrate the compass (page 17). ➊ Zoom keys ➋ Back key ➌ Thumb Stick™ ➍ Menu key ➎ /Backlight key eTrex Owner's Manual 5 - Garmin eTrex 20 | Owner's Manual - Page 6
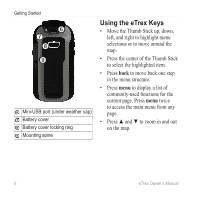
Getting Started ➏ ➐ ➑ ➒ ➏ Mini-USB port (under weather cap) ➐ Battery cover ➑ Battery cover locking ring ➒ Mounting spine Using the eTrex Keys • Move the Thumb Stick up, down, left, and right to highlight menu selections or to move around the map. • Press the center of the Thumb Stick to select the - Garmin eTrex 20 | Owner's Manual - Page 7
capacity as temperature decreases. Therefore, use lithium batteries when operating the device in below-freezing conditions. Installing AA Batteries The device operates on two AA batteries. You can use alkaline, NiMH, or lithium batteries. Use NiMH or lithium batteries for best results. 1. Turn the - Garmin eTrex 20 | Owner's Manual - Page 8
acquire satellite signals. When the GPS bars on the backlight page ( GPS position. For more information about GPS, go to http://www.garmin.com/aboutGPS. Registering Your Device • Go to http://my.garmin.com. • Keep the original sales receipt, or a photocopy, in a safe place. 8 eTrex Owner's Manual - Garmin eTrex 20 | Owner's Manual - Page 9
can edit a waypoint, you must create a waypoint. 1. Select Waypoint Manager. 2. Select a waypoint. 3. Select an item to edit. 4. Enter the new information. 5. Select Done. Deleting a Waypoint 1. Select Waypoint Manager. 2. Select a waypoint. 3. Select menu > Delete > Yes. eTrex Owner's Manual 9 - Garmin eTrex 20 | Owner's Manual - Page 10
the direction, and then navigate to the object. 1. Select Sight 'N Go. 2. Point the device at an object or in the direction of a location. 3. Select Lock Direction > Project Waypoint. 4. Select a unit of measure. 5. Enter the distance to the object, and select Done > Save. 10 eTrex Owner's Manual - Garmin eTrex 20 | Owner's Manual - Page 11
Maps You can use additional maps on the eTrex 20 and eTrex 30, such as BirdsEye™ satellite imagery, BlueChart® g2, TOPO, and City Navigator® detailed maps. Detailed maps may contain additional points of interest, such as restaurants or marine services. For more information, go to http://buy.garmin - Garmin eTrex 20 | Owner's Manual - Page 12
point in the route. 4. Select Use > Select Next Point. 5. Repeat steps 2-4 until the route is complete. 6. Select back to save the route. Editing the Name of a Route 1. Select Route Planner. 2. Select a route. 3. Select Change Name. 4. Enter the new name. 5. Select Done. 12 eTrex Owner's Manual - Garmin eTrex 20 | Owner's Manual - Page 13
Planner. 2. Select a route. 3. Select Delete Route. Viewing the Active Route 1. While navigating a route, select Active Route. 2. Select a point in the route to view additional details. Reversing a Route 1. Select Route Planner. 2. Select a route. 3. Select Reverse Route. eTrex Owner's Manual 13 - Garmin eTrex 20 | Owner's Manual - Page 14
On Map. If you select Record, Show On Map, a line on the map indicates Using the Most Often interval provides the most track detail, but fills up the device memory quicker. • Enter a time or distance, and select Done. As you move with the device turned on, a track log is created. eTrex Owner's Manual - Garmin eTrex 20 | Owner's Manual - Page 15
archive saved tracks to save memory space. 1. Select Track Manager. 2. Select a saved track. 3. Select Archive. Clearing the Current Track Select Setup > Reset > Clear Current Track > Yes. Deleting a Track 1. Select Track Manager. 2. Select a track. 3. Select Delete > Yes. eTrex Owner's Manual 15 - Garmin eTrex 20 | Owner's Manual - Page 16
Navigation Navigation You can navigate a route, a track, to a waypoint, to a geocache, or to any saved location in the device. You can use the map (page 16) or compass (page 17) to navigate to your destination. Navigating to a Destination You can navigate to a destination using the map or compass. - Garmin eTrex 20 | Owner's Manual - Page 17
on the eTrex 20 and eTrex 30. Before you can use the map, you must purchase and load City Navigator maps. If you plan to use an auto mount accessory with the device, you must also purchase and install the mount in your vehicle. 1. Select Profile Change > Automotive. 2. Use the map to navigate to the - Garmin eTrex 20 | Owner's Manual - Page 18
compass after moving long distances, experiencing temperature changes, or changing the batteries. 1. Select Compass > menu > Calibrate Compass > Start. 2. Follow the on-screen instructions. Navigating with the Bearing Pointer When navigating scale ➍ refers to the distance 18 eTrex Owner's Manual - Garmin eTrex 20 | Owner's Manual - Page 19
the course pointer, you must change the pointer setting to Course (CDI) (page 34). 1. Begin navigation to a destination (page 16). 2. Select Compass. 3. Use the course pointer to navigate to the destination (page 18). Elevation Plot Elevation plotting is available on the eTrex 30. By default, the - Garmin eTrex 20 | Owner's Manual - Page 20
The trip computer displays your current speed, average speed, maximum speed, trip odometer, and other helpful statistics. To customize the trip computer, see page 28. 20 eTrex Owner's Manual - Garmin eTrex 20 | Owner's Manual - Page 21
is when you hunt for hidden treasures using GPS coordinates posted online by those hiding the geocache. Downloading Geocaches 1. Connect your device to a computer (page 44). 2. Go to www.OpenCaching.com. 3. If necessary, create an account. 4. Sign in. 5. Follow the on-screen instructions to find and - Garmin eTrex 20 | Owner's Manual - Page 22
Setup. 2. Select a filter. 3. Select an item to edit. Navigating to a Geocache 1. Select Geocaches. 2. Select a geocache. 3. Select Go. 4. Navigate using the map (page 16) or compass (page 17). Logging the Attempt After you have attempted to find a geocache, you can log your results. 1. Select - Garmin eTrex 20 | Owner's Manual - Page 23
for the cache or the cache itself, select Add Comment, enter a comment, and select Done. chirp™ chirp programming and searching is available on the eTrex 30. A chirp is a small Garmin accessory that you can program and leave in a geocache. Only the owner of the chirp can program a chirp, but anyone - Garmin eTrex 20 | Owner's Manual - Page 24
. You can share waypoints, geocaches, routes, and tracks. Sending and Receiving Data Wirelessly Before you can share data wirelessly, you must be within 10 feet (3 m) of a compatible Garmin device. 1. Select Share Wirelessly. 2. Select Send or Receive. 3. Follow the on-screen instructions. Setting - Garmin eTrex 20 | Owner's Manual - Page 25
2. Complete an action: • Use the standard calculator. • Select menu > Scientific to use the scientific calculator functions. • predicted best times for hunting and fishing, select, Hunt and Fish. 2. If necessary, select ▲ or ▼ to view a different month. 3. Select a day. eTrex Owner's Manual 25 - Garmin eTrex 20 | Owner's Manual - Page 26
GPS accuracy, satellite locations, and signal strength. Changing the Satellite View 1. Select Satellite > menu. 2. If necessary, select Track Up to change the signal strength bar of that satellite (eTrex 20/30). Turning Off GPS Select Satellite > menu > Use With GPS Off. 26 eTrex Owner's Manual - Garmin eTrex 20 | Owner's Manual - Page 27
Simulating a Location Before you can simulate a location, you must turn off GPS (page 26). 1. Select Satellite > menu > Use With GPS Off. 2. Select menu > Set Location On Map. 3. Select a location. 4. Select Use. Applications eTrex Owner's Manual 27 - Garmin eTrex 20 | Owner's Manual - Page 28
Data Fields Before you can change the map data fields, you must enable them (page 28). 1. Select Map > menu > Change Data Fields. 2. Select a data field to customize. 3. Select a data field type. For data field descriptions, see page 47. 4. Select back to save the changes. 28 eTrex Owner's Manual - Garmin eTrex 20 | Owner's Manual - Page 29
and views can be different when you are using the device for geocaching and for navigating on water. When you are using a profile and you change settings such as data fields or eTrex Owner's Manual Customizing Your Device units of measurement, the changes are saved automatically as part of the - Garmin eTrex 20 | Owner's Manual - Page 30
/European Geostationary Navigation Overlay Service), or Demo Mode (GPS off). For information about WAAS, go to http://www.garmin.com/ aboutGPS/waas.html. • Language-sets the text language on the device. note: Changing the text language does not change the language of user-entered data or map data - Garmin eTrex 20 | Owner's Manual - Page 31
location (Auto). ◦◦ Day Background Color-sets the background image used in day mode. ◦◦ Day Highlight Color-sets the color . 2. Select a tone for each audible type. Map Settings Select Setup > Map. • Orientation-adjusts how the map is shown on the page. ◦◦ North Up-shows map. eTrex Owner's Manual 31 - Garmin eTrex 20 | Owner's Manual - Page 32
level for optimal use on your map. When Off is selected, you must zoom in or out manually. ◦◦ Zoom Levels-selects the zoom level for map items. ◦◦ Text Size-selects the text size for map items. ◦◦ frequently creates a more-detailed track, but fills the track log faster. 32 eTrex Owner's Manual - Garmin eTrex 20 | Owner's Manual - Page 33
to organize your tracks. Tracks are saved and cleared automatically based on the user setting. • Color (eTrex 20/30)-changes the color of the track line on the map. Changing the Units of Measure You can customize units of measure for distance and speed, elevation, and pressure. 1. Select Setup - Garmin eTrex 20 | Owner's Manual - Page 34
which the map is structured. • Map Spheroid-shows the coordinate system the device is using. The default coordinate system is WGS 84. Heading Settings This function is available on the eTrex 30. Select Setup > Heading. • Display-sets the type of directional heading on the compass. • North Reference - Garmin eTrex 20 | Owner's Manual - Page 35
barometric pressure over a period of time. ◦◦ Ambient Pressure-records ambient pressure changes over a period of time. • Calibrate Altimeter-page 20. Geocaching Settings Select Setup > Geocaches. • Geocache List-allows you to display the geocache list by names or codes. eTrex Owner's Manual 35 - Garmin eTrex 20 | Owner's Manual - Page 36
-allows you to edit the number of geocaches found. This number automatically increases as you log a find (page 22). • Filter Setup- page 21. • chirp™ Searching-page 23. • Program chirp™-programs the chirp accessory. See the chirp Owner's Manual at http://www.garmin.com. Routing Settings The device - Garmin eTrex 20 | Owner's Manual - Page 37
drawing scheme of paper charts. ◦◦ Fishing-(requires marine maps) displays a detailed view of bottom contours and depth soundings. Simplifies map presentation for optimal use while fishing. • Appearance-allows you to set the appearance of marine navigation aids on the map. eTrex Owner's Manual 37 - Garmin eTrex 20 | Owner's Manual - Page 38
You can reset trip data, delete all waypoints, clear the current track, or restore default values. 1. Select Setup > Reset. 2. Select an item to reset. Restoring Specific Settings to Defaults 1. Select Setup. 2. Select an item to reset. 3. Select menu > Restore Defaults. 38 eTrex Owner's Manual - Garmin eTrex 20 | Owner's Manual - Page 39
settings for the map, compass, and trip Your Device Changing the Page Sequence Before you can change the order of the page sequence, you must add pages to Add Page. 3. Select a page to add. Removing a Page 1. Select Setup > Page Sequence. 2. Select a page. 3. Select Remove. eTrex Owner's Manual - Garmin eTrex 20 | Owner's Manual - Page 40
the batteries is low. Extensive use of screen backlighting can significantly reduce battery life. 1. While the device is on, press . 2. Move the Thumb Stick left and right to adjust the brightness level. 3. Move the Thumb Stick up and down to adjust the contrast level (eTrex 10 only). Adjusting the - Garmin eTrex 20 | Owner's Manual - Page 41
, use lithium batteries when operating the device in below-freezing conditions. Maximizing Battery Life You can do various things to increase the battery life. • Leave the backlight off when not needed. • Lower the backlight brightness (page 40). • Decrease the backlight timeout (page 40). eTrex - Garmin eTrex 20 | Owner's Manual - Page 42
withstand immersion in 1 meter of water for 30 minutes. However, prolonged submersion can cause damage using or charging. Extreme Temperatures notice Do not store the device where prolonged exposure to extreme temperatures can occur because it can cause permanent damage. 42 eTrex Owner's Manual - Garmin eTrex 20 | Owner's Manual - Page 43
Card The eTrex 20 and eTrex 30 can use microSD cards for additional storage. Also, some maps are available preloaded on memory cards. Go to http://buy.garmin.com for more information. 1. Turn the D-ring counter-clockwise, and pull up to remove the cover. 2. Remove the batteries or battery. 3. Slide - Garmin eTrex 20 | Owner's Manual - Page 44
Computer on Windows computers and as mounted volumes on Mac computers. Transferring Files to Your Computer Before you can transfer files, you must connect the device to your computer (page 44). 1. Browse your computer for the file. 2. Select the file. 3. Select Edit > Copy. 44 eTrex Owner's Manual - Garmin eTrex 20 | Owner's Manual - Page 45
You must put geocache files in the Garmin\GPX folder. Deleting Files Notice If you do not know the purpose of a file, do not delete it. Your device memory contains important system files that should not be deleted. Be especially cautious of folders entitled "Garmin." Before you can delete files, you - Garmin eTrex 20 | Owner's Manual - Page 46
imagery, Garmin custom maps, Inland Lakes, TOPO, BlueChart g2, and City Navigator maps. Optional Fitness Accessories Fitness accessories are available for the eTrex 30. Before you can use the fitness accessory with your device, you must install the accessory according to the instructions included - Garmin eTrex 20 | Owner's Manual - Page 47
and functioning correctly. • When paired, your Garmin device receives data from only your Appendix accessory, and you can go near other accessories. Data Field Options Not all data fields are available for all models. Data Field Accuracy of GPS Ambient Pressure Ascent Average Ascent Maximum - Garmin eTrex 20 | Owner's Manual - Page 48
Battery Level The remaining battery power. Bearing The direction from your current location to a destination. Cadence (cadence accessory waypoint on the route. The altitude of waypoint on the route. The ratio of horizontal distance traveled to the change in vertical distance. eTrex Owner's Manual - Garmin eTrex 20 | Owner's Manual - Page 49
current position and elevation to the destination elevation. The strength of the GPS signal. The direction you are moving. Your heart rate in beats per path of travel. The data field arrow points in the direction of the next waypoint or turn. The current rate of speed at which you are moving since - Garmin eTrex 20 | Owner's Manual - Page 50
GPS position. The current time of day based on your time settings (format, time zone, and daylight saving time). The estimated time needed to reach your final destination. The estimated time needed to reach the next waypoint you are closing on a destination along a route. 50 eTrex Owner's Manual - Garmin eTrex 20 | Owner's Manual - Page 51
measurement Dest. of your rate of ascent or descent to a predetermined altitude. Vertical Speed Your rate of altitude gain or loss over time. Waypoint at Dest. The last point on a route to your destination. Waypoint at The next point on Next your route. Appendix eTrex Owner's Manual 51 - Garmin eTrex 20 | Owner's Manual - Page 52
Troubleshooting Problem Solution The device does not respond. How do I reset the device? 1. Remove the batteries. 2. Reinstall the batteries for several minutes. The batteries do not To learn how to maximize the battery life, see page 41. mounted volume on Mac computers. 52 eTrex Owner's Manual - Garmin eTrex 20 | Owner's Manual - Page 53
file for your operating system to learn how to assign drive letters. I need replacement Go to http://buy.garmin.com, or contact your Garmin parts or accessories. dealer. I want to buy an Go to http://buy.garmin.com, or contact your Garmin external GPS antenna. dealer. eTrex Owner's Manual 53 - Garmin eTrex 20 | Owner's Manual - Page 54
the device 42 long-term storage 42 chirp 23 City Navigator maps 17 compass 17 calibrating 18 navigating 18 restore 39 setup options 34 connecting to another device 24 USB cable 44 wireless accessories 46 course pointer 19 creating routes 12 waypoints 9 customizing data fields 28 eTrex Owner's Manual - Garmin eTrex 20 | Owner's Manual - Page 55
47 deleting files 45 profiles 30 routes 13 tracks 15 waypoints 9 display backlight timeout 30 screen capture 30 settings 30 downloading geocaches 21 software 40 driving routes 37 E editing profiles 30 routes 12 waypoints 9 eTrex Owner's Manual elevation plot 19, 20 barometric altimeter 20 of - Garmin eTrex 20 | Owner's Manual - Page 56
saving tracks 15 sharing data 24 Sight N' Go 10 software updating 40 version 40 stopwatch 26 storing the device 42 sunrise and sunset times 25, 50 system settings 30 T text size, maps 32 time alarms 26 data fields 50 settings 33 sunrise and sunset 25, 50 zone 33 tones 31 56 eTrex Owner's Manual - Garmin eTrex 20 | Owner's Manual - Page 57
24 trip computer 20 restore 39 troubleshooting 52 W waypoints 9-10 averaging 10 creating 9 deleting 9 editing 9 navigating to 16 WebUpdater 40 Where To? 11 Z zooming 32 U unit ID 40 units of measure 33 updating software 40 USB cable 52 connecting 44 disconnecting 45 eTrex Owner's Manual 57 - Garmin eTrex 20 | Owner's Manual - Page 58
- Garmin eTrex 20 | Owner's Manual - Page 59
- Garmin eTrex 20 | Owner's Manual - Page 60
East 151st Street, Olathe, Kansas 66062, USA Garmin (Europe) Ltd. Liberty House, Hounsdown Business Park, Southampton, Hampshire, SO40 9LR UK Garmin Corporation No. 68, Zhangshu 2nd Road, Xizhi Dist., New Taipei City, 221, Taiwan (R.O.C.) www.garmin.com July 2011 190-01198-00 Rev. B Printed
-
 1
1 -
 2
2 -
 3
3 -
 4
4 -
 5
5 -
 6
6 -
 7
7 -
8
-
9
-
10
-
11
-
12
-
13
-
14
-
15
-
16
-
17
-
18
-
19
-
20
-
21
-
22
-
23
-
24
-
25
-
26
-
27
-
28
-
29
-
30
-
31
-
32
-
33
-
34
-
35
-
36
-
37
-
38
-
39
-
40
-
41
-
42
-
43
-
44
-
45
-
46
-
47
-
48
-
49
-
50
-
51
-
52
-
53
-
54
-
55
-
56
-
57
-
58
-
59
-
60
 |
 |
eTrex
®
owner’s manual
for use with models 10, 20, 30