Garmin eTrex 20 Quick Start Manual
Garmin eTrex 20 Manual
 |
View all Garmin eTrex 20 manuals
Add to My Manuals
Save this manual to your list of manuals |
Garmin eTrex 20 manual content summary:
- Garmin eTrex 20 | Quick Start Manual - Page 1
eTrex® quick start manual for use with models 20 and 30 - Garmin eTrex 20 | Quick Start Manual - Page 2
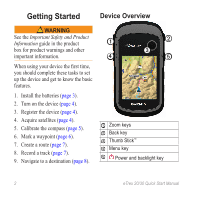
(page 4). 5. Calibrate the compass (page 5). 6. Mark a waypoint (page 6). 7. Create a route (page 7). 8. Record a track (page 7). 9. Navigate to a destination (page 8). ➊ ➋ ➌ ➍ ➎ ➊ Zoom keys ➋ Back key ➌ Thumb Stick™ ➍ Menu key ➎ Power and backlight key 2 eTrex 20/30 Quick Start Manual - Garmin eTrex 20 | Quick Start Manual - Page 3
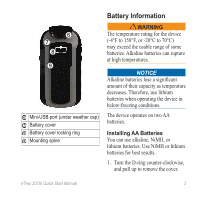
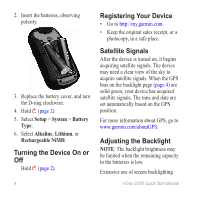
in below-freezing conditions. The device operates on two AA batteries. Installing AA Batteries You can use alkaline, NiMH, or lithium batteries. Use NiMH or lithium batteries for best results. 1. Turn the D-ring counter-clockwise, and pull up to remove the cover. eTrex 20/30 Quick Start Manual 3 - Garmin eTrex 20 | Quick Start Manual - Page 4
set automatically based on the GPS position. For more information about GPS, go to www.garmin.com/aboutGPS. Adjusting the Backlight Note: The backlight brightness may be limited when the remaining capacity in the batteries is low. Extensive use of screen backlighting eTrex 20/30 Quick Start Manual - Garmin eTrex 20 | Quick Start Manual - Page 5
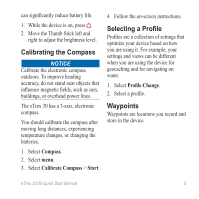
you are using it. For example, your settings and views can be different when you are using the device for geocaching and for navigating on water. 1. Select Profile Change. 2. Select a profile. Waypoints Waypoints are locations you record and store in the device. eTrex 20/30 Quick Start Manual 5 - Garmin eTrex 20 | Quick Start Manual - Page 6
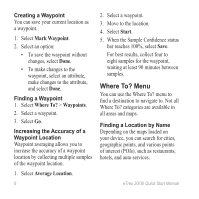
to navigate to. Not all Where To? categories are available in all areas and maps. Finding a Location by Name Depending on the maps loaded on your device, you can search for cities, geographic points, and various points of interest (POIs), such as restaurants, hotels, and auto services. eTrex 20/30 - Garmin eTrex 20 | Quick Start Manual - Page 7
Creating a Route A route is a sequence of waypoints that leads you to your final destination. 1. the first point in the route. 4. Select Use. 5. Repeat steps 2-4 until the route is Show On Map. If you select Record, Show On Map, a line on the map indicates your track. eTrex 20/30 Quick Start Manual 7 - Garmin eTrex 20 | Quick Start Manual - Page 8
the Thumb Stick to move the map to different areas. • Select ▲ and ▼ to zoom in and out of the map. Tip: To customize the map view, select menu > Setup Map, and adjust the settings. Navigating with the Bearing Pointer The eTrex 30 has a 3-axis, electronic compass. 8 eTrex 20/30 Quick Start Manual - Garmin eTrex 20 | Quick Start Manual - Page 9
Plug the small end of the USB cable into the mini-USB port. Your device and memory card (optional) appear as removable drives in My Computer on Windows eTrex 20/30 Quick Start Manual computers and as mounted volumes on Mac computers. Downloading Geocaches 1. Connect your device to a computer (page - Garmin eTrex 20 | Quick Start Manual - Page 10
dealer. Contacting Garmin Product Support • Go to www.garmin.com/support and click Contact Support for in-country support information. • In the USA, call (913) 397.8200 or (800) 800.1020. • In the UK, call 0808 2380000. • In Europe, call +44 (0) 870.8501241. 10 eTrex 20/30 Quick Start Manual - Garmin eTrex 20 | Quick Start Manual - Page 11
- Garmin eTrex 20 | Quick Start Manual - Page 12
Garmin®, the Garmin logo, and eTrex® are trademarks of Garmin Ltd. or its subsidiaries, registered in the USA and other countries. Thumb Stick™is a trademark of Garmin Ltd. or its subsidiaries. These trademarks may not be used without the express permission of Garmin. Other trademarks and trade
-
 1
1 -
 2
2 -
 3
3 -
 4
4 -
 5
5 -
 6
6 -
 7
7 -
8
-
9
-
10
-
11
-
12
 |
 |
eTrex
®
quick start manual
for use with models 20 and 30