Garmin eTrex H Quick Reference Guide
Garmin eTrex H - Hiking GPS Receiver Manual
 |
UPC - 753759072858
View all Garmin eTrex H manuals
Add to My Manuals
Save this manual to your list of manuals |
Garmin eTrex H manual content summary:
- Garmin eTrex H | Quick Reference Guide - Page 1
Track Log Quick Start Guide eTrex® H personal navigator Mark Waypoint Page STOP NAVIGATION, and press ENTER. Review Waypoint Page Stop Navigation garmin.com for additional documentation and information. 190-00818-01 Rev. B © Copyright 2007 Garmin Ltd. or its subsidiaries Printed in Taiwan GPS - Garmin eTrex H | Quick Reference Guide - Page 2
for 30 seconds. To adjust the contrast: 1. Press PAGE until the SkyView page appears. 2. Press UP to darken, and DOWN to lighten the screen. Basic Operation To select a page: 1. Press POWER to turn on the unit, and then press PAGE/ QUIT to move through the SkyView, Map, Pointer, Trip Computer, and
-
 1
1 -
 2
2
 |
 |

Quick Start Guide
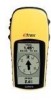
eTrex
®
H
personal navigator
GPS antenna
UP/DOWN
keys
ENTER/MARK
key
LCD display
QUIT/PAGE
key
POWER/
Backlight
key
Waypoints
Mark Waypoint Page
To mark a waypoint:
1. Press and hold
ENTER
to open the Mark Waypoint page.
2. Select
OK
, and press
ENTER
to mark as a waypoint.
To GOTO a waypoint:
1. Press
PAGE
and switch to the Menu page. Press
UP
or
DOWN
to select
WAYPOINTS
.
2. Press
UP
or
DOWN
to select the tab containing the
waypoint you want to
GOTO
, and press
ENTER
.
3. Press
UP
or
DOWN
to select
GOTO,
and press
ENTER
.
Review Waypoint Page
Pointer Page
Use the Pointer page for guidance to a GOTO destination. The pointer
gives direction to the destination. Walk in the direction of the pointer
until it aligns with the direction line at the top of the compass ring.
When the pointer is straight up, you are on the correct track to your
destination.
Move in the direction
of the pointer until it
points straight up.
When the pointer is
vertical, you are on
track.
To quit a GOTO:
1. Press
PAGE
and switch to the Pointer page.
2. Press
ENTER
to view the options menu.
3. Select
STOP NAVIGATION
, and press
ENTER
.
Stop Navigation
Track Log
Track Log
Page
Track Setup
Save Track
Options
To setup a Track:
1.
From the Menu page, select
TRACKS
, and press
ENTER
.
2. Select
SETUP
, and press
ENTER
.
3. Press
UP
or
DOWN
to highlight each setup option and
make a choice for each. Press
PAGE/QUIT
to return to
the Track Log page.
To save the current Track Log:
1. Select
SAVE
, and press
ENTER
. The SAVE BACK
THROUGH window opens to save the track for a time
frame or the entire track log.
2. Press
UP
or
DOWN
to select an option, and press
ENTER
. The saved track now appears on a sub-page.
3. Press
UP
or
DOWN
to select
OK
, and press
ENTER
. The
track is saved and appears on the Saved Tracks list of the
Track Log page.
To clear the Track Log:
1. Press
UP
to select
CLEAR,
and press
ENTER
.
2. Press
DOWN
to select
YES,
and press
ENTER
.
Please visit
www.garmin.com
for additional documentation and
information.
190-00818-01 Rev. B © Copyright 2007 Garmin Ltd. or its subsidiaries Printed in Taiwan