Gateway 995 Gateway 995 Series Server Rack Installation Guide
Gateway 995 Manual
 |
View all Gateway 995 manuals
Add to My Manuals
Save this manual to your list of manuals |
Gateway 995 manual content summary:
- Gateway 995 | Gateway 995 Series Server Rack Installation Guide - Page 1
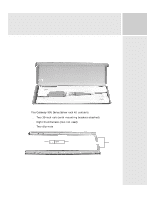
Gateway 995 Series Server Rack Installation Guide Checking the box contents The Gateway 995 Series Server rack kit contains: ■ Two 30-inch rails (with mounting brackets attached) ■ Eight thumbscrews (two not used) ■ Two clip nuts Clip nuts Thumbscrews Rails www.gateway.com - Gateway 995 | Gateway 995 Series Server Rack Installation Guide - Page 2
anchored to an unmovable support to prevent the cabinet from falling over when one or more servers are fully extended from the server must not go below 50°F (10°C) or rise above 95°F (35°C). Extreme fluctuations in temperature may damage the server or cause it to operate unreliably. 2 www.gateway - Gateway 995 | Gateway 995 Series Server Rack Installation Guide - Page 3
Gateway 995 Series Server Rack Installation Guide Cabinet dimensions Your Gateway server is compatible with all cabinets door (for server handles) 2 inches (5.8 cm) minimum Cabinet depth 35.4 to 39.4 inches (90 to 100 cm) minimum Getting help For help, call Gateway Technical Support at: ■ 877 - Gateway 995 | Gateway 995 Series Server Rack Installation Guide - Page 4
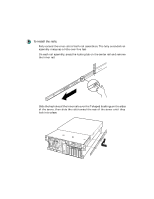
rails of both rail assemblies. The fully extended rail assembly measures a little over five feet. 2 On each rail assembly, press the locking tab on the center rail and remove the inner rail. 3 Slide the keyholes of the inner rails over the T-shaped bushings on the sides of the - Gateway 995 | Gateway 995 Series Server Rack Installation Guide - Page 5
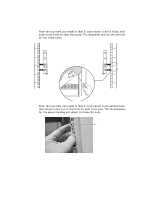
Gateway 995 Series Server Rack Installation Guide 4 Attach the server handles to the front of the server. 5 Using the template on the back of the setup poster, mark on the cabinet where the top of the server template aligns with the front posts. Make sure that the top of the server template aligns - Gateway 995 | Gateway 995 Series Server Rack Installation Guide - Page 6
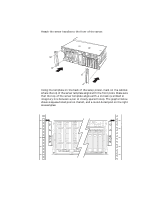
you made in Step 5, count down to the second hole, then attach a clip nut to that hole on each front post. The thumbscrews for the server handles will attach to these clip nuts. Clip nut 6 www - Gateway 995 | Gateway 995 Series Server Rack Installation Guide - Page 7
Gateway 995 Series Server Rack Installation Guide 8 Secure each rail's front and rear brackets to the cabinet posts with thumbscrews. The thumbscrews for the brackets go into the seventh hole down from - Gateway 995 | Gateway 995 Series Server Rack Installation Guide - Page 8
then slide the server into the rack. Warning When sliding the server into or out of the rack, do not force it. If the server does not slide smoothly The rails mounted on the sides of the server are correctly mounted onto the T-shaped bushings on the server. ■ The rails are parallel. ■ The rails - Gateway 995 | Gateway 995 Series Server Rack Installation Guide - Page 9
Gateway 995 Series Server Rack Installation Guide 11 Secure the server to the cabinet by attaching thumbscrews through the upper hole in each rack handle. These thumbscrews will be inserted into the clip nuts you installed in Step 7. Thumbscrew www.gateway.com 9 - Gateway 995 | Gateway 995 Series Server Rack Installation Guide - Page 10
10 www.gateway.com - Gateway 995 | Gateway 995 Series Server Rack Installation Guide - Page 11
Gateway 995 Series Server Rack Installation Guide www.gateway.com 11 - Gateway 995 | Gateway 995 Series Server Rack Installation Guide - Page 12
A MAN 995 RAIL INSTALL GDE R0 07/03 12 www.gateway.com
-
 1
1 -
 2
2 -
 3
3 -
 4
4 -
 5
5 -
 6
6 -
 7
7 -
8
-
9
-
10
-
11
-
12
 |
 |

www.gateway.com
Gateway 995 Series Server Rack
Installation Guide
Checking the box contents
The Gateway 995 Series Server rack kit contains:
■
Two 30-inch rails (with mounting brackets attached)
■
Eight thumbscrews (two not used)
■
Two clip nuts
Rails
Thumbscrews
Clip nuts