Gateway MX6436 8511418 - Component Replacement Manual
Gateway MX6436 - Sempron 2 GHz Manual
 |
View all Gateway MX6436 manuals
Add to My Manuals
Save this manual to your list of manuals |
Gateway MX6436 manual content summary:
- Gateway MX6436 | 8511418 - Component Replacement Manual - Page 1
your notebook's power connector. Power indicator If the power indicator does not turn on, unplug the adapter from your notebook, then plug it back in. Warning Do not attempt to disassemble the AC adapter. The AC adapter has no user-replaceable or user-serviceable parts inside. The AC adapter has - Gateway MX6436 | 8511418 - Component Replacement Manual - Page 2
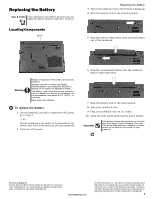
of explosion if the battery is incorrectly replaced. Replace only with a battery specifically manufactured for your notebook. Recycle or dispose of the battery as hazardous waste. The battery used in this device may present a fire or chemical burn hazard if mishandled. Do not disassemble, heat above - Gateway MX6436 | 8511418 - Component Replacement Manual - Page 3
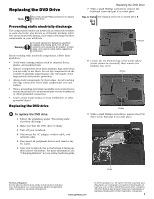
the AC adapter, modem cable, and network cable. 5 Disconnect all peripheral devices and remove any PC Cards. 6 Turn your notebook over so the bottom is facing up, then remove the battery. For more information, see "Changing Batteries" in your online hardware guide. Replacing the DVD Drive 7 With - Gateway MX6436 | 8511418 - Component Replacement Manual - Page 4
in the bay. 12 Secure the DVD drive with the screw removed in Step 9. 13 Replace the memory bay cover, then tighten the six cover screws. 14 Replace the keyboard screw. 15 Insert the battery, then turn your notebook over. 16 Connect the power adapter, modem cable, and network cable, then turn - Gateway MX6436 | 8511418 - Component Replacement Manual - Page 5
the AC adapter, modem cable, and network cable. 5 Disconnect all peripheral devices and remove any PC Cards. 6 Turn your notebook over so the bottom is facing up, then remove the battery. For more information, see "Changing Batteries" in your online hardware guide. 7 Remove the two hard drive bay - Gateway MX6436 | 8511418 - Component Replacement Manual - Page 6
the power adapter, modem cable, and network cable. 15 Reconnect all peripheral devices and replace any PC Cards. 16 Turn on your notebook. 17 If the hard drive was sent to you from Gateway with the operating system, applications, and drivers installed, you will see the Windows startup screen. -ORIf - Gateway MX6436 | 8511418 - Component Replacement Manual - Page 7
the AC adapter, modem cable, and network cable. 4 Disconnect all peripheral devices and remove any PC Cards. 5 Turn your notebook over so the bottom is facing up, then remove the battery. For more information, see "Changing Batteries" in your online hardware guide. 9 Turn your notebook over - Gateway MX6436 | 8511418 - Component Replacement Manual - Page 8
two optional keyboard screws. 10 Replace the memory bay cover and wireless network bay cover. 11 Replace the keyboard screw. 12 Insert the battery, then turn your notebook over. 13 Connect the power adapter, the modem cable, and the network cable, then turn on your notebook. Technical Support See - Gateway MX6436 | 8511418 - Component Replacement Manual - Page 9
be removed), then remove the memory bay cover. Screws Screws To replace the memory module: 1 Follow the guidelines under "Preventing static electricity discharge." 2 Turn off your notebook. 3 Disconnect the AC adapter, modem cable, and network cable. Technical Support See the label on the bottom - Gateway MX6436 | 8511418 - Component Replacement Manual - Page 10
modules designed for your Gateway notebook. 11 Gently push the module down until it clicks in place. 12 Replace the memory bay cover, then tighten the six cover screws. 13 Replace the keyboard screw. 14 Insert the battery, then turn your notebook over. 15 Connect the power adapter, the modem cable - Gateway MX6436 | 8511418 - Component Replacement Manual - Page 11
the AC adapter, modem cable, and network cable. 4 Disconnect all peripheral devices and remove any PC Cards. 5 Turn your notebook over so the bottom is facing up, then remove the battery. For more information, see "Changing Batteries" in your online hardware guide. 6 Loosen the wireless network - Gateway MX6436 | 8511418 - Component Replacement Manual - Page 12
Replace the wireless network bay cover, then tighten the cover screw. 16 Insert the battery, then turn your notebook over. 17 Connect the power adapter, the modem cable, and the network cable. 18 Reconnect all peripheral devices and replace any PC Cards. 19 Turn on your notebook. Technical Support
-
 1
1 -
 2
2 -
 3
3 -
 4
4 -
 5
5 -
 6
6 -
 7
7 -
8
-
9
-
10
-
11
-
12
 |
 |
1
www.gateway.com
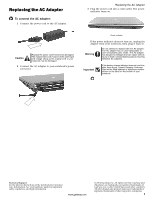
Replacing the AC Adapter
Technical Support
See the label on the bottom of the notebook for Customer
Care Information. See your hardware guide for important
safety, regulatory, and legal information.
© 2006 Gateway, Inc. All rights reserved. Gateway and
eMachines are trademarks or registered trademarks of
Gateway, Inc. in the United States and other countries.
All other brands and product names are trademarks or
registered trademarks of their respective companies.
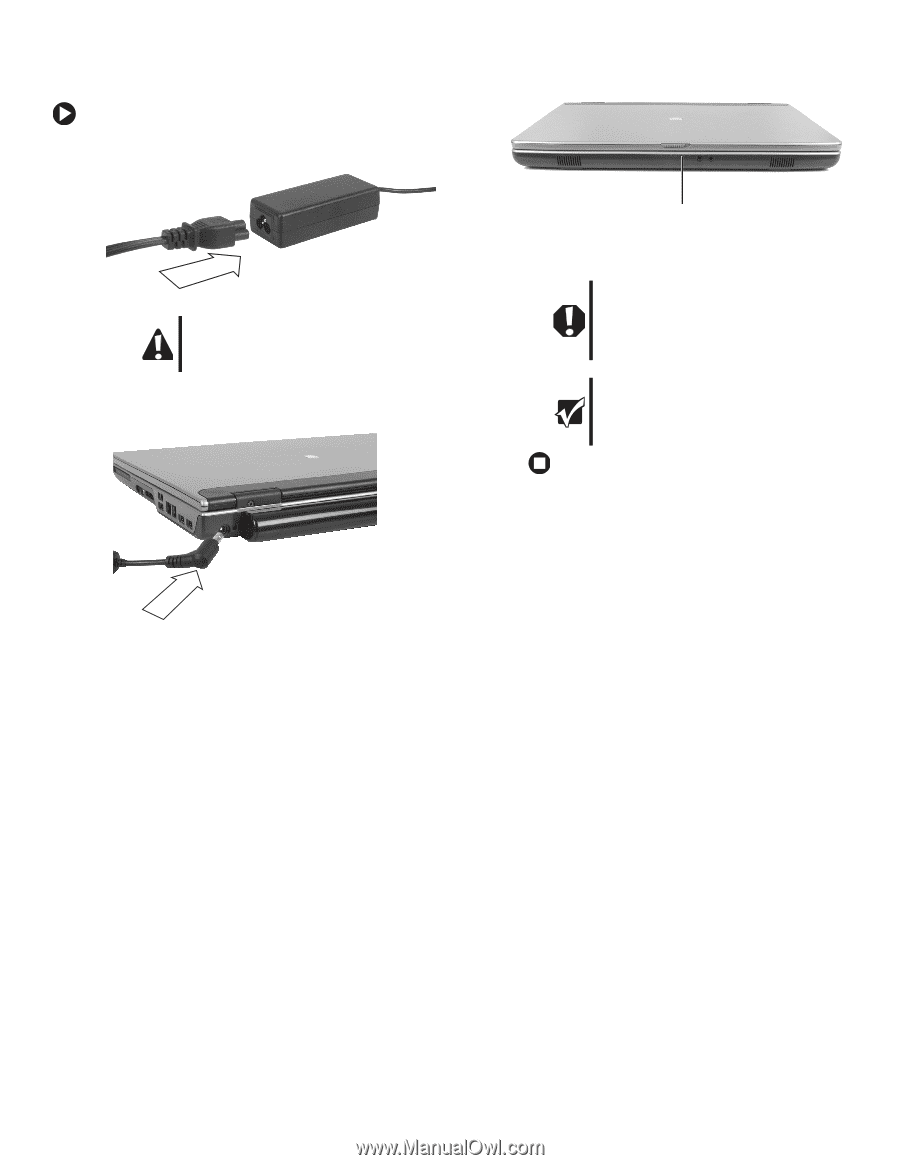
Replacing the AC Adapter
To connect the AC adapter:
1
Connect the power cord to the AC adapter.
2
Connect the AC adapter to your notebook’s power
connector.
3
Plug the power cord into a wall outlet. The power
indicator turns on.
If the power indicator does not turn on, unplug the
adapter from your notebook, then plug it back in.
Caution
Replace the power cord if it becomes damaged.
The replacement cord must be of the same type
and voltage rating as the original cord or your
notebook may be damaged.
Warning
Do not attempt to disassemble the AC adapter.
The AC adapter has no user-replaceable or
user-serviceable parts inside. The AC adapter
has dangerous voltages that can cause serious
injury or death. Contact Gateway about returning
defective AC adapters.
Important
If the battery charge indicator does not turn blue
after three hours, contact Gateway Customer
Care at the Web address or telephone number
shown on the label on the bottom of your
notebook.
Power indicator