Gateway GT5656 8512418 - Gateway Reference Guide - Page 35
Using the diskette drive
 |
View all Gateway GT5656 manuals
Add to My Manuals
Save this manual to your list of manuals |
Page 35 highlights
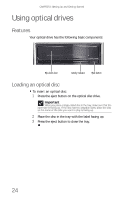
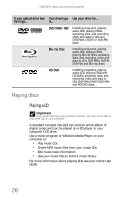
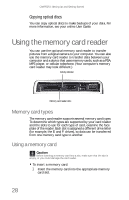
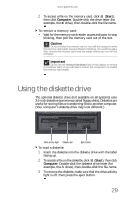
www.gateway.com 2 To access a file on the memory card, click (Start), then click Computer. Double-click the drive letter (for example, the E: drive), then double-click the file name. To remove a memory card: • Wait for the memory card reader access indicator to stop blinking, then pull the memory card out of the slot. Caution Do not remove the memory card or turn off the computer while the memory card reader access indicator is blinking. You could lose data. Also, remove the memory card from the reader before you turn off the computer. Important Do not use the remove hardware icon in the taskbar to remove the memory card, or you will have to restart the computer to re-enable the memory card reader. Using the diskette drive The optional diskette drive (not available on all systems) uses 3.5-inch diskettes (sometimes called floppy disks). Diskettes are useful for storing files or transferring files to another computer. (Your computer's diskette drive may look different.) Drive activity light Diskette slot Eject button To load a diskette: 1 Insert the diskette into the diskette drive with the label facing up. 2 To access a file on the diskette, click (Start), then click Computer. Double-click the diskette drive letter (for example, the A: drive), then double-click the file name. 3 To remove the diskette, make sure that the drive activity light is off, then press the eject button. 29
-
 1
1 -
2
-
3
-
4
-
5
-
6
-
7
-
8
-
9
-
10
-
11
-
12
-
13
-
14
-
15
-
16
-
17
-
18
-
19
-
20
-
21
-
22
-
23
-
24
-
25
-
26
-
27
-
28
-
29
-
 30
30 -
 31
31 -
 32
32 -
 33
33 -
 34
34 -
 35
35 -
 36
36 -
 37
37 -
 38
38 -
 39
39 -
 40
40 -
41
-
42
-
43
-
44
-
45
-
46
-
47
-
48
-
49
-
50
-
51
-
52
-
53
-
54
-
55
-
56
-
57
-
58
-
59
-
60
-
61
-
62
-
63
-
64
-
65
-
66
-
67
-
68
-
69
-
70
-
71
-
72
-
73
-
74
-
75
-
76
-
77
-
78
-
79
-
80
-
81
-
82
-
83
-
84
-
85
-
86
-
87
-
88
-
89
-
90
-
91
-
92
-
93
-
94
-
95
-
96
-
97
-
98
-
99
-
100
-
101
-
102
-
103
-
104
-
105
-
106
-
107
-
108
-
109
-
110
-
111
-
112
-
113
-
114
-
115
-
116
-
117
-
118
-
119
-
120
-
121
-
122
-
123
-
124
-
125
-
126
-
127
-
128
-
129
-
130
-
131
-
132
-
133
-
134
-
135
-
136
-
137
-
138
-
139
-
140
 |
 |