Gateway M-6846 8512936 - Gateway Notebook Reference Guide R0 - Page 74
Using the projector or monitor for a presentation, Resolution, Colors
 |
View all Gateway M-6846 manuals
Add to My Manuals
Save this manual to your list of manuals |
Page 74 highlights
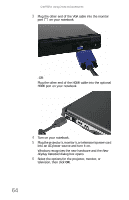
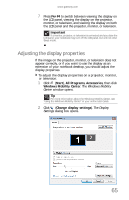
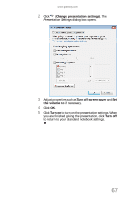
CHAPTER 4: Using Drives and Accessories 3 Click monitor 2. 4 Adjust properties such as Resolution or Colors if necessary. 5 To use the monitor, projector, or television as a "mirror" (duplicate) of the notebook display (both displays have the same content), click to deselect the check box for Extend my Windows desktop onto this monitor. 6 To use the monitor, projector, or television as an extension of your desktop (increasing the size of your Windows desktop), click to select the check box for Extend my Windows desktop onto this monitor. You can click and drag the "2" monitor icon to position it the same way the physical monitor is arranged on your desk. 7 Click OK. Using the projector or monitor for a presentation You can configure your notebook so the settings are correct each time you give a presentation. To use a projector, monitor, or television for a presentation: 1 Click (Start), All Programs, Accessories, then click Windows Mobility Center. The Windows Mobility Center window opens. Tip For more information about the Windows Mobility Center, see "Using the Windows Mobility Center" in your online User Guide. 66
-
 1
1 -
2
-
3
-
4
-
5
-
6
-
7
-
8
-
9
-
10
-
11
-
12
-
13
-
14
-
15
-
16
-
17
-
18
-
19
-
20
-
21
-
22
-
23
-
24
-
25
-
26
-
27
-
28
-
29
-
30
-
31
-
32
-
33
-
34
-
35
-
36
-
37
-
38
-
39
-
40
-
41
-
42
-
43
-
44
-
45
-
46
-
47
-
48
-
49
-
50
-
51
-
52
-
53
-
54
-
55
-
56
-
57
-
58
-
59
-
60
-
61
-
62
-
63
-
64
-
65
-
66
-
67
-
68
-
 69
69 -
 70
70 -
 71
71 -
 72
72 -
 73
73 -
 74
74 -
 75
75 -
 76
76 -
 77
77 -
 78
78 -
 79
79 -
80
-
81
-
82
-
83
-
84
-
85
-
86
-
87
-
88
-
89
-
90
-
91
-
92
-
93
-
94
-
95
-
96
-
97
-
98
-
99
-
100
-
101
-
102
-
103
-
104
-
105
-
106
-
107
-
108
-
109
-
110
-
111
-
112
-
113
-
114
-
115
-
116
-
117
-
118
-
119
-
120
-
121
-
122
-
123
-
124
-
125
-
126
-
127
-
128
-
129
-
130
-
131
-
132
-
133
-
134
-
135
-
136
-
137
-
138
-
139
-
140
-
141
-
142
-
143
-
144
-
145
-
146
-
147
-
148
-
149
-
150
-
151
-
152
-
153
-
154
-
155
-
156
-
157
-
158
-
159
-
160
-
161
-
162
-
163
-
164
-
165
-
166
-
167
-
168
-
169
-
170
-
171
-
172
 |
 |