GE AJEQ08ACD Use and Care Manual
GE AJEQ08ACD Manual
 |
View all GE AJEQ08ACD manuals
Add to My Manuals
Save this manual to your list of manuals |
GE AJEQ08ACD manual content summary:
- GE AJEQ08ACD | Use and Care Manual - Page 1
10 Installation Instructions Before You Begin 12, 13 Installing a J-Model in an Existing Wall Case 14 Through-the-Wall Installation 15 Window Installation (Optional 16-21 Troubleshooting Tips 22 Normal Operating Sounds 22 Consumer Support Consumer Support Back Cover Warranty 23 *ENERGY STAR - GE AJEQ08ACD | Use and Care Manual - Page 2
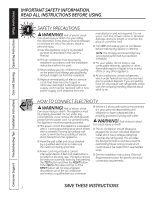
installed in accordance with the Installation Instructions before it is used. ■ Never unplug your air conditioner by pulling on the power cord. Always grip plug firmly and pull straight out from the receptacle. ■ Replace immediately all electric service cords that have become frayed or otherwise - GE AJEQ08ACD | Use and Care Manual - Page 3
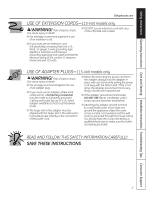
Instructions Operating Instructions Care and Cleaning Installation Instructions Troubleshooting Tips Consumer Support GEAppliances.com USE OF EXTENSION CORDS-115-Volt models only WARNING! Risk of electric terminal breaks, DO NOT USE the air conditioner until a proper ground has been established - GE AJEQ08ACD | Use and Care Manual - Page 4
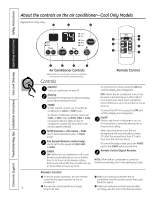
Consumer Support Troubleshooting Tips Installation Instructions Care and Cleaning Operating Instructions Safety Instructions About the controls on the air conditioner-Cool Only Models Appearance may vary. Air Conditioner Controls Lights beside the touch pads on the air conditioner control panel - GE AJEQ08ACD | Use and Care Manual - Page 5
Safety Instructions Operating Instructions Care and Cleaning Installation Instructions Troubleshooting Tips Consumer Support GEAppliances.com COOL MODE Remote Control 1. Press COOL pad. 2. Press LOW, MED or HIGH pads to set desired fan speed. 3. Press the INCREASE + / DECREASE - pads to set the - GE AJEQ08ACD | Use and Care Manual - Page 6
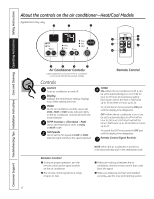
Consumer Support Troubleshooting Tips Installation Instructions Care and Cleaning Operating Instructions Safety Instructions About the controls on the air conditioner-Heat/Cool Models Appearance may vary. Air Conditioner Controls Lights beside the touch pads on the air conditioner control panel - GE AJEQ08ACD | Use and Care Manual - Page 7
Safety Instructions Operating Instructions Care and Cleaning Installation Instructions Troubleshooting Tips Consumer Support GEAppliances.com COOL MODE Remote Control 1. Press COOL pad. 2. Press LOW or HIGH pads to set desired fan speed. 3. Press the INCREASE + / DECREASE - pads to set the desired - GE AJEQ08ACD | Use and Care Manual - Page 8
Support Troubleshooting Tips Installation Instructions Care and Cleaning Operating Instructions Safety Instructions About the controls on the air conditioner Vent Control The vent control is located behind the front grille on the right side of the air discharge area. When CLOSED, only the air - GE AJEQ08ACD | Use and Care Manual - Page 9
Safety Instructions Operating Instructions Care and Cleaning Installation Instructions Troubleshooting Tips Consumer Support GEAppliances.com Terminal Connections Remote Thermostat - Class 2 (on some models) The controls are located under a plastic cover behind the front grille. 1 Remove the front - GE AJEQ08ACD | Use and Care Manual - Page 10
the air conditioner should be checked regularly. If they are clogged with dirt or soot they may be professionally steam cleaned, a service available through your GE service outlet. Front Grille The front grille can be removed for more thorough cleaning and to locate the model and serial numbers on - GE AJEQ08ACD | Use and Care Manual - Page 11
Safety Instructions Operating Instructions Care and Cleaning Installation Instructions Troubleshooting Tips Consumer Support GEAppliances.com To maintain optimum performance, clean the filter at least every 30 days. Air Filter To remove the air filter, on other models: FRONT FRONT Pull it - GE AJEQ08ACD | Use and Care Manual - Page 12
air conditioner. Aluminum house wiring may present special problems-consult a qualified electrician. ELECTRICAL REQUIREMENTS (cont.) Some models is not covered under the terms of the GE warranty. J-MODEL QUALIFYING QUESTIONS J-model air conditioners may fit in existing wall cases. However, they - GE AJEQ08ACD | Use and Care Manual - Page 13
engaged, discontinue use of the air conditioner and contact a qualified service technician. TOOLS YOU MAY NEED Phillips-head screwdriver Adjustable Wrench Drill Pencil Ruler or Tape Measure Level Scissors or knife Hand or Saber Saw GE KIT NUMBERS USE GE KIT NUMBER: RAB46A, 47A & 48A RAK65A1 - GE AJEQ08ACD | Use and Care Manual - Page 14
Installation Instructions INSTALLING A J-MODEL IN AN EXISTING WALL CASE Read these instructions completely and carefully. 1 the bottom of the front grille. Remove shipping pads (if present) 3 CAREFULLY SLIDE AIR CONDITIONER BACK INTO CASE Make sure that the tubing on the unit does not touch the - GE AJEQ08ACD | Use and Care Manual - Page 15
is 72″ to the right and 47″ to the left. For the 230/208-volt models the cord length is 65″ to the right and 39″ to the left. 2 SUPPORT REQUIREMENTS FOR AIR CONDITIONER The air conditioner wall case may be installed with 1/4″ min. extension out from the inside wall or with 1/4″ min. extension - GE AJEQ08ACD | Use and Care Manual - Page 16
and Wall Sleeve RAB46A, 47A or 48A Read these instructions completely and carefully. Vinyl window gasket Sill support bracket (2) supporting parts must be secured to firm wood, masonry or metal. • The electrical outlet must be within reach of the power cord. 16 Air conditioner Type E (4) Support - GE AJEQ08ACD | Use and Care Manual - Page 17
Installation Instructions 2 STORM WINDOW REQUIREMENTS A storm window frame will not allow the air conditioner to tilt towards the outside and will keep it from draining properly. To adjust for this, attach a piece of wood to the stool. Wood 1/2″ higher - GE AJEQ08ACD | Use and Care Manual - Page 18
Installation Instructions WINDOW INSTALLATION-OPTIONAL (cont.) 4 PREPARE WINDOW A Mark the centerline of the stool. Measure from the centerline 133⁄8″ on both sides for the panel cuts. B Measure 123⁄8″ from the centerline on both sides for the sill support brackets. Centerline Sill Outside 133 - GE AJEQ08ACD | Use and Care Manual - Page 19
Instructions 6 MEASURE, CUT AND INSTALL FILLER PANELS A Measure from the edge of the panel marks (see Prepare the Window) to the inside of the window track on each side (A and B). Sill Window track Outside A Left side 133⁄8″ Inside 133⁄8″ Width of the air conditioner into the sill support. B A - GE AJEQ08ACD | Use and Care Manual - Page 20
Installation Instructions WINDOW INSTALLATION-OPTIONAL (cont.) 7 INSTALL CASE IN WINDOW A Peel off the backing from the bottom window gasket. B Place the gasket on the stool and over - GE AJEQ08ACD | Use and Care Manual - Page 21
insects from getting into the room. C Attach the window locking bracket with 1 type E screw. 9 REPLACE AIR CONDITIONER IN CASE A Carefully slide the air conditioner back into the case. C Reinstall the locking plate with the tab behind the wall case flange. Tighten the screw. Locking plate Tighten - GE AJEQ08ACD | Use and Care Manual - Page 22
Instructions Safety Instructions Before you call for service... Troubleshooting Tips: Save time and money! Review the chart below first and you may not need to call for service. Problem Air conditioner does not start Air conditioner does not cool or heat (some models) as it should Air conditioner - GE AJEQ08ACD | Use and Care Manual - Page 23
and Cleaning Installation Instructions Troubleshooting Tips Consumer Support Air Conditioner Warranty. All warranty service provided by our Factory Service Centers, or an authorized Customer Care® technician. To schedule service, on-line visit us at GEAppliances.com, or call 800.GE.CARES (800.432 - GE AJEQ08ACD | Use and Care Manual - Page 24
Us GEAppliances.com If you are not satisfied with the service you receive from GE, contact us on our Website with all the details including your phone number, or write to: General Manager, Customer Relations GE Appliances, Appliance Park Louisville, KY 40225 Register Your Appliance GEAppliances - GE AJEQ08ACD | Use and Care Manual - Page 25
Avant d'appeler le service 22 Bruits normaux de fonctionnement 22 Soutien au consommateur Garantie 23 Soutien au consommateur Couverture arrière *Produit avec l'etiquette ENERGY STAR® Manuel d'utilisation et instructions d'installation Rafraîchissement AJCM 08, 10 uniquement AJCM 10, 12 AJCQ - GE AJEQ08ACD | Use and Care Manual - Page 26
faire effectuer tout service par un technicien qualifié. ■ Vous devez bien monter ce conditionneur, conformément aux Instructions de montage, RESET ne reste pas enfoncé, cessez d'utiliser votre conditionneur d'air et appelez un technicien de service qualifié. ■ Si vous avez une prise biphasée, vous - GE AJEQ08ACD | Use and Care Manual - Page 27
de sécurité Instructions de fonctionnement Entretien et nettoyage www.electromenagersge.ca UTILISATION DE RALLONGES- modèles à la terre. LISEZ ET SUIVEZ SCRUPULEUSEMENT CES INFORMATIONS DE SÉCURITÉ. CONSERVEZ CES INSTRUCTIONS Instructions de montage En cas de panne Soutien au consommateur 3 - GE AJEQ08ACD | Use and Care Manual - Page 28
. Instructions de fonctionnement Entretien et nettoyage Instructions de est en mode COOL. Vitesses du ventilateur (FAN) (télécommande seulement) Utilisez cette fonction pour Chaque effleurement augmente la durée d'une demi heure jusqu'à 10, puis d'une heure jusqu'à 24. Pour annuler la minuterie - GE AJEQ08ACD | Use and Care Manual - Page 29
ou à la position OFF (arrêt), attendez au moins 3 minutes avant de revenir au mode COOL. MODE VENTILATEUR (FAN) Utilisez le mode FAN (ventilateur) pour filtrer et faire circuler l'air sans refroidissement. Étant donné qu'un réglage en mode ventilateur seulement n'entraîne pas de refroidissement, le - GE AJEQ08ACD | Use and Care Manual - Page 30
Instructions de fonctionnement Entretien et nettoyage Instructions mode COOL ou HEAT. Vitesses du ventilateur (FAN) (Télécommande seulement) Utilisez cette fonction pour ré Chaque effleurement augmente la durée d'une demi heure jusqu'à 10, puis d'une heure jusqu'à 24. Pour annuler la minuterie - GE AJEQ08ACD | Use and Care Manual - Page 31
arrêt) et retour à COOL. Entretien et nettoyage MODE CHAUFFAGE (HEAT) Instructions de montage Télécommande 1. Appuyez sur la touche HEAT (chaleur). 2. panne Soutien au consommateur VENTILATEUR (FAN) Utilisez le mode FAN pour filtrer et faire circuler l'air sans refroidissement ou chauffage. É - GE AJEQ08ACD | Use and Care Manual - Page 32
Instructions de fonctionnement Au sujet des commandes sur le climatiseur. Commande d'évent La commande d'évent est située derrière la grille frontale sur le côté droit de la zone d'évacuation d'air. Lorsque cette commande est réglée à CLOSE, seul l'air service. 8 Le réglage par - GE AJEQ08ACD | Use and Care Manual - Page 33
érique/électronique, assurez-vous qu'il est compatible avec un signal de 24 VCA. Consultez les instructions d'installation du thermostat mural. Rouge - 24 V AC seulement Vert - ventilateur vitesse réduite Vert - ventilateur vitesse élevée Jaune - Compresseur Blanc - Chauffage Commun - Terre AVIS - GE AJEQ08ACD | Use and Care Manual - Page 34
sécurité Instructions de fonctionnement les faire nettoyer à la vapeur par des professionnels en passant par votre Centre de services GE. Grille frontale La grille frontale peut être enlevée pour nettoyer en profondeur et rep Instructions de montage En cas de panne Soutien au consommateur - GE AJEQ08ACD | Use and Care Manual - Page 35
■ Réduit le risque de défectuosités précoces. Pour nettoyer le filtre à air : ■ Enlevez les particules grossières avec l'aspirateur. ■ Faites circuler de l'eau vendeur, votre revendeur GE, votre Centre de services et pièces GE ou de réparateurs Customer Care® autorisés. Instructions de montage En - GE AJEQ08ACD | Use and Care Manual - Page 36
Conservez le Manuel du propriétaire. • Note au consommateur - Conservez ces instructions pour consultation ultérieure. • Niveau de compétence - L'installation de une trousse pour adapter adéquatement le logement au conditionneur d'air GE. Répondez aux questions suivantes et consultez le tableau de - GE AJEQ08ACD | Use and Care Manual - Page 37
instructions attentivement enfoncé, cessez d'utiliser votre conditionneur d'air et appelez un technicien de service qualifié. OUTILS DONT VOUS POUVEZ AVOIR de 257⁄8 po L x 161⁄2 po H x 231⁄ 8 po P Adapte un logement mural GE à un châssis de modèle « J ». Convient au logement mural RAB 30 de 26 po - GE AJEQ08ACD | Use and Care Manual - Page 38
de montage INSTALLATION D'UN MODÈLE « J » DANS UN LOGEMENT MURAL EXISTANT Veuillez lire toutes ces instructions attentivement. 1 RETIREZ LA PLAQUE DE VERROUILLAGE SUR LE CÔTÉ GAUCHE AVANT Plaque de verrouillage Enlevez la vis 2 À L'INTÉRIEUR DU CONDITIONNEUR, RETIREZ TOUS LES COUSSINETS - GE AJEQ08ACD | Use and Care Manual - Page 39
À TRAVERS LE MUR Veuillez lire toutes ces instructions attentivement. 1 PRÉPARATION DE L'OUVERTURE DANS la longueur du cordon est 65 po (1,65 m) à droite et 39 po (1,0 m) à gauche. 2 SUPPORT DU CONDITIONNEUR Le logement mural du conditionneur doit être installé en excédant le mur intérieur ou ext - GE AJEQ08ACD | Use and Care Manual - Page 40
gauche) (les trous sont du côté droit) Conditionneur d'air Quincaillerie pour la ferrure de support Type A (9) Type C (peintes) (6) Type D (2) Type B (2) Type E (4) Agrafe d'écartement (2) Contre-écrou (2) Boulon de réglage (2) Grande rondelle (2) 1 INSTRUCTIONS RELATIVES À LA FENÊTRE • Ces - GE AJEQ08ACD | Use and Care Manual - Page 41
Instructions de montage 2 INSTRUCTIONS RELATIVES À LA CONTRE-FENÊTRE Le cadre de la contre-fenêtre empêche le conditionneur de pencher vers l'extérieur et donc de se - GE AJEQ08ACD | Use and Care Manual - Page 42
Instructions de montage INSTALLATION DE FENÊTRE (EN OPTION) (suite) 4 PRÉPAREZ seuil. Serrez les vis de montage de l'agrafe d'écartement. Les vis sont en place Encoche en « V » du support Intérior Rebord Seuil décalé (comme la brique ou la pierre) REMARQUES : • Dans le cas d'un seuil étroit, - GE AJEQ08ACD | Use and Care Manual - Page 43
Instructions de montage 6 MESUREZ, COUPEZ ET INSTALLEZ LES PANNEAUX DE FERMETURE A De chaque côté et poussez les brides pour les loger dans les rails de la fenêtre et insérez la languette dans le support de seuil. 3 po (les trous sont du côté gauche) (les trous sont du côté droit) C Assemblez les - GE AJEQ08ACD | Use and Care Manual - Page 44
Instructions de montage INSTALLATION DE FENÊTRE (EN OPTION) (suite) 7 MONTEZ LE LOGEMENT DANS LA FENÊTRE A Enlevez le doublage en papier du joint d'étanchéité inférieur de la fenêtre. B Placez le joint d'étanchéité sur le rebord de la fenêtre et par-dessus les supports, à égalité avec le bord - GE AJEQ08ACD | Use and Care Manual - Page 45
Instructions de montage 8 MONTEZ LE JOINT D'ÉTANCHÉITÉ EN MOUSSE DE LA FENÊTRE ET LA FERRURE DE VERROUILLAGE A Coupez, à la largeur de la fenêtre, le joint d'étanchéité supérieur en mousse. B Insérez la mousse entre la vitre et la fenêtre pour empêcher l'air et les insectes de - GE AJEQ08ACD | Use and Care Manual - Page 46
- pad. Le filtre à air est sale. • Nettoyez le filtre au moins tous les 30 jours. Consulter la section Instructions de fonctionnement. La chambre é air gèle" ci-dessous. La glace bloque la circulation d'air et empêche le conditionneur de refroidir la chambre. • Réglez les commandes à HIGH FAN - GE AJEQ08ACD | Use and Care Manual - Page 47
Instructions de fonctionnement Garantie du conditionneur d'air. Tout le service en vertu de la garantie est offert par nos centres de service d'usine ou par un technicien autorisé de Customer Care®. Pour obtenir le service de service autorisé GE. General Electric Company. Louisville, KY 40225 - GE AJEQ08ACD | Use and Care Manual - Page 48
par Internet au site www.electromenagersge.ca 24 heures par jour, tous les jours de l'année. Service de réparations Service de réparations GE est tout près de vous. Pour faire réparer votre électroménager GE, il suffit de nous téléphoner. 1.800.561.3344 Studio de conception réaliste Sur demande - GE AJEQ08ACD | Use and Care Manual - Page 49
ENERGY STAR® Refrescar solamente Refrescar/ calentar Manual del propietario y instrucciones de instalación AJCM 08, 10 AJCM 10, 12 AJCQ 06 AJCQ 08, 10, 12 AJCQ 09, 10, 12 AJEM 12 AJEQ 06 AJEQ 08 AJEQ 09, 10, 12 ACD* DCD* LCD* ACD* DCD* DCD LCD ACD DCD Como un asociado de ENERGY STAR®, GE - GE AJEQ08ACD | Use and Care Manual - Page 50
o lesiones personales. ■ Use este electrodoméstico solamente para el propósito determinado según se describe en el Manual del propietario. ■ Este acondicionador de aire debe instalarse correctamente de acuerdo con las Instrucciones de instalación antes de su uso. ■ Nunca desenchufe su acondicionador - GE AJEQ08ACD | Use and Care Manual - Page 51
después de que este proceso se repita varias veces. ■ Si se rompe el terminal de conexión a tierra del adaptador, NO USE el acondicionador de aire hasta que la conexión a tierra se haya restablecido. ■ Unir el terminal de conexión a tierra del adaptador a un tornillo de la cubierta en la pared - GE AJEQ08ACD | Use and Care Manual - Page 52
el temporizador. MODE (modo) En el control remoto, usado para ajustar el acondicionador de aire al modo COOL (frío) o FAN (ventilador). En los controles del acondicionador de aire, usado para ajustar en COOL o en modo FAN en HIGH (alto), MED (medio) o LOW (bajo) para la velocidad del ventilador. Las - GE AJEQ08ACD | Use and Care Manual - Page 53
los cambios de configuración tales como de COOL a OFF (apagado) y de nuevo a COOL. MODO VENTILADOR (FAN) Use el modo FAN (ventilador) para proporcionar circulación de aire y filtración sin enfriamiento. Debido a que los niveles de ventilador únicamente no proporcionan enfriamiento, el nivel de - GE AJEQ08ACD | Use and Care Manual - Page 54
COOL (frío), HEAT (calor) o FAN (ventilador). Las luces indicadoras de los controles del acondicionador de aire mostrarán el modo seleccionado. TEMP Teclas Con cada presión se fijará la hora en periodos de media hora hasta 10 y luego en periodos de una hora hasta 24. Para cancelar el Temporizador de - GE AJEQ08ACD | Use and Care Manual - Page 55
á un retraso de tres minutos entre los cambios de configuración tales como de HEAT a OFF y otra vez a HEAT. MODO VENTILADOR (FAN) Use el FAN para hacer que circule el aire y filtro sin enfriar o calentar. Debido a que las configuraciones sólo de ventilación no brindan frío o calor, no aparecerá una - GE AJEQ08ACD | Use and Care Manual - Page 56
del ventilador, voltee y reemplace localizando el orificio posterior en la tarjeta sobre la pata de localización al interior de la descarga de aire y volviendo a colocar el tornillo al frente. La unidad sale de fábrica en la posición CERRADA. Encontrar el orificio Encontrar el orificio Orificio - GE AJEQ08ACD | Use and Care Manual - Page 57
de Instalación del termostato de pared. Rojo - sólo 24 V AC Verde - Ventilador baja velocidad Verde - Ventilador alta velocidad Amarillo - Compresor producir daños sobre la pared del termostato o sobre los componentes electrónicos. Se debe tener especial cuidado al conectar los cables. No - GE AJEQ08ACD | Use and Care Manual - Page 58
exteriores Los resortes en el lado exterior del acondicionador de aire deben revisarse con frecuencia. Si están obstruidos con suciedad de servicios GE. Rejilla delantera La rejilla frontal puede ser retirada para una limpieza más a fondo y para ubicar los números de modelo y serie en problemas 10 - GE AJEQ08ACD | Use and Care Manual - Page 59
bobina interior y reduce el enfriamiento, la calefacción, el flujo del aire y la eficacia de la unidad. Los filtros de reemplazo están disponibles a través de su concesionario GE, centro de servicios y partes de GE o de los técnicos de servicio al cliente (Customer Care®). Instalación Solucionar - GE AJEQ08ACD | Use and Care Manual - Page 60
un kit para adaptar correctamente la caja al acondicionador de aire de GE. eléctrica. Puede provocar lesiones o la muerte. Este planea usar solamente tiene 2 tomas, es su responsabilidad hacer que un técnico a otra serie de modelo de marca o voltaje específico. En estos casos, usted necesita el nú - GE AJEQ08ACD | Use and Care Manual - Page 61
de 257⁄8" ancho x 161⁄2" alto x 231⁄ 8" profundidad Adapta la caja de pared GE a un chasis modelo "J". Ajusta la caja de pared RAB 30 de 26" ancho x la medida para exteriores, use este kit para garantizar el flujo de aire correcto. Rejilla exterior estándar de aluminio (Incluida con las cajas - GE AJEQ08ACD | Use and Care Manual - Page 62
LOS PROTECTORS DE EMPAQUE (SI APLICABLE) AL INTERIOR DEL ACONDICIONADOR DE AIRE AL LADO DEL COMPRESOR Cable eléctrico Abrazadera 6 UNA LA REJILLA los protectors de empaque (si aplicable) 3 CUIDADOSAMENTE DESLICE EL ACONDICIONADOR DE AIRE HACIA ATRÁS EN LA CAJA Verifique que el tubo en la unidad no - GE AJEQ08ACD | Use and Care Manual - Page 63
230/208 voltios la longitud del cable es 65" hacia la derecha y 39" hacia la izquierda. 3 REQUISITOS DE APOYO PARA EL ACONDICIONADOR DE AIRE El mortero o cemento entre la caja y el ladrillo alrededor de la caja puede cortarse más baja a aproximadamente 45° para mejorar el calafateo. Interior Parte - GE AJEQ08ACD | Use and Care Manual - Page 64
VENTANA • Estas instrucciones son para una ventana estándar tipo guillotina. Necesitará modificarlas para otros tipos de ventanas. • El acondicionador de aire se puede instalar sin los paneles de acordeón si es necesario para ajustarse a una ventana angosta. Consulte las dimensiones de la abertura - GE AJEQ08ACD | Use and Care Manual - Page 65
añadirá la rejilla desde el interior de la caja, use 2 tornillos cortos. Retire el tornillo E Hale las esquinas de la parte inferior del acondicionador de aire y deslice hacia fuera de la caja. Inserte los dos tornillos largos en el exterior 17 Inserte los dos tornillos cortos en el interior - GE AJEQ08ACD | Use and Care Manual - Page 66
Instrucciones para la instalación INSTALACIÓN EN UNA VENTANA-OPCIONAL (cont.) 4 PREPARE LA VENTANA A Marque la línea central de la alfajía interior. Mida desde la línea central 133⁄8" en ambos lados para los cortes de los paneles. Alfajía exterior Línea central Fuera B Mida 123⁄8" desde la lí - GE AJEQ08ACD | Use and Care Manual - Page 67
riel de la ventana en cada lado. (A y B) Alfajía exterior Riel de la ventana Fuera 133⁄8" A Dentro Lado izquierdo 133⁄8" Ancho del acondicionador de aire B Lado derecho B Marque las medidas A y B en cada lado de la placa del panel de relleno. Corte los paneles y deseche la pieza del centro - GE AJEQ08ACD | Use and Care Manual - Page 68
Instrucciones para la instalación INSTALACIÓN EN UNA VENTANA-OPCIONAL (cont.) 7 INSTALE LA CAJA EN LA VENTANA A Pele la protección del empaque para la parte inferior de la ventana. B Coloque el empaque en la alfajía interior sobre los soportes, al mismo nivel del borde posterior, con el lado - GE AJEQ08ACD | Use and Care Manual - Page 69
espuma para la parte superior de la ventana al ancho de la ventana. B Rellene la espuma entre el vidrio y la ventana para evitar que el aire y los insectos entren en la habitación. C Una el soporte de bloqueo de la ventana con un tornillo tipo E. 9 REEMPLACE EL ACONDICIONADOR DE - GE AJEQ08ACD | Use and Care Manual - Page 70
Las bobinas de enfriamiento se congelaron. • Ver "Acondicionador de aire congelándose" más adelante. El hielo bloquea el flujo de aire hacia el acondicionador de aire evitando que se enfríe la habitación. • Configure los controles en HIGH FAN (ventilador alto) o HIGH COOL (frío alto) y ajuste el - GE AJEQ08ACD | Use and Care Manual - Page 71
llame al 800.GE.CARES (800.432.2737). Cuando llame para solicitar servicio, por favor tenga a mano el número de serie y el nú por defectos posibles con este acondicionador de aire. ■ Daños causados después de la General en su localidad. Garante: General Electric Company. Louisville, KY 40225 23 - GE AJEQ08ACD | Use and Care Manual - Page 72
GE Appliances 24 horas al día, cualquier día del año! Para mayor conveniencia y servicio más rápido, ya puede descargar los Manuales horas normales de oficina. GE Consumer Home Services estará aún ahí fono o escríbanos a: General Manager, Customer Relations GE Appliances, Appliance Park Louisville,
-
 1
1 -
 2
2 -
 3
3 -
 4
4 -
 5
5 -
 6
6 -
 7
7 -
8
-
9
-
10
-
11
-
12
-
13
-
14
-
15
-
16
-
17
-
18
-
19
-
20
-
21
-
22
-
23
-
24
-
25
-
26
-
27
-
28
-
29
-
30
-
31
-
32
-
33
-
34
-
35
-
36
-
37
-
38
-
39
-
40
-
41
-
42
-
43
-
44
-
45
-
46
-
47
-
48
-
49
-
50
-
51
-
52
-
53
-
54
-
55
-
56
-
57
-
58
-
59
-
60
-
61
-
62
-
63
-
64
-
65
-
66
-
67
-
68
-
69
-
70
-
71
-
72
 |
 |

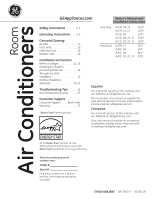
Cool Only:
AJCM
08, 10
ACD*
AJCM
10, 12
DCD*
AJCQ 06
LCD*
AJCQ
08, 10, 12
ACD*
AJCQ
09, 10, 12
DCD*
Heat/Cool:
AJEM 12
DCD
AJEQ 06
LCD
AJEQ 08
ACD
AJEQ
09, 10, 12
DCD
Write the model and serial
numbers here:
Model # ____________________
Serial #
______________________
Find these numbers on a label on
the front of the base pan behind the
front grille.
Air Conditioners
GEAppliances.com
Room
TINSEA568JBRZ
49-7597-2
05-09 JR
Safety Instructions
. . . . . . . . . . 2, 3
Operating Instructions
. . . . . .4-9
Care and Cleaning
Air Filter . . . . . . . . . . . . . . . . . . . . . . . . . . . 11
Front Grille
. . . . . . . . . . . . . . . . . . . . . . . .10
Grille and Case
. . . . . . . . . . . . . . . . . . . 10
Outdoor Coils . . . . . . . . . . . . . . . . . . . . . 10
Installation Instructions
Before You Begin . . . . . . . . . . . . . .12, 13
Installing a J-Model in
an Existing Wall Case
. . . . . . . . . . . . .14
Through-the-Wall
Installation . . . . . . . . . . . . . . . . . . . . . . . . 15
Window Installation
(Optional) . . . . . . . . . . . . . . . . . . . . . . 16-21
Troubleshooting Tips
. . . . . . . . 22
Normal Operating Sounds . . . . . . . . 22
Consumer Support
Consumer Support . . . . . . Back Cover
Warranty . . . . . . . . . . . . . . . . . . . . . . . . . 23
Owner’s Manual and
Installation Instructions
Español
For a Spanish version of this manual, visit
our Website at GEAppliances.com.
Para consultar una version en español de
este manual de instrucciones, visite nuestro
sitio de internet GEAppliances.com.
Française
For a French version of this manual, visit
our Website at GEAppliances.com.
Pour une version française de ce manuel
d’utilisation, veuillez visiter notre site web
à l’adresse GEAppliances.com.
As an
E
NERGY
S
TAR
®
partner, GE has
determined that this product meets the
E
NERGY
S
TAR
®
guidelines for energy efficiency.
*
E
NERGY
S
TAR
®
labeled product