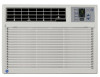
GE ASM10AL Owners Manual
GE ASM10AL Manual
 |
View all GE ASM10AL manuals
Add to My Manuals
Save this manual to your list of manuals |
GE ASM10AL manual content summary:
- GE ASM10AL | Owners Manual - Page 1
Insudlatkm ......... 15 9-14 Troubleshooting Tips ......... 1(; Normal ()p_ rating Sounds ..... 16 Com'un_+ Support Consumer Support Produ(t Registration ....... Wa nma I3 20 17, 18 19 *ENERGY• STAR _ labeled l)l-°(hlcl ENERGYSTAR ._, an ENERGY STAR (_ [)artn_ 1; GE has determined that - GE ASM10AL | Owners Manual - Page 2
electric shock or personal injury SAFETYPRECUATIONS ?;2Use dlis appliance only tor its intended ptupose as described ill this ()wn(r's Manual. _; This air conditioner must be properly installed ill all ordan/e with tile Insmllati/:m Instructions the air conditioner and (on(a( t a/lualified service - GE ASM10AL | Owners Manual - Page 3
ge.com WARNING! USEOFEXTENSIOCNORDS--115-Vmooltde&only Because of potential extension cord, it is al)solmcly nec(ssa_ dlat it be a UL-listed, 14 gauge, _wire gromlding type appliance extensi,.)n cord having a grotmding type [)lug and otttlet and fllat the electlical _ting of" ill( cord be 15 - GE ASM10AL | Owners Manual - Page 4
Ill{ lilxR! ill holllX,. "[\_ cancel th( timex; prtss the Timerpad until the displa? time (lisappeap< 0 Sleep (on some models) Press to st'l tile air conditioner to run for 8 h(mr_ betore it automatically shuts off. One hour aflcr lhe sleep timer is set, the set temper, ran> will automatically - GE ASM10AL | Owners Manual - Page 5
(onditioner was not dcsign(+(l tbr fl-eezing outdoor con(litions. It must not be used ill fl-eezing outdoor conditions. When the air conditioner is turned on, it wil! automatically start in the setting last used, go.tom Power Outage Recovery Feature In the _ase of a power Otltage or - GE ASM10AL | Owners Manual - Page 6
the t_mspeed to LOor HI. ForNormalCooling_%lect a Coolmode _dth the ModeiTemp knob set tt the midpoint. O Mode/Temp Control Use to set the air conditione[ to tile FanOnlyor a Cool mode. ForMaximumCooling-_Selecta Cooml ode with the ModeiTemp knob set tow,ud tilt"Imge_ bhle area. Fan OnlyMode Use - GE ASM10AL | Owners Manual - Page 7
go.tom Additional controls and important information. Do Not Operatein Freezing OutdoorConditions This cool4mly air conditioner was not designed tor fl(ezing outdooF conditions. It must not l)e us(d in fi-eezing outdoor conditions. Vent Control (on some models) Th_ vent control - GE ASM10AL | Owners Manual - Page 8
us{ bleach or al)rasixcs. Outdoor Coils The coils on the outdoor side o1"the air conditioner should be checked regulm'l?; It they arc clogged with dilt or soot, thc'_' may b< professionally clean(d. Air Filter The air filter behind 1he fl-ont rille should be checked and cleaned al l - GE ASM10AL | Owners Manual - Page 9
wiring may present special problems--consult a qualified electrician. If the sill support bolts do not contact the window sill, or if you have a window without a sill, you must order accessory kit RAK87 to properly install this air conditioner. Call 800.626.2002 or visit ge.com. TOOLS YOU WILL - GE ASM10AL | Owners Manual - Page 10
Window Installation Instructions PARTS INCLUDED (appearance may vary) Left accordion panel Foam top window gasket _ p mounting rail sash seal Window _Bo_to mounting rail seal strip Right accordion panel m inner Type A(18 or 19) 1/2" screws Sill support (2)"_1;;_" case gasket Type B (8) - GE ASM10AL | Owners Manual - Page 11
a window without a sill, you must order accessory kit RAK87 to properly install this air conditioner. Call 800.626.2002 or visit ge.com. • All supporting parts must be secured to firm wood, masonry or metal. • The electrical outlet must be within reach of the power cord. • Follow the dimensions in - GE ASM10AL | Owners Manual - Page 12
Window Installation Instructions [] REMOVE THE AIR CONDITIONER FROM THE CASE [] Remove the 2 or 4 screws ( attach it to the bottom of the top mounting rail. Cut to size. [] Slide the air conditioner from the case by gripping the base pan handle and pulling forward while bracing the case. [] - GE ASM10AL | Owners Manual - Page 13
Instructions [] INSTALL THE CASE IN THE WINDOW [] Cut the window sash seal to the window width and stick the adhesive side to the bottom of the sash. Window sill Window sash seal [] Thread two type C bolts into the support install this air conditioner. Call 800.626.2002 or visit ge.com. [] - GE ASM10AL | Owners Manual - Page 14
Window Installation Instructions [] INSTALL THE AIR CONDITIONER IN THE CASE [] Slide the air conditioner into the case, Reinstall the 2 front-side screws removed earlier on each side of the case. [] Place the bottom inner case gasket between the bottom of the air conditioner and the inside bottom of - GE ASM10AL | Owners Manual - Page 15
to the outside. Lintel angle is required to support bricks or blocks above opening. Flashing is required and should extend the length of the opening to ensure no inside cavity leakage occurs. [] Remove the air conditioner from the case. For specific instruction, refer to the Window Installation - GE ASM10AL | Owners Manual - Page 16
tlerea: • This is normal _br a short period in areas with little humidity; normal for a kruger perk×/in ver?, lmmid m'eas. * I rnl)lug the air conditione/: Wait 3 minutes and plug it ba(k ill. • In th( c_t_eofa po_er outage or int(tmpfion, tll_ unit Timerand Sleepl_mtures will reset to tile original - GE ASM10AL | Owners Manual - Page 17
your - GE ASM10AL | Owners Manual - Page 18
I I II I E_mail A&hess* Cil) II I II I I II II I I Slal_ ] CZ,,ipd_,i I II In Use Mondl Appliances General Electric Company GLoEuisCvilolen, sumKYer4022&5 Industrial ge.com 18 Number I I I I I ,i Please plovide your t_mail address to recelxe, via e-mail, dlscounls, special idtcrs and - GE ASM10AL | Owners Manual - Page 19
to obtahl service under the warranty. GE Will Replace: Anypart of' the air conditioner which fhils due to a detbct in mawrials or workmanship. I)uring this limitedone-yearwarranty, GE will also provkle, free ofcharge,all labor and relat_d se_vi(_ to rq)la(t, the det;.*ctivc part. _'_Service trips - GE ASM10AL | Owners Manual - Page 20
mg normal bus[n{ ss hours. Instructions contained in this manual cover procedures to be performed by any user, Otherservicing generally should be referred to qualified service personnel Caution must be exercised, since improper servicing may cause unsafe operation. ContactUs ge.com IfT,ou are not - GE ASM10AL | Owners Manual - Page 21
ge.com °e,,,q < © hlstrucciones de seguridad ...... 2, 3 lnstrucciones de operaci6n Controles--botones d( (omrol . . .6, 7 ( ontrol(s--te(:las de toque ...... 4, 5 Cuidado y limpieza Baterfas 8 Bobinas para _xterior_ s ........... 8 Fihro d_ aire 8 Parrilla y caja 8 - GE ASM10AL | Owners Manual - Page 22
seguridad, se debe seguir la informaciSn en este manual para minimizar e! riesgo de incendios, descargas el# twmas de pared para minimizar la posibilidad de una & scarg_a el('cttica. El acondicionador de air,_' d(bcHa siemp_*! ,.star conecmdo a ttIl tolnac()rtiente individual El caM( eldct*ico - GE ASM10AL | Owners Manual - Page 23
ge.com A iADVERTENCIA! USODECABLEDSEEXTENSi ION--Modedleo1s!5 voltiossolamente Debide al potencial de riesgos de seguridad baje ciertas condiciones, en#rgicamente recomendamos centra el use de cables de - GE ASM10AL | Owners Manual - Page 24
(), coloque elk On (Eneendido) h_t_ta que la ci_t ulal idn de aire deseada sea Iograda, ]uego ('o]o(Itlt en Off(Apagado). s ( noenrtgroylaSav ilj/lsmi5 el tiemlx) el/hoi'as. Oll(Apagado)---Cumldo el al:(mdicionador tie air(" est_ encel/dklo, ptmde ;@stm_.e pata que se apag-ue mm)mfificamente (/ - GE ASM10AL | Owners Manual - Page 25
importante. ge.com No use enlas cendicienesexternasdebajeel puntode cengelacion Estc acondicionador (it- ai_ no es dJscfiado pm'd u_ar cn tcm[x'rattmts extcmas deb_}jo el pm_to de ((mgelacidn. No us_ cn 1_ _on(liciones cxt_ rnas dcb_ljo cl ptmto dc (ongda(idn. Cuande atacendicienader de aire se - GE ASM10AL | Owners Manual - Page 26
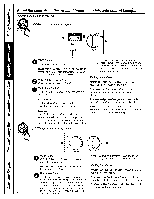
). @Controlde Mode/Temp (Modo/Temp) _sc pala _tjustal cl acondicionador oh" air(' al modo FanOnly(VeatJladorsolamente) o a un Illodo Cool(Enlriado). Modo de de las agt!jas del lel@ hacia el fil - GE ASM10AL | Owners Manual - Page 27
de (:(mgelacidn. No use en las condiciones externas deb@) el punto de (ongelacidn. ge.com Control de la ventilaci6n (on algunos modotos) El control de v(ntilacidn estfi } se aconditionm-,L Cuando est_i @lstado {n OPEN(ABIERTO), un poco del air(' int_ mo es { xpelido hacia afil( ra. ,f ¢/ (1 II - GE ASM10AL | Owners Manual - Page 28
de airc debe ser inspe((iomlda legulm-mcnle. Si la misma estfi obsHuida con suciedad u hollfil, p(_h-_ ser limpiada protbsionahnente. Filtro de aire El filno de aire (lelrfis de la r - GE ASM10AL | Owners Manual - Page 29
con una ventana sin umbral, debe ordenar el kit de accesorios RAK87 para instalar de forma adecuada este acondicionador de aire. Llame a 800.626.2002 o visite ge.com. (_ REQUISITOS ELECTRICOS El cable de alimentaci6n incluye un dispositivo para interrupcion de corriente. Se incluye un boton de - GE ASM10AL | Owners Manual - Page 30
Instrucciones para la instalacion en una ventana HERRAMIENTAS QUE USTED NECESITARA Destornillador Phillips Nivel Tijeras o cuchilla Lapiz Regla o cinta metrica Llave ajustable (PapAaRrieTncEiaS IpNuCedLeUvIaDriAarS) Panel de acordeon izquierdo ___ Empaque superior de espuma de la ventana - GE ASM10AL | Owners Manual - Page 31
sin umbral, debe ordenar el kit de accesorios RAK87 para instalar de forma adecuada este acondicionador de aire. Llame a 800.626.2002 o visite ge.com. • Todas las partes de apoyo deben quedar totalmente aseguradas a alg0n metal, mamposteria o a la madera. • El tomacorriente el6ctrico debe estar al - GE ASM10AL | Owners Manual - Page 32
o 4 tornillos (dependiendo en el modelo) en cada lado de la caja. Guardelos los 2 tornillos de la parte delantera para mas tarde. Frente del acondicionador de aire [] Deslice el acondicionador de aire de la caja agarrando la empu_adura del carter base y tire hacia adelante mientras sostiene la caja - GE ASM10AL | Owners Manual - Page 33
A (dependiendo en los nt]meros de agujeros en el riel de montaje superior) desde la parte externa de la caja, Riel de montaje superior Umbral de la ventana Sello del marco de adecuada este acondicionador de aire. Llame a 800.626.2002 o visite ge.com. tipos A POSTERIOR Riel de montaje inferior 13 - GE ASM10AL | Owners Manual - Page 34
posterior si es posible. Riel de montaje superior 'Tornillos tipo B [] INSTALE EL ACONDICIONADOR DE AIRE EN LA CAJA [] Deslice el acondicionador de aire en la caja. Reinstale los 2 tornillos de la parte delantera removidos anteriormente en cada lado de la caja. [] Coloque el empaque inferior de la - GE ASM10AL | Owners Manual - Page 35
de la cavidad. para fugas [] Retire el acondicionador de aire de la caja. Para instrucciones especificas, refi6rase alas Instrucciones para la abertura de la pared y coloque las bandas de soporte de madera entre la parte inferior de la caja y los tapajuntas de ambos lados del riel inferior. Deben - GE ASM10AL | Owners Manual - Page 36
Riel inferior / Tapaju ntas (riel de goteo) de la caja Riel inferior Tapajuntas (riel de goteo) Bandas de soporte de madera [] Coloque el acondicionador de aire hacia el interior de la caja. Para instrucciones especificas, refierase alas Instrucciones para la instalacion en una ventana. 16 - GE ASM10AL | Owners Manual - Page 37
{mscon poca humedad; rlormal pot tm ]x!rk)do de tiempo m:;_s posm)gado en rireas narishdmedas. C6_go de error de flmcidn. *De_onecm el acondickmador de aire. Espere 3 minutos y enchdf;elo otlvt vez. Una p&dida en el sumin'mt_'o eli,c(rico o tma interrupd6n ha ocurrido. *En el caso de una p&*/ida - GE ASM10AL | Owners Manual - Page 38
Solucionarproblemas. Sonidos de operacion normales i_ Ouiz5s escnche un sonido metfilico cmlsado pot el agxla tomada y timda contra el condensador en los d_as llm iosos o cuando la humedad es alto. Esta caracmt_stica de disefio a) uda a temow'r la humedad y mttjota la eficiencia. N ()jliz[ks escuche - GE ASM10AL | Owners Manual - Page 39
por defectos posibles con este acondicionador de aire. ;4_Danos despu6s de la entrega. #rea que no dispone de servicio por parte de un proveedor de servicio autorizado de GE,poflria tener que hacerse cargo de los General en su Iocalidad. Garante: General Electric Company. Louisville, KY 40225 19 - GE ASM10AL | Owners Manual - Page 40
este manual cubren los prooedimientos a seguir por cualquier usuario. Cualqoier otra reparaoi6n deberia, por regla general, r, Cl/SIOlll(:l"R(lations (;F Apl)lian(( s, Applianc( Park Louls\•lll¢. , t_ r 4()22C:_,X Registresu electrodomestico ge.com iReg_,gre su nuevo electrodom6stico en linea---
-
 1
1 -
 2
2 -
 3
3 -
 4
4 -
 5
5 -
 6
6 -
 7
7 -
8
-
9
-
10
-
11
-
12
-
13
-
14
-
15
-
16
-
17
-
18
-
19
-
20
-
21
-
22
-
23
-
24
-
25
-
26
-
27
-
28
-
29
-
30
-
31
-
32
-
33
-
34
-
35
-
36
-
37
-
38
-
39
-
40
 |
 |

ge.com
©
Safety
Ins_cqio_z_
...........
2, 3
Operating
lnsO_uctions
(;onu'ols_Contvol
F,
haobs
.....
6, 7
Conu'ols
Tou(h
Pads
........
4, 5
Care
and
Cleaning
Air
Fiber
. .....................
8
gaueri_s
......................
8
Grille
and
(;as_
................
8
Outdoor
(kills
.................
S
Installation
Ins_ctions
Through-the-Wall
[nsudladon--Optiot_al
.........
15
Window
Insudlatkm
.........
9-14
Troubleshooting
Tips
.........
1(;
Normal ()p_ rating Sounds
.....
16
Com'un_+ Support
Consumer
Support
............
20
Produ(t
Registration
.......
17, 18
Wanma I3
.....................
19
A SI) 06 *
ASM08*
ASMIO*
ASMI2*
ASQm
Asq12
ASQI4
ASVIO
ASVI2
ASV[4
*ENERGY•
STAR
_
labeled
l)l-°(hlcl
©
ENERGYSTAR
._,
an
ENERGY
STAR (_ [)artn_
1;
GE has
determined
that
this
product
meets
the
ENERGYSTAR
°°
guidelines
t;,_r
energy
etfi_ iencv.
Write the model andserial
numbershere:
Model
#
Serial
#
Find
lhese
mnnl)ers
on a l_lt)('l on
the side of tile air conditionm:
49-7581
11-07JR