GE ASQ10AK User Manual
GE ASQ10AK - G.E. 10,000 BTU Room Air Conditioner Manual
 |
UPC - 084691159841
View all GE ASQ10AK manuals
Add to My Manuals
Save this manual to your list of manuals |
GE ASQ10AK manual content summary:
- GE ASQ10AK | User Manual - Page 1
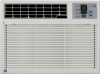
ASQ14 ASV10 ASV12 ASV14 As an ENERGY STAR® partner, GE has determined that this product meets the ENERGY STAR® guidelines for energy efficiency. Write the model and serial numbers here: Model Serial Find these numbers on a label on the side of the air conditioner. DB98-26675A 49-7567 02-07 - GE ASQ10AK | User Manual - Page 2
electric shock or personal injury. SAFETY PRECAUTIONS I Use this appliance only for its intended purpose as described in this Owner's Manual. I This air conditioner must be properly installed in accordance with the Installation Instructions the air conditioner and contact a qualified service - GE ASQ10AK | User Manual - Page 3
Safety Instructions Operating Instructions Installation Instructions Troubleshooting Tips Consumer Support ge.com WARNING! USE OF EXTENSION CORDS-115-Volt models only Because of potential safety hazards under certain conditions, we strongly recommend against the use of an extension cord. However - GE ASQ10AK | User Manual - Page 4
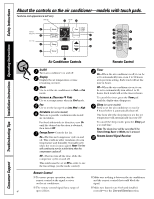
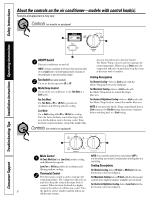
Troubleshooting Tips Installation Instructions Operating Instructions Safety Instructions About the controls on the air conditioner-models with touch pads. Features and appearance will vary. COOL On FAN On ENERGY SAVER On SLEEP On TIMER On Air Conditioner Controls Remote Control On/Off - GE ASQ10AK | User Manual - Page 5
Safety Instructions Operating Instructions Installation Instructions Troubleshooting Tips Consumer Support Additional controls and important information. ge.com Do Not Operate in Freezing Outdoor Conditions This cool-only air conditioner was not designed for freezing outdoor conditions. It must - GE ASQ10AK | User Manual - Page 6
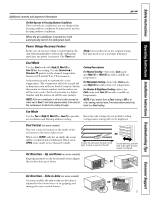
Troubleshooting Tips Installation Instructions Operating Instructions Safety Instructions About the controls on the air conditioner-models with control knob(s). Features and appearance may vary. Controls (on models so equipped) ON/OFF Switch Turns air conditioner on and off. NOTE: If the air air air - GE ASQ10AK | User Manual - Page 7
Instructions Operating Instructions Installation Instructions Troubleshooting Tips Consumer Support ge.com Additional controls and important information. Do Not Operate in Freezing Outdoor Conditions This cool-only air conditioner Air Direction-Side-to-Side On some models, the side-to-side air - GE ASQ10AK | User Manual - Page 8
Troubleshooting Tips Installation Instructions Operating Instructions Safety Instructions Care and cleaning of the air conditioner air conditioner air conditioner should be checked regularly. If they are clogged with dirt or soot, they may be professionally cleaned. Air Filter The air air conditioner - GE ASQ10AK | User Manual - Page 9
special problems-consult a qualified electrician. Do not install this air conditioner in a window if the type C bolts do not contact the window sill. See the Window Installation Instructions in this manual. TOOLS YOU WILL NEED Phillips head screwdriver Adjustable wrench ELECTRICAL REQUIREMENTS - GE ASQ10AK | User Manual - Page 10
Window Installation Instructions PARTS INCLUDED (appearance may vary) Left accordion panel Foam top window gasket Top mounting rail Window sash seal Top mounting rail seal strip Right accordion panel Sill support (2) Bottom inner case gasket Type A (18 or 19) 1/2″ screws Type B (8) 3/4″ - GE ASQ10AK | User Manual - Page 11
1 WINDOW REQUIREMENTS • These instructions are for a standard double-hung window. You will need to modify them for other types of windows. • All supporting parts must be secured to firm wood, masonry or metal. • The electrical outlet must be within reach of the power cord. Models ASD06, ASM08, ASQ10 - GE ASQ10AK | User Manual - Page 12
Window Installation Instructions 4 REMOVE THE AIR CONDITIONER FROM THE CASE A Remove the 2 or 4 screws (depending on model) on each side of the case. Keep the 2 front-side screws for later use. 5 PREPARE THE CASE A Remove the backing from the top mounting rail - GE ASQ10AK | User Manual - Page 13
outermost point on the window sill. Attach the support brackets to each side of the case bottom using 4 type A screws on each side. Adjust the leveling bolts to touch the sill. Type A screws Window sill Type C bolts CAUTION: Do not install this air conditioner in a window if the type C bolts do - GE ASQ10AK | User Manual - Page 14
Window Installation Instructions 8 INSTALL THE AIR CONDITIONER IN THE CASE A Slide the air conditioner into the case. Reinstall the 2 front-side screws removed earlier on each side of the case. B Place the bottom inner case gasket between the bottom of the air conditioner and the inside bottom of - GE ASQ10AK | User Manual - Page 15
is required to support bricks or blocks above opening. Flashing is required and should extend the length of the opening to ensure no inside cavity leakage occurs. A Remove the air conditioner from the case. For specific instruction, refer to the Window Installation Instructions. B Make certain that - GE ASQ10AK | User Manual - Page 16
Tips Installation Instructions Operating Instructions Safety Instructions Troubleshooting Tips... Problem Air conditioner does not start Air conditioner does not cool as it should Air conditioner freezing up The remote control is not working Water drips outside Water drips indoors Water - GE ASQ10AK | User Manual - Page 17
repairs. Place your confidence in GE and call us in the U.S. toll-free at 800.626.2224 for more information. *All brands covered, up to 20 years old, in the continental U.S. ✁ Cut here Please place in envelope and mail to: General Electric Company Warranty Registration Department P.O. Box 32150 - GE ASQ10AK | User Manual - Page 18
! Model Number Serial Number First Name Mr. s Ms. s Mrs. s Miss s Street Address Last Name Apt. # E-mail Address* Zip City State Code Date Placed In Use Month Day Year Phone _ _ Number GE Consumer & Industrial Appliances General Electric Company Louisville, KY 40225 ge.com - GE ASQ10AK | User Manual - Page 19
Instructions Operating Instructions Installation Instructions Troubleshooting Tips Consumer Support GE Air Conditioner Warranty. All warranty service provided by our Factory Service Centers, or an authorized Customer Care® technician. To schedule service, on-line, 24 hours a day, visit us at ge - GE ASQ10AK | User Manual - Page 20
Consumer Support. GE Appliances Website ge.com Have a question or need assistance with your appliance? Try the GE Appliances Website 24 hours a day, any day of the year! For greater convenience and faster service, you can now download Owner's Manuals, order parts or even schedule service on-line. - GE ASQ10AK | User Manual - Page 21
STAR® Manual del propietario e Instrucciones de Instalación ASD06* ASM08* ASM10* ASM12* ASQ10 ASQ12 ASQ14 ASV10 ASV12 ASV14 Como socio de ENERGY STAR®, GE ha confirmado que este producto cumple las directrices de ENERGY STAR® relativas al rendimiento energético. Escriba los números de modelo - GE ASQ10AK | User Manual - Page 22
! Por su seguridad, se debe seguir la información en este manual para minimizar el riesgo de incendios, descargas eléctricas o lesiones ósito determinado según se describe en el Manual del propietario. I Este acondicionador de aire debe instalarse correctamente de acuerdo con las Instrucciones - GE ASQ10AK | User Manual - Page 23
Seguridad ge.com ¡ADVERTENCIA! USO DE CABLES DE EXTENSIÓN-Modelos de 115 voltios solamente Debido al potencial de riesgos de seguridad bajo ciertas condiciones, enérgicamente recomendamos - GE ASQ10AK | User Manual - Page 24
fija de lado a lado, coloque en On (Encendido) hasta que la circulación de aire deseada sea lograda, luego coloque en Off (Apagado). Energy Saver (Ahorrador de energía) Controla el ventilador. On (Encendido)-El ventilador y el compresor hacen ciclo en encendido y apagado. Este resulta en variaciones - GE ASQ10AK | User Manual - Page 25
Seguridad Operación ge.com Controles adicionales e información importante. No use en las condiciones externas debajo el punto de congelación Este acondicionador de aire no es diseñado para usar en temperaturas externas debajo el punto de congelación. No use en las condiciones externas debajo el - GE ASQ10AK | User Manual - Page 26
función para cambiar la velocidad del ventilador entre LO (BAJO) ó HI (ALTO). Control de Mode/Temp (Modo/Temp) Use para ajustar el acondicionador de aire al modo Fan Only (Ventilador solamente) o a un modo Cool (Enfriado). Modo de Fan Only (Ventilador solamente) Use Fan Only en HI (ALTO) o LO (BAJO - GE ASQ10AK | User Manual - Page 27
condiciones externas debajo el punto de congelación Este acondicionador de aire no es diseñado para usar en temperaturas externas debajo el congelación. No use en las condiciones externas debajo el punto de congelación. ge.com Control de la ventilación (en algunos modelos) El control de ventilaci - GE ASQ10AK | User Manual - Page 28
ías del control remoto si el sistema no ha de ser usado por un período de tiempo extenso. Parrilla y caja Apague el acondicionador de aire y retire el enchufe del tomacorriente de la pared antes de limpiar. Para limpiar, use agua y un detergente suave. No use cloro o materiales abrasivos. Bobinas - GE ASQ10AK | User Manual - Page 29
de aire la instalación ¿Preguntas? Llame al 800.GE.CARES (800.432.2737) o bien Visite nuestra página Web: ge.com la ventana. Consulte la Instrucciones para la instalación en una ventana en este manual. El cable de alimentación incluye un dispositivo para interrupción de corriente. Se - GE ASQ10AK | User Manual - Page 30
Instrucciones para la instalación en una ventana HERRAMIENTAS QUE USTED NECESITARÁ Destornillador Phillips Nivel Lápiz Regla o cinta métrica PARTES INCLUIDAS (apariencia puede variar) Panel de acordeón izquierdo Empaque superior de espuma de la ventana Riel de montaje superior Tijeras o - GE ASQ10AK | User Manual - Page 31
Un marco de ventana de tormentas no permitirá que el acondicionador de aire se incline hacia el exterior y evitará que drene apropiadamente. Para solucionar pedazo de madera en la repisa para hacerla 1/2″ más alta que la parte superior del marco de la ventana de tormentas o del marco vinilo. - GE ASQ10AK | User Manual - Page 32
) A Retire la cinta de envío si todavía está pegada. En los modeles con parrilla de entrada elevadiza, levántela y retire el tornillo detrás de él los 2 tornillos de la parte delantera para más tarde. Frente del acondicionador de aire B Deslice el acondicionador de aire de la caja agarrando la - GE ASQ10AK | User Manual - Page 33
dependiendo en los números de agujeros en el riel de montaje superior) desde la parte externa de la caja. Riel de montaje superior Umbral de la ventana Sello del marco tipo A Pernos tipo C PRECAUCIÓN: No instale este acondicionador de aire en una ventana si los pernos tipo C no contacte el umbral - GE ASQ10AK | User Manual - Page 34
es posible. Riel de montaje superior Tornillos tipo B Tornillos tipo B 8 INSTALE EL ACONDICIONADOR DE AIRE EN LA CAJA A Deslice el acondicionador de aire en la caja. Reinstale los 2 tornillos de la parte delantera removidos anteriormente en cada lado de la caja. B Coloque el empaque inferior de - GE ASQ10AK | User Manual - Page 35
se produzcan fugas dentro de la cavidad. A Retire el acondicionador de aire de la caja. Para instrucciones específicas, refiérase a las Instrucciones abertura de la pared y coloque las bandas de soporte de madera entre la parte inferior de la caja y los tapajuntas de ambos lados del riel inferior. - GE ASQ10AK | User Manual - Page 36
que el agua gotee hacia el interior de la pared y hacia el exterior de la construcción. Ángulo del lintel Calafateo EXTERIOR Persianas de aire (persianas superiores y laterales debe proyectar hacia el lado exterior de la pared) Relleno de madera y calafateo (por encima y por debajo del tapajuntas - GE ASQ10AK | User Manual - Page 37
Seguridad Operación Instalación Solucionar problemas. ge.com Problema El acondicionador de aire no enciende El acondicionador de aire no enfría como debería El acondicionador de aire se está congelando El control remoto no funciona Hay agua goteando afuera Hay agua goteando en el interior de la - GE ASQ10AK | User Manual - Page 38
Seguridad Solucionar problemas. Sonidos de operación normales I Quizás escuche un sonido metálico causado por el agua tomada y tirada contra el condensador en los días lluviosos o cuando la humedad es alta. Esta característica de diseño ayuda a remover la humedad y mejora la eficiencia. I Quizás - GE ASQ10AK | User Manual - Page 39
ía. Por el período de: GE reemplazará: Un año A partir de la fecha de la compra original Cualquier parte del acondicionador de aire que falle debido a defectos en del consumidor local o la oficina del Attorney General en su localidad. Garante: General Electric Company. Louisville, KY 40225 19 - GE ASQ10AK | User Manual - Page 40
normales de oficina. GE Consumer Home Services estará aún ahí cuando su garantía termine. Piezas y accesorios ge.com Aquellos individuos con o escríbanos a: General Manager, Customer Relations GE Appliances, Appliance Park Louisville, KY 40225 Registre su electrodoméstico ge.com ¡Registre su
-
 1
1 -
 2
2 -
 3
3 -
 4
4 -
 5
5 -
 6
6 -
 7
7 -
8
-
9
-
10
-
11
-
12
-
13
-
14
-
15
-
16
-
17
-
18
-
19
-
20
-
21
-
22
-
23
-
24
-
25
-
26
-
27
-
28
-
29
-
30
-
31
-
32
-
33
-
34
-
35
-
36
-
37
-
38
-
39
-
40
 |
 |

Safety Instructions
. . . . . . . . . .2, 3
Operating Instructions
Controls—Control Knobs . . . . .6, 7
Controls—Touch Pads
. . . . . . .4, 5
Care and Cleaning
Air Filter . . . . . . . . . . . . . . . . . . . . .8
Batteries . . . . . . . . . . . . . . . . . . . . .8
Grille and Case
. . . . . . . . . . . . . . .8
Outdoor Coils . . . . . . . . . . . . . . . .8
Installation Instructions
Through-the-Wall
Installation—Optional
. . . . . . . .15
Window Installation . . . . . . . . .9–14
Troubleshooting Tips
. . . . . . . .16
Normal Operating Sounds . . . . .16
Consumer Support
Consumer Support . . . . . . . . . . .20
Product Registration . . . . . . .17, 18
Warranty . . . . . . . . . . . . . . . . . . . .19
DB98-26675A
49-7567
02-07 JR
ASD06*
ASM08*
ASM10*
ASM12*
ASQ10
ASQ12
ASQ14
ASV10
ASV12
ASV14
Air Conditioners
Owner’s Manual and
Installation Instructions
ge.com
Write the model and serial
numbers here:
Model #
______________________
Serial #
______________________
Find these numbers on a label on
the side of the air conditioner.
Room
As an
E
NERGY
S
TAR
®
partner, GE has
determined that this product meets
the
E
NERGY
S
TAR
®
guidelines for
energy efficiency.
*
E
NERGY
S
TAR
®
labeled product