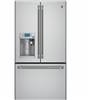
GE CYE22USHSS Use and Care Manual
GE CYE22USHSS Manual
 |
View all GE CYE22USHSS manuals
Add to My Manuals
Save this manual to your list of manuals |
GE CYE22USHSS manual content summary:
- GE CYE22USHSS | Use and Care Manual - Page 1
Water Filter Cartridge Limited Warranty 45 Performance Data Sheet 46 Consumer Support 48 Write the model and serial numbers here: Model Serial Find these numbers on a label on the left side, near the middle of the refrigerator compartment. Owner's Manual and Installation Instructions GE - GE CYE22USHSS | Use and Care Manual - Page 2
Instructions before it is used. „ Unplug the refrigerator before making repairs, replacing a light bulb, or cleaning. Note: Power to the refrigerator cannot be disconnected by any setting on the control panel. Note: Repairs must be performed by a qualified service professional. „ Replace all parts - GE CYE22USHSS | Use and Care Manual - Page 3
doors open. These models must be secured with the anti-tip floor bracket to prevent tipping forward, which could result in death or serious injury. Read and follow the entire installation instructions for installing the anti-tip floor bracket packed with your refrigerator. CONNECTING ELECTRICITY - GE CYE22USHSS | Use and Care Manual - Page 4
formula manufacturer's instructions for preparation of baby formula. „ Do not use with water that is microbiologically unsafe or of unknown quality. „ Your container should be close to the dispensing point to minimize the splashing of hot water. „ A newly installed water filter cartridge will cause - GE CYE22USHSS | Use and Care Manual - Page 5
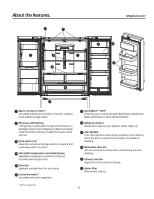
Showcase LED lighting LED lighting is positioned throughout the interior to spotlight areas in the refrigerator. LEDs are located under the fresh food door to light the freezer when opened. zone bin Separate bins for produce storage. Water filter Filters water and ice. * Select models only. 5 - GE CYE22USHSS | Use and Care Manual - Page 6
guide brackets and push until the ice bucket seats properly. 5. If bucket cannot be replaced, rotate the Ice Bucket Fork 1/4 turn clockwise. Drop down dairy bin* 1. Open right fresh food door. 2. Depress both buttons on lower sides and bin will drop down. 3. Reverse to reinstall. Ice/water filter - GE CYE22USHSS | Use and Care Manual - Page 7
Control Style CWE Control Style Lock Controls Light Temperature Express Modes Water Settings Precise Fill Hot Water Water Crushed Cubed Changing the Temperature for Control Style CYE/CFE To Change the Refrigerator Temperature: Access By: Temperature Button Temperature Activate By: Below the - GE CYE22USHSS | Use and Care Manual - Page 8
CYE Models Lock Controls Light Temperature Express Modes Water Settings Precise Fill Hot Water Water Crushed Cubed NOTE: The refrigerator is Hot Water Dispenses up to 10 ounces of filtered hot water from user selected ranges of 90°F to 185°F. Hot Water Knob Illuminates to indicate hot water - GE CYE22USHSS | Use and Care Manual - Page 9
have been left open. Reset Filter Hold for 3 seconds after replacing filter. Lock Controls Press and hold 3 seconds to lock out ice and water dispenser and all feature and temperature buttons. Freezer temp control Adjust freezer compartment temperature Refrigerator temp control Adjust fresh food - GE CYE22USHSS | Use and Care Manual - Page 10
and align with center guides. „ Push in until Water Dispenser (CWE Models Only) The water dispenser is located on the left wall inside the refrigerator compartment . To dispense water: Hold the glass against the recess. Push the water dispenser button. If no water is dispensed when the refrigerator - GE CYE22USHSS | Use and Care Manual - Page 11
GE's standards for quality, performance and reliability. If you have questions, or to order additional filter cartridges, visit our website at www.geapplianceparts.com or call GE Parts and Accessories, 800.626.2002. Customers in Canada should consult the yellow pages for the nearest Camco Service - GE CYE22USHSS | Use and Care Manual - Page 12
of 40 to 100 psi. • HOT WATER will time out if unused and may require a short reheat time. For GE Cafe™ with K-Cup Brewing System Lock Controls Light Temperature Express Modes Water Settings Precise Fill Hot Water Water Crushed Cubed On GE Café refrigerators equipped with the K-Cup brewing - GE CYE22USHSS | Use and Care Manual - Page 13
coffee settings. Be sure to use ONLY powdered beverages when using the cocoa setting. Lock Controls Light Temperature Express Modes Water Settings Precise Fill Hot Water Water Crushed Cubed Rails for the brewer Cancel Coffee Coffee Cocoa Serving Size 6oz 8oz 10oz 4 Ensure the mug being - GE CYE22USHSS | Use and Care Manual - Page 14
GE WiFi Connect Enabled* If your refrigerator has a Connected Appliance information label located on the inside as shown, your refrigerator notifications. Depending on the refrigerator model you have, you Statement: This device complies with Part 15 of the FCC Rules. with the instructions, may cause - GE CYE22USHSS | Use and Care Manual - Page 15
About the fresh food storage options. Rearranging the Shelves Shelves in the refrigerator compartment are adjustable. To remove: Remove all items from the shelf. Tilt the shelf up shelves). NOTE: The back half of the Quick Space Shelf is not adjustable. *Select Models Only GEAppliances.com 15 - GE CYE22USHSS | Use and Care Manual - Page 16
supports and push down. The bin will lock in place. See page 33. Adjustable Bins on the Door Adjustable bins can easily be carried from refrigerator . 3. Reverse to reinstall. Non-Dispense Models (Left Hand Door) Non-Adjustable Bins on the Door (Dispenser Models - Left Hand Door) To remove: Lift - GE CYE22USHSS | Use and Care Manual - Page 17
the climate zone and temperature controlled drawer. GEAppliances.com ClimateZone Keep fruits and vegetables organized in separate compartments for easy access. Excess water that may accumulate in the bottom of the drawers or under the drawers should be wiped dry. Note: Temperatures indicate the - GE CYE22USHSS | Use and Care Manual - Page 18
the drawer out to the stop position. Slide pan divider to right to release it from pan. Reverse steps 1 and 2 to replace drawer divider. *Select Models Only 18 - GE CYE22USHSS | Use and Care Manual - Page 19
by lifting up the rear of the basket and rotate it upward. Lift it out to remove. To replace: Reverse step 1 thru 4 to replace. *Select Models Only 19 - GE CYE22USHSS | Use and Care Manual - Page 20
homes with lower-than-average water pressure, you may hear contact with the moving parts of the ejector mechanism refrigerator is plugged in. Display Type (See Page 7) Control Style A Control Style B How to Turn the Ice Maker On/Off Model bucket, set it on the guide brackets and push until the ice - GE CYE22USHSS | Use and Care Manual - Page 21
15 ml) of baking soda to one quart (1 liter) of water. Leave the doors open. LCD Models: turn refrigerator off at control (pg 7) . If the temperature can drop below freezing, have a qualified service technician drain the water supply system to prevent serious property damage due to flooding. 1) Turn - GE CYE22USHSS | Use and Care Manual - Page 22
Replacing the lights Refrigerator Lights (LEDs) There is LED lighting in fresh food compartment and on the bottom of the fresh food doors to light the freezer compartment. An authorized technician will need to replace the LED light. If this assembly needs to be replaced, call GE Service at 1.800. - GE CYE22USHSS | Use and Care Manual - Page 23
Installation Instructions Refrigerator GE Café™ models Questions? Call 800.GE.CARES (800.432.2737) or visit our Website at: GEAppliances.com In Canada, call 1.800.561.3344 or visit our Website at: www.GEAppliances.ca BEFORE YOU BEGIN Read these instructions completely and carefully. WARNING Tip - GE CYE22USHSS | Use and Care Manual - Page 24
Installation Instructions DIMENSIONS All measurements are given with leveling leg refrigerator. Place the refrigerator on the hand truck with a side against the truck. We strongly recommend that two people move and complete this installation. If your model number starts with CFE If your model - GE CYE22USHSS | Use and Care Manual - Page 25
install the refrigerator in a location exposed to water (rain, etc.) or direct sunlight. • Install it on a floor strong enough to support it fully loaded (50 mm) REMOVING THE REFRIGERATOR DOORS • IMPORTANT NOTE: This refrigerator is 361/4" deep (311/4" for CYE models). Doors and passageways leading - GE CYE22USHSS | Use and Care Manual - Page 26
Installation Instructions INSTALLING THE REFRIGERATOR (cont.) 3 REMOVE THE REFRIGERATOR DOORS A Securely tape the door shut with masking tape or have a second person support the door. 3 REMOVE THE REFRIGERATOR DOORS (cont) D Disconnect the water line from the back of the unit by pressing down on - GE CYE22USHSS | Use and Care Manual - Page 27
Instructions INSTALLING THE REFRIGERATOR (cont.) 3 REMOVE THE REFRIGERATOR door. There are no wires or water lines on the opposite side 4 steps below: 1. If space or model limits opening door to less than 180 with masking tape or have a second person support the door. Reinstall the top hinge and - GE CYE22USHSS | Use and Care Manual - Page 28
Installation Instructions INSTALLING THE REFRIGERATOR (cont.) 6 REMOVE THE FREEZER DOOR A Pull the freezer door open to full extension. B Remove 3 attachment screws screws and torque the screws to 65 in-lb E For adjusting freezer door gaps, follow the instructions on pg 27. F Replace the basket 28 - GE CYE22USHSS | Use and Care Manual - Page 29
Installation Instructions INSTALLING THE REFRIGERATOR (cont.) Instructions for adjusting freezer door gaps: Étape 1 Paso 1 Step 4 Étape 4 Paso 4 Set Screw Vis d'ajustement Tornillo del Set GE Appliances General Electric Company Louisville, KY 40225 GEAppliances.com Step 2 Étape 2 Paso 2 Step 3 - GE CYE22USHSS | Use and Care Manual - Page 30
Installation Instructions INSTALLING THE REFRIGERATOR (cont.) 8 LEVEL THE FREEZER DOOR 9 LEVEL THE FREEZER DOOR (cont.) A Lift the door on the side requiring adjustment, rotate the cam to required position. A Locate - GE CYE22USHSS | Use and Care Manual - Page 31
installing the anti-tip floor bracket packed with your refrigerator. NOTE: If you did not receive an anti-tip bracket with your purchase, call 1.800.626.8774 to receive one at no cost. (In Canada, call 1.800.561.3344.) For installation instructions of the bracket, visit: www.GEAppliances.com. (In - GE CYE22USHSS | Use and Care Manual - Page 32
Installation Instructions INSTALLING THE REFRIGERATOR (cont.) Anti-Tip Floor Bracket Installation (Models PYE, CYE, GYE, PWE, CWE, and ZWE only) (cont.) AT-2 LOCATING THE ANTI-TIP FLOOR BRACKET (cont.) Figure 2 - Acceptable Screw Placement Locations Recommended Installation - Wood - GE CYE22USHSS | Use and Care Manual - Page 33
to hold it in position. You may need to pry open the clamp. refrigerator's water valve. Install it in the water line near the refrigerator. If using GE SmartConnect™ Refrigerator Tubing Kit, you will need an additional tube (WX08X10002) to connect the filter. Do not cut plastic tube to install - GE CYE22USHSS | Use and Care Manual - Page 34
Installation Instructions INSTALLING THE REFRIGERATOR (cont.) 12 TURN ON THE WATER SUPPLY Turn the water on at the shutoff valve (house water supply) and check for any leaks. 13 PLUG IN THE REFRIGERATOR 15 LEVEL THE REFRIGERATOR DOORS Remember a level refrigerator is necessary for getting the - GE CYE22USHSS | Use and Care Manual - Page 35
Installation Instructions INSTALLING THE REFRIGERATOR (cont.) Non-Dispense Models Refrigerator Assembly Instructions, suggested assembly. H H G J To place bins into doors: Match your bin with the letter shown. Position the bin hooks over the bin locator and push forward - GE CYE22USHSS | Use and Care Manual - Page 36
a water filter, use the refrigerator's filter bypass plug. Using the refrigerator's water filtration cartridge in conjunction with an RO water filter can result in hollow ice cubes. This water line installation is not warranted by the refrigerator or ice maker manufacturer. Follow these instructions - GE CYE22USHSS | Use and Care Manual - Page 37
Installation Instructions INSTALLING THE WATER LINE (cont.) WHAT YOU WILL NEED (CONT.) NOTE: The only GE approved plastic tubing is that supplied in GE SmartConnect™ Refrigerator Tubing kits. Do not use any other plastic water supply line because the line is under pressure at all times. Certain - GE CYE22USHSS | Use and Care Manual - Page 38
Instructions INSTALLING THE WATER LINE (cont.) 4 FASTEN THE SHUTOFF VALVE Fasten the shutoff valve to the cold water pipe with the pipe clamp. Pipe Clamp Saddle-Type Shutoff Valve Vertical Cold Water . For plastic tubing from a GE SmartConnect™ Refrigerator Tubing kit, insert the molded end - GE CYE22USHSS | Use and Care Manual - Page 39
hear the ice cubes dropping into the ice bucket. „ On models with a dispenser, during water dispense, you may hear the water lines move at initial dispense and after dispenser button is released. WATER SOUNDS „ The flow of refrigerant through the cooling coils may make a gurgling noise like boiling - GE CYE22USHSS | Use and Care Manual - Page 40
for service... Troubleshooting Tips Save time and money! Review the charts on the following pages first and you may not need to call for service. Problem Possible Causes What to Do Water filter indicated as installed incorrectly or a leak is present message on LCD screen. Water filter indicator - GE CYE22USHSS | Use and Care Manual - Page 41
turned off or not connected See Installing the Water Line Water filter clogged or filter/bypass plug Replace filter cartridge or remove filter not installed and install bypass plug Hot water continues to dispense for a Water filter is partially clogged or low short time after releasing the knob - GE CYE22USHSS | Use and Care Manual - Page 42
detailed troubleshooting tips in the Owner's man- SERVICE ual. If needed, service can be scheduled by visiting us online GEAppliances.com or calling 800.ge.CARES 800.432.2737. In Canada visit GEAppliances.ca or call 800.561.3344. Truth or Myth Truth or Myth? Answer The refrigerator water filter - GE CYE22USHSS | Use and Care Manual - Page 43
needed, service can be scheduled by visiting us online GEAppliances.com or calling 800.ge.CARES 800.432.2737. In Canada visit GEAppliances.ca or call 800.561.3344. Truth or Myth (cont.) Truth or Myth? When the refrigerator is installed, or after replacing the water filter, I must dispense water for - GE CYE22USHSS | Use and Care Manual - Page 44
of the purchase GE Will Replace Any part of the refrigerator which fails due to a defect in materials or workmanship. During the limited one-year warranty, GE will also provide, free of charge, all labor and related service to replace the defective part. Any part of the water filter cartridge which - GE CYE22USHSS | Use and Care Manual - Page 45
Water Filter Cartridge Limited Warranty. Appliance Service GE Appliances 800-GE-CARES Contact us at www.geapplianceparts.com, or call 800.GE.CARES. Staple your receipt here. Proof of the original purchase date is needed to obtain service under the warranty Date *If your GE part fails because of - GE CYE22USHSS | Use and Care Manual - Page 46
Water Pressure Water Temperature 25-120 psi (172- 827 kPa) 33º F - 100º F (0.6º C - 38º C) It is essential that the manufacturer's recommended installation, maintenance and filter replacement requirements be carried out for the product to perform as advertised. See Installation Manual for Warranty - GE CYE22USHSS | Use and Care Manual - Page 47
Notes GEAppliances.com 47 - GE CYE22USHSS | Use and Care Manual - Page 48
any day of the year! For greater convenience and faster service, you can now download Owner's Manuals, order parts or even schedule service on-line. In Canada: www.GEAppliances.ca Schedule Service In the U.S.: GEAppliances.com Expert GE repair service is only one step away from your door. Get on - GE CYE22USHSS | Use and Care Manual - Page 49
.20 Entretien et nettoyage 21 Remplacement des ampoules . . . . . .22 Instructions d'installation Préparation avant installation du réfrigérateur 23, 24 Installation du réfrig érateur. . . . . 25-35 Installation du support anti-basculement 31, 32 Installation de l'alimentation en eau 36-38 - GE CYE22USHSS | Use and Care Manual - Page 50
LES CONSIGNES AVANT UTILISATION . SÉCURITÉ Site Internet d'Électroménagers GE Pour de plus amples informations sur le fonctionnement de votre ré ce dernier doit obligatoirement être homologué UL (aux USA) ou CSA (au Canada), à trois brins avec mise à la terre pour appareil électroménager et doit - GE CYE22USHSS | Use and Care Manual - Page 51
. Branchez l'appareil dans une prise triple avec terre. Ne retirez pas la broche de terre. N'utilisez pas d'adaptateur. Le non-respect de ces instructions peut entraîner des risques d'incendies, des chocs électriques ou la mort. Ne coupez pas ou n'enlevez pas, sous aucun prétexte, la troisi - GE CYE22USHSS | Use and Care Manual - Page 52
mort ou des lésions cérébrales. IMPORTANT: Les enfants pris au piège ou morts d'asphyxie sont toujours d'actualité. Les réfrigérateurs jetés ou jours ». Si vous voulez jeter votre ancien réfrigérateur, suivez les instructions suivantes pour empêcher les accidents. Avant de jeter votre ancien réfrig - GE CYE22USHSS | Use and Care Manual - Page 53
A propos des fonctions. GEAppliances.ca Machine à glaçons à faible encombrement * La machine à glaçons et son bac sont situés sur la porte permettant d'avoir un espace de stockage plus spacieux. Éclairage à DEL L'éclairage à DEL est placé dans tout le compartiment pour éclairer différentes zones - GE CYE22USHSS | Use and Care Manual - Page 54
au fond du bac. 4. Pour remettre le seau à glace, placez-le sur les guides et enfoncez-le jusqu'à ce qu'il soit correctement en place. 5. Si vous n' porte et alignez les languettes du PSivwointegr filtre avec celle du support de filtre et 1 appuyez sur le filtre pour le positionner correctement - GE CYE22USHSS | Use and Care Manual - Page 55
CFE Lock Controls Light Temperature Water Express Modes Settings Precise Fill Hot Water Water Crushed Cubed Refrigerator Hold 3 Sec for °F/°C Hold 3 Seconds Door Alarm Ice Maker Lock Controls Hold 3 Seconds Reset Filter Hold 3 Seconds Changer la temp., pour le type de commande CWE L' - GE CYE22USHSS | Use and Care Manual - Page 56
À propos des contrôles - Funciones. Style de commandes A, Commandes externes CFE/CYE Models Lock Controls Light Temperature Express Modes Water Settings Precise Fill Hot Water Water Crushed Cubed REMARQUE: Le réfrigérateur est livré avec un film protecteur sur les commandes de températures - GE CYE22USHSS | Use and Care Manual - Page 57
Models GEAppliances.ca Refrigerator Hold 3 Sec for °F/°C Recommended: 37 °F Actual Set F Energy Smart Recommended: 0°F Freezer Energy Smart Override Hold 3 Seconds Door Alarm Ice Maker Lock Controls Hold 3 Seconds Reset Filter Mode Press and hold Door Alarm and Ice Maker simultaneously for - GE CYE22USHSS | Use and Care Manual - Page 58
cupération et placez-le sous les deux pattes en plastique de chaque côté. „ Centrez la grille du distributeur et alignez-la à l'aide des guides centraux. „ Poussez jusqu'à ce qu'elle soit bien en place. Informations importantes concernant votre distributeur „ N'ajoutez pas de glaçons provenant des - GE CYE22USHSS | Use and Care Manual - Page 59
de son support, pivoter les instructions ci- GE. Pour toute question ou pour commander des cartouches filtrantes de rechange, visitez notre site Web au www.geappliance.ca, ou composez le 800.661.1616. Les consommateurs du Canada doivent consulter les pages jaunes pour connaître le centre de service - GE CYE22USHSS | Use and Care Manual - Page 60
eau chaude GE Cafe™ seulement Lock Controls Light Temperature Express Modes Water Settings Precise Fill Hot Water Water Crushed Cubed Keurig), le dispositif d'eau chaude passera en mode K-Cup. Voir la page 20 pour les instructions sur le mode K-Cup. AVERTISSEMENT Risque de brûlure • - GE CYE22USHSS | Use and Care Manual - Page 61
la fonction Cocoa, assurez-vous d'utiliser UNIQUEMENT des breuvages à base de poudre. Lock Controls Light Temperature Express Modes Water Settings Precise Fill Hot Water Water Crushed Cubed Rails pour l'infuseur Cancel Coffee Coffee Cocoa Serving Size 6oz 8oz 10oz 4 Veillez à ce que - GE CYE22USHSS | Use and Care Manual - Page 62
Connect (pour les clients aux États-Unis) GE WiFi Connect Enabled* Une étiquette d'information intitulée Connected qui, en cas d'une installation erronée ou d'une utilisation non-conforme aux instructions de ce manuel d'utilisation peuvent causer un brouillage nuisible aux communications radio. Il - GE CYE22USHSS | Use and Care Manual - Page 63
A propos du stockage des produits frais. Réorganisation des clayettes Les clayettes du réfrigérateur sont réglables. Pour les retirer : Retirez tous les aliments de la clayette. Soulevez l'avant de la clayette. Soulevez l'arrière de la clayette et sortez-la du réfrigérateur. Pour le remettre en - GE CYE22USHSS | Use and Care Manual - Page 64
réglable* Pour le retirer : Tirez le bac à produits laitiers vers le haut, puis retirez-le. Pour le remettre en place : Engagez le bac dans les supports de porte moulés et poussez-le vers le bas. Le bac s'encastrera. Voir page 79. Bacs de porte réglables Les bacs réglables peuvent facilement être - GE CYE22USHSS | Use and Care Manual - Page 65
A propos de la zone climatisée & du tiroir à température contrôlée. GEAppliances.ca Zone climatisée Conservez les fruits et les légumes dans des compartiments séparés pour un accès facile. Essuyez l'eau accumulée dans le fond ou en dessous des bacs. Remarque : Les températures indiquent les tempé - GE CYE22USHSS | Use and Care Manual - Page 66
A propos de la zone climatisée & du tiroir à température contrôlée. Retrait et remise en place du tiroir à charcuterie/à produits frais réglable Pour le retirer : Tirez le tiroir jusqu'à la butée. Soulevez l'avant du tiroir puis faites le sortir en tirant. Pour le remettre en place : Tirez les - GE CYE22USHSS | Use and Care Manual - Page 67
À propos du congélateur. Panier et tiroir du congélateur Panier. Tiroir Seau à glaçons * GEAppliances.ca Bac non réglable dans le congélateur To remove: push in plastic tab on either left or right side To replace: slide bin into location until it locks into place. Retrait d'un panier Pour le - GE CYE22USHSS | Use and Care Manual - Page 68
panier supérieur. • Tirez le panier supérieur vers vous pour enlever le seau à glaçons. • Pour remettre le seau à glace, placez-le sur les guides et enfoncez-le jusqu'à ce qu'il soit correctement en place. • Si vous n'arrivez pas à le remettre, faites tourner la fourche d'1/4 de tour dans le - GE CYE22USHSS | Use and Care Manual - Page 69
touchent le sol. Lorsque vous remettez le réfrigérateur en place en le poussant, veillez à ne pas le faire rouler sur le cordon d'alimentation. Départ en vacances Encas d'absences ou de vacances prolongées, retirez tous les aliments du réfrigérateur et débranchez-le. Nettoyez l'intérieur avec une - GE CYE22USHSS | Use and Care Manual - Page 70
le compartiment de congélation Le remplacement des ampoules à DEL doit être effectué par un technicien autorisé. Si cet ensemble doit être remplacé, contactez le service GE au 1.800.561.3344. 22 - GE CYE22USHSS | Use and Care Manual - Page 71
alimentation en eau froide. Vous pouvez vous procurer une trousse GE de branchement à l'alimentation d'eau (contenant tuyau, robinet, raccords et instructions) auprès de votre fournisseur, en consultant notre site internet GEAppliances.com (au Canada par le site GEAppliances.ca), ou au Centre de Pi - GE CYE22USHSS | Use and Care Manual - Page 72
Instructions d'installation DIMENSIONS Toutes les mesures sont données avec les pieds de mise à niveau escamotés. Uniquement CFE et CYE 353ø4" CWE uniquement 353ø4" 697ø8" 697ø8" - GE CYE22USHSS | Use and Care Manual - Page 73
Instructions d'installation INSTALLATION DU RÉFRIGÉRATEUR EMPLACEMENT DU RÉFRIGÉRATEUR • .) ou directement aux rayons solaires. • Il doit être installé sur une surface suffisamment solide pour supporter le poids d'un réfrigérateur rempli. 1 RETRAIT DES POIGNÉES DE PORTE DU COMPARTIMENT DE RÉFRIG - GE CYE22USHSS | Use and Care Manual - Page 74
Instructions d'installation INSTALLATION DU RÉFRIGÉRATEUR (suite) 3 RETRAIT DES PORTES DU RÉFRIGÉRATEUR A Maintenez la porte bien fermée à l'aide de Ils doivent donc être associés pour que la porte se ferme correctement de façon automatique. Veuillez suivre les instructions scrupuleusement. 26 - GE CYE22USHSS | Use and Care Manual - Page 75
ère centrale 5 REINSTALLATION DES PORTES DU RÉFRIGÉRATEUR Inverser en sens inverse, étapes 4 à 1, pour réinstaller les portes du réfrigérateur. Suivez les instructions suivantes pour les alignements critiques. A Réinstallez la charnière centrale d'abord, puis serrez les vis à un couple de 65 po-lb - GE CYE22USHSS | Use and Care Manual - Page 76
du congélateur dans la fente du support du mécanisme à glissières du congélateur. D Remettez les vis de fixation en place et serrez-les au couple de 65 po-lb. E Pour ajuster les écarts au niveau de la porte du congélateur, suivez les instructions données en page 73. F Remettez - GE CYE22USHSS | Use and Care Manual - Page 77
d'installation INSTALLATION DU RÉFRIGÉRATEUR (suite) Instructions concernant l'ajustement des écarts de la porte du congélateur : IMPORTANT! Les 6 vis de montage (3 de chaque côté) ne sont PAS interchangeables avec les vis de - GE CYE22USHSS | Use and Care Manual - Page 78
Instructions d'installation INSTALLATION DU RÉFRIGÉRATEUR (suite) 8 MISE À NIVEAU DE LA PORTE DU CONGÉLATEUR 9 MISE À NIVEAU DE LA PORTE DU CONGÉLATEUR (suite) A Soulevez la - GE CYE22USHSS | Use and Care Manual - Page 79
(Au Canada, appelez le 1.800.561.3344). Pour les instructions d'installation du système consultez le site : www.GEAppliances.com. (Au Canada, www. le mur Système de fixation au sol à installer Trous à droite 15 ¼" Support de base sur le réfrigérateur Côté droit du réfrigérateur Coin arrière - GE CYE22USHSS | Use and Care Manual - Page 80
Instructions d'installation INSTALLATION DU RÉFRIGÉRATEUR (suite) AT-2 POSITIONNEMENT DU SYSTÈME ANTIBASCULEMENT PAR FIXATION AU SOL (suite) Figure 2 - Emplacements acceptables pour les vis Installation recommandée - - GE CYE22USHSS | Use and Care Manual - Page 81
Instructions d'installation INSTALLATION DU RÉFRIGÉRATEUR (suite) 11 RACCORDEMENT DU RÉ conduite d'alimentation d'eau froide près du réfrigérateur. Si vous utilisez une trousse GE SmartConnect™ Refrigerator Tubing, vous aurez besoin d'un tuyau supplémentaire (WX08X10002) pour brancher le filtre. - GE CYE22USHSS | Use and Care Manual - Page 82
Instructions d'installation INSTALLATION DU RÉFRIGÉRATEUR (suite) 12 OUVRIR L'ALIMENTATION EN EAU Ouvrez l'alimentation d'eau au niveau du robinet d'arrêt (alimentation en eau de la maison) - GE CYE22USHSS | Use and Care Manual - Page 83
d'installation INSTALLATION DU RÉFRIGÉRATEUR (suite) Modèles sans distributeur Instructions de montage du réfrigérateur (suggestion). H H G J Pour positionner les bacs dans les portes : Faites correspondre votre bac avec la lettre indiquée. Positionnez les crochets du - GE CYE22USHSS | Use and Care Manual - Page 84
du réfrigérateur ou de la machine à glaçons. Suivez attentivement ces instructions afin de minimiser le risque de fuite d'eau et de dommages onéreux. Les locaux. PIÈCES NÉCESSAIRES • Tuyaux en cuivre ou trousse GE SmartConnect™ Refrigerator Tubing, diamètre extérieur d'¼ po pour brancher le ré - GE CYE22USHSS | Use and Care Manual - Page 85
Instructions d'installation INSTALLATION DE LA CONDUITE D'EAU (suite) PIÈCES NÉCESSAIRES (suite) REMARQUE : Les seuls tuyaux en plastique autorisés par GE sont fournis avec la trousse GE SmartConnect™ Refrigerator Tubing. N'utilisez pas d'autres tuyaux d'alimentation d'eau en plastique, cette ligne - GE CYE22USHSS | Use and Care Manual - Page 86
Instructions d'installation INSTALLATION DE LA CONDUITE D'EAU (suite) 4 FIXATION DU ROBINET D' le robinet. Serrez bien l'écrou de compression. Pour le tuyau en matière plastique d'une trousse GE SmartConnect™ Refrigerator Tubing, insérez l'extrémité moulée du tuyau dans le robinet d'arrêt et serrez - GE CYE22USHSS | Use and Care Manual - Page 87
Conditions normaux de fonctionnement. GEAppliances.ca Les réfrigérateurs plus récents font des bruits différents de ceux des anciens. Les réfrigérateurs modernes proposent plus de fonctions et sont plus avancés sur le plan technologique. Entendez-vous ce que j'entends ? Ces conditions sont normaux - GE CYE22USHSS | Use and Care Manual - Page 88
de la porte Consultez les sections Fixation de la Poignée du Compartiment de Réfrigération et Fixation de la Poignée du Congélateur pour des instructions détaillées. Arrêtez-la ou désactivez-la avec la porte fermée. Si la porte est ouverte et l'alarme retentit, vous ne pouvez qu'arr - GE CYE22USHSS | Use and Care Manual - Page 89
l'aide d'un trombone. Rincez l'infuseur après chaque utilisation. L'infuseur est bloqué dans le support de porte. L'infuseur est en mode de distribution Annulez le mode de distribution d'eau chaude d'eau chaude plutôt qu'en mode d'infusion afin que le tube d'eau chaude se retire du alors que le - GE CYE22USHSS | Use and Care Manual - Page 90
dans ce ENTRETIEN manuel. Si nécessaire, une visite par un technicien de service peut être prévue en nous contactant en ligne sur GEAppliances.ca ou The water filter indicator will indicate the need to replace the water filter every six months or 170 gallons of water dispensed (select models only). - GE CYE22USHSS | Use and Care Manual - Page 91
par un technicien de service peut être pré refrigerator enough time to warm up, and the display should be okay. N'utilisez pas de cire, de javellisant ou de tout autre produit contenant du chlore sur les panneaux, les poignées de porte et les garnitures en acier inoxydable. Vérifiez ces instructions - GE CYE22USHSS | Use and Care Manual - Page 92
évoir une réparation, consultez notre site GEAppliances.com ou appelez le 800.GE.CARE5 (800.432.2737). Veuillez avoir votre numéro de série et votre numéro de modèle à portée de main lorsque vous appelez pour obtenir un service. Au Canada, appelez le 800.561.3344. Agrafez votre facture ici. Pour - GE CYE22USHSS | Use and Care Manual - Page 93
de garantie de la cartouche RPWFE du filtre à eau Communiquez avec nous sur www.geapplianceparts.com, ou appelez le 800.GE.CARES. Agrafez votre facture ici. Pour obtenir le service sous garantie, une preuve de la date d'achat initial est nécessaire. Pendant la période de garantie de : Trente jours - GE CYE22USHSS | Use and Care Manual - Page 94
installation sur des conduites d'eau chaude. La température température de service maximale de l'eau pour ce système de filtre est de 100 l'inondation. • Lisez et observez les instructions d'utilisation avant l'installation et l'utilisation de 53 in model GE RPWF and GE RPWFE for the reduction of the - GE CYE22USHSS | Use and Care Manual - Page 95
Notes GEAppliances.ca 47 - GE CYE22USHSS | Use and Care Manual - Page 96
de Service Mabe le plus proche ou appeler le 1.800.661.1616. Les instructions contenues GE, veuillez nous contacter par l'intermédiaire de notre site internet avec toutes vos coordonnées, y compris votre numéro de téléphone ou écrivez à l'adresse suivante : Directeur, Relations Clientèle, Mabe Canada - GE CYE22USHSS | Use and Care Manual - Page 97
48 Escriba los números de modelo y de serie aquí: Nº de Modelo Nº de Serie Busque estos números en una etiqueta del lado izquierdo, cerca de la parte intermedia del compartimiento del refrigerador. 1 - GE CYE22USHSS | Use and Care Manual - Page 98
INSTRUCCIONES ANTES DE USAR. SEGURIDAD Sitio Web de Electrodomésticos de GE Para más información sobre el funcionamiento de su refrigerador, visite con máquinas de hacer hielo automáticas, evite el contacto con las partes móviles del mecanismo eyector o con el elemento de calefacción que libera - GE CYE22USHSS | Use and Care Manual - Page 99
se conecta a un tomacorriente de pared estándar de 3 cables (conexión a tierra) para minimizar la posibilidad de riesgos de descargas eléctricas por parte del mismo. Contrate a un electricista calificado para que controle el tomacorriente y el circuito eléctrico, a fin de asegurar que el enchufe est - GE CYE22USHSS | Use and Care Manual - Page 100
éstico sólo para su propósito original, como se describe en el Manual del Propietario. A fin de reducir el riesgo de quemaduras severas, lesiones riesgo de que se dispense agua caliente de forma no intencional o por parte de niños pequeños. No manipule indebidamente ni modifique la perilla para - GE CYE22USHSS | Use and Care Manual - Page 101
como un estante normal de tamaño completo cuando lo necesite y se desliza fácilmente hacia adentro para guardar artículos altos en la parte inferior. Estantes a prueba de derrames Diseñados para capturar derrames y permitir una limpieza más fácil. Tapete Antideslizante Revestimiento que captura los - GE CYE22USHSS | Use and Care Manual - Page 102
de comidas frescas. 2. Baje la traba para abrir la puerta del recipiente. 3. . Uso del recipiente con sujeción manual hacia arriba y afuera para despejar los localizadores en la parte inferior del recipiente. 4. Para reemplazar la hielera, ajuste la misma a los soportes de la guía y empuje hasta - GE CYE22USHSS | Use and Care Manual - Page 103
Modes Water Settings Precise Fill Hot Water Water Crushed Cubed Refrigerator Lock Controls Hold 3 Seconds Reset Filter Hold 3 Seconds Cambio de la Temperatura parte interior de la puerta izquierda del refrigerador. Para cambiar la temperatura, presione y libere las teclas REFRIGERATOR - GE CYE22USHSS | Use and Care Manual - Page 104
CYE Lock Controls Light Temperature Express Modes Water Settings Precise Fill Hot Water Water Crushed Cubed NOTA: El refrigerador se : • Connected Home (Hogar Conectado) está listo • Diapositivas • Reset filter • Reinicie el filtro de agua • Máquina de hacer hielo encendida/ apagada - GE CYE22USHSS | Use and Care Manual - Page 105
Refrigerator Hold 3 Sec for °F/°C Recommended: 37 °F Actual Set F Energy Smart Recommended: 0°F Freezer Energy Smart Override Hold 3 Seconds Door Alarm Ice Maker Lock Controls Hold 3 Seconds Reset Filter (Máquina de Hielos) durante 5 segundos para ingresar/ salir de Sabbath Mode (Modo Sábatico). 9 - GE CYE22USHSS | Use and Care Manual - Page 106
la picadora. „ Una vez que el hielo picado es dispensado, es posible que parte del agua gotee del vertedor. „ A veces se formará una pequeña cantidad de finalmente se evaporará. Para Usar el Dispensador de Agua Interno (CWE Models Only) El dispensador de agua está ubicado en la pared izquierda - GE CYE22USHSS | Use and Care Manual - Page 107
the risk of property damage due to water leakage, you MUST use the filter bypass plug when a replacement filter cartridge is not available. The dispenser sitio Web en www.geapplianceparts.com, o llame a GE Parts and Accessories (Piezas y Accesorios de GE), 800.626.2002. Los clientes de Canadá deber - GE CYE22USHSS | Use and Care Manual - Page 108
y se podrá requerir un breve tiempo de recalentamiento. Para GE Cafe™ con Sistema de Elaboración con Cápsula Lock Controls Light Temperature Water Express Modes Settings Precise Fill Hot Water Water Crushed Cubed En los refrigeradores de GE Café equipados con el sistema de elaboración con - GE CYE22USHSS | Use and Care Manual - Page 109
de café. Asegúrese de usar SÓLO bebidas en polvo al usar la configuración de cacao. Lock Controls Light Temperature Express Modes Water Settings Precise Fill Hot Water Water Crushed Cubed Rieles de la cafeteria Cancel Coffee Coffee Cocoa Serving Size 6oz 8oz 10oz 4 Asegúrese de que la - GE CYE22USHSS | Use and Care Manual - Page 110
Comunicación del Electrodoméstico GE WiFi Connect (Conexión WiFi de GE) (Para clientes en Estados Unidos) Conexión Wifi de GE Permitida* Si su refrigerador cuenta con una etiqueta con información del Electrodoméstico Conectado ubicada en la parte interior como se muestra, su refrigerador puede ser - GE CYE22USHSS | Use and Care Manual - Page 111
del refrigerador son ajustables. Para retirar: Retire todos los artículos del estante. Incline el estante hacia arriba en la parte frontal. Levante el estante hacia arriba desde la parte trasera y retire el mismo. Para reemplazar: Al inclinar el estante hacia arriba, inserte el gancho superior en la - GE CYE22USHSS | Use and Care Manual - Page 112
Acerca de las opciones de almacenamiento de comidas frescas. Recipiente de Lácteos No Ajustable* Para retirar: Levante el recipiente de forma recta y luego empuje hacia afuera. Para reemplazar: Adhiera el recipiente en los soportes de puerta moldeados y empuje hacia abajo. El recipiente se - GE CYE22USHSS | Use and Care Manual - Page 113
Mantenga las frutas y verduras organizadas en compartimientos separados para un fácil acceso. El exceso de agua que se puede acumular en la parte inferior de los cajones o debajo de los mismos se deberá limpiar. Nota: Las temperaturas indican las temperaturas adecuadas para la comida y la - GE CYE22USHSS | Use and Care Manual - Page 114
el Cajón Ajustable de Embutidos/ Productos Cultivados Para retirar: Para reemplazar: Empuje el cajón fuera de su posición final. Levante la parte frontal del cajón hacia arriba y hacia afuera. Empuje los costados izquierdo y derecho hasta que estén completamente extendidos. Primero vuelva - GE CYE22USHSS | Use and Care Manual - Page 115
ástico tanto hacia la derecha como hacia la izquierda para liberar el perno de las bisagras del cubo. Retire la canasta del freezer levantando su parte trasera y moviendo la misma hacia atrás hasta que el frente se pueda rotar hacia arriba y afuera. Levante hacia afuera para retirar la misma. Para - GE CYE22USHSS | Use and Care Manual - Page 116
hacer hielo realice varios ciclos para producir una cantidad de hielo. ADVERTENCIA Para minimizar el riesgo de lesiones personales, evite el contacto con las partes móviles del mecanismo eyector o con el elemento de calefacción que libera los cubos. No coloque los dedos ni las manos en el mecanismo - GE CYE22USHSS | Use and Care Manual - Page 117
de forma segura en sus respectivos lugares a fin de evitar daños. Al usar un carro manual para mover el refrigerador, no deje que la parte frontal ni la parte trasera descansen contra el carro manual. Esto podría dañar el refrigerador. Lleve el mismo sólo sobre los costados del refrigerador. Aseg - GE CYE22USHSS | Use and Care Manual - Page 118
(LEDs) Hay una luz LED en el compartimiento de comidas frescas y en la parte inferior de las puertas de comidas frescas para iluminar el compartimiento del freezer.* Será de este ensamble, llame al Servicio Técnico de GE al 1.800.432.2737 en Estados Unidos o al 1.800.561.3344 en Canadá. 22 - GE CYE22USHSS | Use and Care Manual - Page 119
aplanada Cinta métrica Broca y Taladro Eléctrico o Manual de 1/8" Llave de Tuercas de ¼" Lápiz Nivel Pinzas agua fría. Un kit de suministro de agua de GE (que contenga tubería, válvula de cierre, uniones www.geappliances.ca) o en Parts and Accessories (Piezas y Accesorios), 800.626.2002 (en - GE CYE22USHSS | Use and Care Manual - Page 120
311ø4" 361ø4" Altura General a la Parte Superior de la Tapa de la Bisagra Altura hasta la Parte Superior del Gabinete Profundidad de la Caja sin Use un carro manual con almohadillas o correas móviles para transportar el refrigerador. Coloque el refrigerador en el carro manual, apoyando un costado - GE CYE22USHSS | Use and Care Manual - Page 121
adecuada circulación de aire y plomería y conexiones eléctricas. Costados Parte superior Parte trasera 1/8" (3 mm) Gabinete/ Tapa de la Bisagra de 1" ( . • NOTA: Use un carro manual para transportar el refrigerador. Coloque el refrigerador en el carro manual, apoyando un costado contra este ú - GE CYE22USHSS | Use and Care Manual - Page 122
. Coloque la línea de agua a través del conducto de la caja desde la parte superior para liberar la línea para el retiro de la puerta. La línea de Al retirar la puerta, a fin de evitar daños sobre la puerta y la parte electrónica, coloque con cuidado la puerta en una ubicación adecuada. Nota: El - GE CYE22USHSS | Use and Care Manual - Page 123
en contra de las agujas del reloj para la puerta derecha y a favor de las agujas del reloj para la puerta izqui- erda. Luego alinee la parte plana con la lengüeta/ marca. d) Instale la puerta a 90º. De forma segura encinte el cierre de la puerta con cinta de mascarar o pida a otra - GE CYE22USHSS | Use and Care Manual - Page 124
(cont.) 6 RETIRE LA PUERTA DEL FREEZER A Abra la puerta del freezer hasta su extensión completa. B Retire los 3 tornillos adheridos, ubicados en la parte inferior a cada lado de la puerta del freezer usando un destornillador con cabeza hueca hexagonal de 3/8". 7 REEMPLAZO DE LA PUERTA DEL FREEZER - GE CYE22USHSS | Use and Care Manual - Page 125
2 - Ajuste el tornillo del set en dirección de las agujas del reloj si el espacio en la parte superior es demasiado grande (vea la plantilla). Gire el tornillo del set usando una llave hexagonal de 3/32" 1 Paso 4 Tornillo del Set Paso 2 Paso 3 Consulte 239D4144P001 Pub Nº 31-45474-2 11-12 GE 29 - GE CYE22USHSS | Use and Care Manual - Page 126
Instrucciones de Instalación CÓMO INSTALAR EL REFRIGERADOR (cont.) 8 NIVELACIÓN DE LA PUERTA DEL FREEZER 9 NIVELACIÓN DE LA PUERTA DEL FREEZER (cont.) A LLevante la puerta del lado que requiera ajustes, gire la leva hacia la posición requerida. A Ubique la leva de ajuste de altura en la puerta - GE CYE22USHSS | Use and Care Manual - Page 127
instrucciones de instalación en su totalidad, a fin de instalar el soporte de piso antivolcaduras embalado con su refrigerador. Broca y Taladro Eléctrico o Manual de 1/8" (3 mm) Cinta métrica Lápiz Llave de tuercas de 5/16" (8 mm) UBICACIÓN DEL SOPORTE DE PISO AT-2 ANTI-VOLCADURAS NOTA: Si no - GE CYE22USHSS | Use and Care Manual - Page 128
Instrucciones de Instalación CÓMO INSTALAR EL REFRIGERADOR (cont.) SOPORTE DE PISO ANTI-VOLCADURAS (Modelos de PYE, CYE, GYE, PWE, CWE, and ZWE sólo ) AT-2 UBICACIÓN DEL SOPORTE DE PISO ANTI-VOLCADURAS (cont.) Figura 2 - Ubicaciones Aceptables para la Colocación de Tornillos Instalación - GE CYE22USHSS | Use and Care Manual - Page 129
de cobre, inserte el extremo de la tubería en la conexión del refrigerador, en la parte trasera del refrigerador, lo más lejos posible. Al sostener la tubería, ajuste la unión. Si usará tuberías de GE SmartConnectTM , inserte el extremo moldeado de la tubería en la conexión del refrigerador, en la - GE CYE22USHSS | Use and Care Manual - Page 130
Instrucciones de Instalación CÓMO INSTALAR EL REFRIGERADOR (cont.) 12 ABRA EL SUMINISTRO DE AGUA Abra el suministro de agua usando la válvula de cierre (suministro de agua hogareño) y controle que no haya pérdidas. 13 ENCHUFE EN EL REFRIGERADOR 15 NIVELACIÓN DE LAS PATAS DEL REFRIGERADOR Recuerde - GE CYE22USHSS | Use and Care Manual - Page 131
con la letra mostrada. Posicione los ganchos del recipiente sobre el ubicador del recipiente y empuje hacia adelante hasta que se inserte completamente. Parte trasera del gancho del recipiente a cada lado Empuje el recipiente hacia abajo hasta que se bloquee en su posición. Ubicador del recipiente - GE CYE22USHSS | Use and Care Manual - Page 132
LO QUE NECESITARÁ • Kit de Tubería para Refrigerador de Cobre o GE SmartConnectTM de ¼" de diámetro externo para conectar el refrigerador al suministro es necesaria: mida la distancia desde la válvula de agua en la parte trasera del refrigerador hasta la tubería del suministro de agua. Asegúrese - GE CYE22USHSS | Use and Care Manual - Page 133
aprobada es aquella provista con los Kits de Tuberías para Refrigerador de GE SmartConnectTM. No use ningún otro suministro de agua plástico, ya que disponible por un costo adicional a través de su vendedor minorista o de Parts and Accessories (Piezas y Accesorios), 800.626.2002 (En Canadá 1.800.661 - GE CYE22USHSS | Use and Care Manual - Page 134
en la válvula. Ajuste la tuerca de compresión de forma segura. Para usar una tubería de plástico del kit de Tuberías para Refrigerador GE SmartConnectTM, inserte el extremo moldeado de la tubería en la válvula de cierre y ajuste la tuerca de compresión hasta que quede ajustada manualmente, y luego - GE CYE22USHSS | Use and Care Manual - Page 135
Condiciones de funcionamiento normal. GEAppliances.com El sonido de los refrigeradores nuevos es diferente al de aquellos más antiguos. Los refrigeradores modernos cuentan con más funciones y utilizan una tecnología más nueva. ¿Escuchas lo que yo escucho? Estos condiciones son normales. HUMMM... - GE CYE22USHSS | Use and Care Manual - Page 136
sin LCD: -Mantenga presionado el botón de reinicio. Modelos con LCD: -En la pantalla de LCD seleccione SETTINGS (Configuraciones), y luego WATER FILTER (Filtro de Agua). Seleccione RESET (Reiniciar). Para acceder a instrucciones detalladas, consulte las secciones Cómo Ajustar la Manija de Comidas - GE CYE22USHSS | Use and Care Manual - Page 137
en el en pantalla o hay un goteo de agua soporte caliente en la parte superior de la cafetera. Asegúrese de que el Logo de Keurig esté en que revientan. cafetera Asegúrese de que el agujero de ventilación en la parte inferior de la cafetera esté despejado de la comida o de cualquier otro - GE CYE22USHSS | Use and Care Manual - Page 138
de problemas de forma detallada en el Manual del Propietario. En caso de ser Internet en GEAppliances.com o llamando al 800.ge.CARES 800.432.2737. Verdad o Mito water filter indicator will indicate the need to replace the water filter every six months or 170 gallons of water dispensed (select models - GE CYE22USHSS | Use and Care Manual - Page 139
Manual del Propietario. En caso de ser necesario, se podrá programar el servicio técnico visitándonos a través de Internet en GEAppliances.com o llamando al 800.ge de la derecha. El tornillo de ajuste está ubicado en la parte inferior de la puerta derecha o izquierda. Abra la puerta del freezer - GE CYE22USHSS | Use and Care Manual - Page 140
Días (Filtro de Agua, si está incluido) Desde la fecha de la compra original del refrigerador Cinco Años Desde la fecha de la compra original GE Reemplazará Cualquier parte del refrigerador que falle debido a un defecto en los materiales o la fabricación. Durante esta garantía limitada de un - GE CYE22USHSS | Use and Care Manual - Page 141
Garantía Limitada del Cartucho del Filtro de Agua RPWFE Appliance Service GE Appliances 800-GE-CARES Comuníquese con nosotros en www.geapplianceparts.com, o llame al 800.GE.CARES. Abroche su recibo aquí. Para acceder al servicio técnico de acuerdo con la garantía deberá contar con la prueba de - GE CYE22USHSS | Use and Care Manual - Page 142
0.05 mg/L N/A ≥50% Partícula Nominal Por lo menos 10,000 Clase I, , ≥0.5 to < 1.0 μm 7,633,333 pts/mL partículas/mL 99.0% 71,850 a información sobre la Garantía, consulte el Manual de Instalación. Nota: Observe que aunque la el modelo GE RPWF para la reducción de los reclamos especificados - GE CYE22USHSS | Use and Care Manual - Page 143
Notas. GEAppliances.com 47 - GE CYE22USHSS | Use and Care Manual - Page 144
su electrodoméstico? ¡Intente a través del Sitio Web de Electrodomésticos de GE las 24 horas del día, cualquier día del año! Para mayor conveniencia y un servicio más rápido, ahora puede descargar el Manual del Propietario, ordenar piezas o incluso programar el servicio técnico a través de Internet
-
 1
1 -
 2
2 -
 3
3 -
 4
4 -
 5
5 -
 6
6 -
 7
7 -
8
-
9
-
10
-
11
-
12
-
13
-
14
-
15
-
16
-
17
-
18
-
19
-
20
-
21
-
22
-
23
-
24
-
25
-
26
-
27
-
28
-
29
-
30
-
31
-
32
-
33
-
34
-
35
-
36
-
37
-
38
-
39
-
40
-
41
-
42
-
43
-
44
-
45
-
46
-
47
-
48
-
49
-
50
-
51
-
52
-
53
-
54
-
55
-
56
-
57
-
58
-
59
-
60
-
61
-
62
-
63
-
64
-
65
-
66
-
67
-
68
-
69
-
70
-
71
-
72
-
73
-
74
-
75
-
76
-
77
-
78
-
79
-
80
-
81
-
82
-
83
-
84
-
85
-
86
-
87
-
88
-
89
-
90
-
91
-
92
-
93
-
94
-
95
-
96
-
97
-
98
-
99
-
100
-
101
-
102
-
103
-
104
-
105
-
106
-
107
-
108
-
109
-
110
-
111
-
112
-
113
-
114
-
115
-
116
-
117
-
118
-
119
-
120
-
121
-
122
-
123
-
124
-
125
-
126
-
127
-
128
-
129
-
130
-
131
-
132
-
133
-
134
-
135
-
136
-
137
-
138
-
139
-
140
-
141
-
142
-
143
-
144
 |
 |
Refrigerators
Bottom Freezer
239D3389P011
Pub No.
49-60741
07-15 GE
Write the model and serial
numbers here:
Model #
____________________
Serial #
____________________
Find these numbers on a label
on the left side, near the middle
of the refrigerator compartment.
GE Caf
é™
models
Owner’s Manual and
Installation Instructions
Models that start with CFE are
Standard Depth Models (SD)
Models that start with CYE and CWE
are Counter Depth Models (CD)
Safety Instructions
............
2-4
Operating Instructions
Features
..........................
5, 6
Controls
..........................
7-9
Dispenser
..........................
10
Water Filter
........................
11
Hot Water
.........................
12
Single Serve Keurig K-Cup Brewer
....
13
Appliance Communication
..........
14
Fresh Food Storage Options
.....
15,16
Climate Zone & Temperature
Controlled Drawer
...............
17,18
Freezer
............................
19
Automatic Ice maker
...............
20
Care and Cleaning
................
21
Replacing the Lights
................
22
Installation Instructions
Preparing to Install the
Refrigerator
....................
23, 24
Installing the Refrigerator
.......
25–35
Installing the Anti-Tip Bracket . . . 31, 32
Installing the Water Line
........
36-38
Troubleshooting Tips
......
40-42
Normal Operating Conditions
.......
39
Service - Truth or Myth
.........
42, 43
Consumer Support
Warranty
..........................
44
RPWFE Water Filter Cartridge Limited
Warranty
........................
45
Performance Data Sheet
...........
46
Consumer Support
.................
48
Modèles GE Caf
é™
Manuel d’utilisation
et instructions
d’installation
Les numéros de modèle commençant par
CFE sont des modèles de profondeur normale
(PN).
Les numéros de modèle commençant par
CYE et CWE sont des modèles de profondeur
de comptoir (PC).
Réfrigérateurs
Modelos GE Café
TM
Manual del Propietario
e Instrucciones de
Instalación
Los modelos que comienzan con las letras
CFE son Modelos con Profundidad Estándar
(SD)
Los modelos que comienzan con las letras
CYE y CWE son Modelos con Profundidad de
Mesada (CD)
Refrigeradores