GE DPGT650EHMG Owners Manual
GE DPGT650EHMG - 27" Electric Dryer Manual
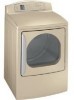 |
UPC - 084691170570
View all GE DPGT650EHMG manuals
Add to My Manuals
Save this manual to your list of manuals |
GE DPGT650EHMG manual content summary:
- GE DPGT650EHMG | Owners Manual - Page 1
Gas Dryer 17-20 Connecting an Electric Dryer 21-23 Exhausting the Dryer 24-28 Final Setup 29, 30 Reversing the Door Swing . . . . . .31, 32 Troubleshooting Tips 33 Consumer Support Consumer Support 36 Warranty (Canada 35 Warranty (U.S 34 Owner's Manual and Installation Instructions DPGT650 - GE DPGT650EHMG | Owners Manual - Page 2
primarily by the incomplete combustion of natural gas or LP fuels. Properly adjusted dryers will minimize incomplete combustion. Exposure to these substances can be minimized further by properly venting the dryer to the outdoors. Installation Instructions Consumer Support Troubleshooting Tips 2 - GE DPGT650EHMG | Owners Manual - Page 3
by calling 800.GE.CARES (800.432.2737). ■ Properly ground dryer to conform with all governing codes and ordinances. Follow details in Installation Instructions. ■ Install For complete details, follow the Installation Instructions. Installation Instructions Troubleshooting Tips Consumer Support 3 - GE DPGT650EHMG | Owners Manual - Page 4
around your washer or dryer during operation. ■ Do not place items exposed to cooking oils in your dryer. Items dryer uses. ■ To minimize the possibility of electric shock, unplug this appliance from the power supply or disconnect the dryer Instructions Consumer Support Troubleshooting Tips 4 - GE DPGT650EHMG | Owners Manual - Page 5
from service, remove the dryer door to prevent children from hiding inside. ■ Do not tamper with controls. ■ Do not attempt to repair or replace any part of this appliance or attempt any servicing unless specifically recommended in this Owner's Manual or in published user-repair instructions that - GE DPGT650EHMG | Owners Manual - Page 6
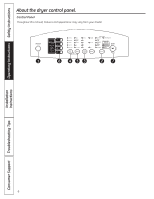
Operating Instructions Safety Instructions About the dryer control panel. Control Panel Throughout this manual, features and appearance may vary from your model. 1 6 453 27 Installation Instructions Consumer Support Troubleshooting Tips 6 - GE DPGT650EHMG | Owners Manual - Page 7
Instructions Operating Instructions Installation Instructions GEAppliances.com 1 Power Press to "wake up" the display. If the display is active, press to put the dryer fabrics. ULTRA DELICATES For delicate fabrics. Manual Dry Cycles SPEED DRY For small loads Troubleshooting Tips Consumer Support 7 - GE DPGT650EHMG | Owners Manual - Page 8
Operating Instructions Safety Instructions Installation Instructions About the dryer control panel (cont.). 5 TEMP You Press to start a dry cycle. If the dryer is running, press it once and it will pause the dryer. Press it again to restart the dryer cycle. 8 Consumer Support Troubleshooting Tips - GE DPGT650EHMG | Owners Manual - Page 9
Instructions Operating Instructions About cycle options. NOTE: Not all features are available on all dryer models. Wrinkle Care Tumbles the drum without heat for 10 seconds every 5 minutes for up to 3 hours. The dryer 10 minutes. Installation Instructions Troubleshooting Tips Consumer Support 9 - GE DPGT650EHMG | Owners Manual - Page 10
after you have started a cycle. Children cannot accidentally start the dryer by touching pads with this option selected. To lock the dryer, press and hold the DRY LEVEL and TEMP buttons at 3 seconds. See page 8 for more details. Installation Instructions Consumer Support Troubleshooting Tips 10 - GE DPGT650EHMG | Owners Manual - Page 11
the dryer drum. NOTE: • The drying rack should only be used with the TIME DRY cycle. It is also strongly recommended when drying sneakers. • Do not use this drying rack when there are other clothes in the dryer. GEAppliances.com Installation Instructions Troubleshooting Tips Consumer Support 11 - GE DPGT650EHMG | Owners Manual - Page 12
Operating Instructions Safety Instructions Loading and using the dryer. Always follow fabric manufacturer's care label when laundering. Sorting and Loading Hints As a general rule, if clothes are sorted properly for the washer, they are sorted properly for the dryer. Try also to sort items - GE DPGT650EHMG | Owners Manual - Page 13
stainless steel used to make the dryer drum provides the highest reliability available in a GE dryer. If the dryer drum should be scratched or dented during the dryer lint filter area if you notice a change in dryer performance. Installation Instructions Troubleshooting Tips Consumer Support 13 - GE DPGT650EHMG | Owners Manual - Page 14
-rigid or foil-type) duct is installed, it must be UL-listed and installed in accordance with the instructions found in "Connecting the Dryer to House Vent" on page 25 of this manual. Flexible ducting materials are known to collapse, be easily crushed and trap lint. These conditions will obstruct - GE DPGT650EHMG | Owners Manual - Page 15
Instructions UNPACKING YOUR DRYER Tilt the dryer sideways and remove the foam shipping pads by pulling at the sides and breaking them away from the dryer must be given to provide adequate clearance for proper operation and service. DRYER DIMENSIONS Front View 437⁄ 8″ (111.4 cm) Side View 27 - GE DPGT650EHMG | Owners Manual - Page 16
If the closet contains both a washer and a dryer, doors must contain a minimum of dryer MUST be vented to the outdoors. See EXHAUST INFORMATION. • The installation must conform with local codes or, in the absence of local codes, with the NATIONAL ELECTRICAL CODE, ANSI/NFPA NO. 70 (for electric dryers - GE DPGT650EHMG | Owners Manual - Page 17
Installation Instructions CONNECTING A GAS DRYER (skip for electric dryers) TOOLS AND MATERIALS YOU WILL NEED FOR CONNECTING THE GAS SUPPLY ❒ Flat- or straight-blade screwdriver (may be needed for cord strain relief) ❒ Flexible stainless - GE DPGT650EHMG | Owners Manual - Page 18
Instructions CONNECTING A GAS DRYER (cont.) GAS REQUIREMENTS WARNING • Installation must conform to local codes and ordinances or, in their absence, the NATIONAL FUEL GAS CODE, ANSI Z223. • This gas dryer kit WE25X10026, your local service organization can convert this dryer for use with propane ( - GE DPGT650EHMG | Owners Manual - Page 19
Installation Instructions CONNECTING THE DRYER TO THE GAS SUPPLY A Install a female 3/8″ NPT elbow at the end of the dryer gas inlet. Install a 3/8″ flare union adapter to the female elbow. IMPORTANT: Use a pipe wrench to securely hold on to the end of the dryer gas inlet to prevent twisting the - GE DPGT650EHMG | Owners Manual - Page 20
Installation Instructions CONNECTING A GAS DRYER (cont.) TEST FOR LEAKS WARNING - Never use leaks are found, close the valve, retighten the joint and repeat the soap test. ELECTRICAL REQUIREMENTS FOR GAS DRYERS This appliance must be supplied with 120V, 60Hz, and connected to a properly grounded - GE DPGT650EHMG | Owners Manual - Page 21
Installation Instructions CONNECTING AN ELECTRIC DRYER (skip for gas dryers) TOOLS AND MATERIALS YOU WILL NEED FOR CONNECTING THE ELECTRICAL SUPPLY ❒ Flat- or straight-blade screwdriver (may be needed for cord strain relief) ❒ #2 Phillips-head screwdriver (for terminal connections) FOR YOUR SAFETY - GE DPGT650EHMG | Owners Manual - Page 22
Installation Instructions CONNECTING AN ELECTRIC DRYER (cont.) ELECTRICAL REQUIREMENTS FOR ELECTRIC DRYERS This dryer must be connected minimum copper conductor power cord through the strain relief. GROUNDING INSTRUCTIONS This dryer must be connected to a grounded metal, permanent wiring system, - GE DPGT650EHMG | Owners Manual - Page 23
Installation Instructions CONNECTING DRYER POWER CORD (cont .) D For 3-wire Connection ONLY: Be sure the dryer's green ground wire is connected to green ground screw on cabinet rear. CONNECTING DRYER POWER CORD (cont .) E For 3-wire and 4-wire Connection: Connect the neutral (center line on 3-wire - GE DPGT650EHMG | Owners Manual - Page 24
flexible metal (semi-rigid or foil-type) duct to connect the dryer to the home exhaust duct. It must be installed in accordance with the instructions found in "Connecting the Dryer to House Vent" on page 25 of this manual. • Do not terminate exhaust in a chimney, a wall, a ceiling, gas vent, crawl - GE DPGT650EHMG | Owners Manual - Page 25
Installation Instructions CONNECTING THE DRYER TO HOUSE VENT RIGID METAL TRANSITION DUCT • For best drying maximum airflow. 4. Secure the duct to the exhaust pipe with the other clamp. FOR TRANSITION VENTING (DRYER TO WALL), DO: •DO cut duct as short as possible and install straight into wall. •DO - GE DPGT650EHMG | Owners Manual - Page 26
Installation Instructions EXHAUSTING THE DRYER (cont.) WARNING USE ONLY METAL 4″ DUCT. DO NOT USE DUCT LONGER THAN SPECIFIED IN THE EXHAUST LENGTH TABLE. Ducting longer than 90 equivalent feet will: • Increase the drying times and the energy cost. • Reduce the dryer life. • Accumulate lint, - GE DPGT650EHMG | Owners Manual - Page 27
Installation Instructions INSIDE WALLS/CEILING TRANSITION DUCTING DUCTING COMPONENT EQUIVALENCY CHART DUCT PIECES Rigid Metal Ducting (Preferred) EQUIVALENT RIGID LENGTH 1 Ft. (DRYER TO WALL) UL-Listed Semi-Rigid 3 Ft. Metal Ducting (inside diameter does not change) Elbows (90°/45°) 10 - GE DPGT650EHMG | Owners Manual - Page 28
Instructions EXHAUSTING THE DRYER your dryer before installing your washer. This dryer and secure with duct tape or a hose clamp. DRYER EXHAUST TO SIDE OR BOTTOM OF CABINET If you wish to exhaust your dryer to the side or bottom of the cabinet, order exhaust kit 14-A003, available from your GE - GE DPGT650EHMG | Owners Manual - Page 29
FINAL SETUP Installation Instructions 1 LEVEL THE DRYER Stand the dryer near the final location. Place a level against the side and bottom of the dryer door frame and use the four leveling legs to level your dryer. 2 PLUG IN DRYER Ensure proper ground exists before use. Raise Lower 29 - GE DPGT650EHMG | Owners Manual - Page 30
on. The dryer is now ready for use. SERVICING WARNING - Label all wires prior to disconnection when servicing controls. Wiring errors can cause improper and dangerous operation after servicing/installation. For replacement parts and other information, refer to the Owner's Manual for servicing phone - GE DPGT650EHMG | Owners Manual - Page 31
Installation Instructions REVERSING THE DOOR SWING (if desired) 1 REMOVE FILLER PLUGS Open of Door 2 REMOVE DOOR • With the door completely open, remove the BOTTOM screw from each hinge on the dryer face. • Insert the screws about halfway into the TOP holes, for each hinge, on the opposite side ( - GE DPGT650EHMG | Owners Manual - Page 32
Installation Instructions REVERSING THE DOOR SWING (cont.) 5 REVERSE HANDLE Install the handle on the opposite side of the door. 6 REMOVE HINGES AND REHANG DOOR (cont .) Insert the - GE DPGT650EHMG | Owners Manual - Page 33
Safety Instructions Operating Instructions Before you call for service... Troubleshooting Tips Save time and money! Review the chart below first and you may not need to call for service. GEAppliances.com Problem Dryer won't operate Possible Cause Control panel is asleep Dryer is unplugged - GE DPGT650EHMG | Owners Manual - Page 34
which vary from state to state. To know what your legal rights are, consult your local or state consumer affairs office or your state's Attorney General. Warrantor: General Electric Company. Louisville, KY 40225 Consumer Support Troubleshooting Tips 34 - GE DPGT650EHMG | Owners Manual - Page 35
Instructions Operating Instructions GE Dryer Warranty. (For customers in Canada) All warranty service provided by our Factory Service Centres or an authorized Customer Care® technician. To schedule service ., Burlington, Ontario Installation Instructions Troubleshooting Tips Consumer Support 35 - GE DPGT650EHMG | Owners Manual - Page 36
Consumer Support. GE Appliances Website In the U.S.: GEAppliances.com Have a question or need assistance with your appliance? Try the GE Appliances Website 24 hours a day, any day of the year! For greater convenience and faster service, you can now download Owner's Manuals, order parts or even - GE DPGT650EHMG | Owners Manual - Page 37
par Internet au site www.electromenagersge.ca 24 heures par jour, tous les jours de l'année. Service de réparations Service de réparations GE est tout près de vous. Pour faire réparer votre électroménager GE, il suffit de nous téléphoner. 1.800.561.3344 Studio de conception réaliste Sur demande - GE DPGT650EHMG | Owners Manual - Page 38
en raison d'un vice de matériaux ou de fabrication. Pendant cette garantie limitée de un an, GE prendra en charge également, gratuitement, tous les frais de main-d'œuvre et les frais connexes de service pour remplacer la pièce défectueuse. Toute pièce de la sécheuse qui tomberait en panne à cause - GE DPGT650EHMG | Owners Manual - Page 39
Notes. 34 Soutien au consommateur Conseils de dépannage Installation Fonctionnement Mesures de sécurité - GE DPGT650EHMG | Owners Manual - Page 40
du tambour • Si la sécheuse n'a pas été utilisée pendant une période prolongée, vous pouvez entendre le bruit sourd des souillures plates temporaires sur les rouleaux du support de tambour. Ce bruit disparaîtra après utilisation. Installation Conseils de dépannage Soutien au consommateur 33 - GE DPGT650EHMG | Owners Manual - Page 41
Instructions d'installation INVERSION DE L'OUVERTURE DE LA PORTE (suite) 5 INVERSEZ LA POIGNÉE Installez la poignée sur le côté opposé de la porte. 6 ENLEVEZ LES CHARNIÈRES ET - GE DPGT650EHMG | Owners Manual - Page 42
Instructions d'installation INVERSION DE L'OUVERTURE DE LA PORTE (optionnel) 1 ENLEVEZ LES BOUCHONS DE REMPLISSAGE Ouvrez la porte et enlevez les bouchons de remplissage à l'opposé des charniè - GE DPGT650EHMG | Owners Manual - Page 43
Instructions d'installation INSTALLATION FINALE (suite) 3 DÉMARRAGE DE LA SÉCHEUSE Appuyez sur la touche POWER (alimentation). REMARQUE : Si la sécheuse a été exposée ées et les autres informations, consultez le manuel d'utilisation pour connaître les numéros de téléphone du service après-vente. 30 - GE DPGT650EHMG | Owners Manual - Page 44
Instructions d'installation INSTALLATION FINALE 1 METTEZ DE NIVEAU LA SÉCHEUSE Placez la sécheuse à proximité de l'emplacement final. Posez un niveau contre le côté et le fond du châ - GE DPGT650EHMG | Owners Manual - Page 45
Instructions d'installation ÉVACUATION DE LA SÉCHEUSE (suite) AVANT DE COMMENCER • Enlevez ou fond du placard, commandez le kit d'évacuation 14-A003, disponible chez votre fournisseur GE. Conduit Attache REMARQUE : Nous vous recommandons fortement d'utiliser un conduit d'évacuation rigide et en - GE DPGT650EHMG | Owners Manual - Page 46
Instructions d'installation TABLEAU D'ÉQUIVALENCE DES CONDUITS PIÈCES DE CONDUIT LONGUEUR RIGIDE NOMBRE ÉQUIVALENTE X UTILISÉ = Conduit métallique 30,5 cm (1 Pi.) X ( ) = rigide (recommandé) LONGUEUR ÉQUIVALENTE m ( Pi.) CONDUIT - GE DPGT650EHMG | Owners Manual - Page 47
Instructions d'installation ÉVACUATION DE LA SÉCHEUSE (suite) AVERTISSEMENT UTILISEZ UNIQUEMENT DES CONDUITS MÉTALLIQUES DE 10,2 CM (4 PO). N'UTILISEZ DE CONDUIT PLUS LONG QUE SPÉCIFIÉ DANS - GE DPGT650EHMG | Owners Manual - Page 48
Instructions d'installation CONNEXION DE LA SECHEUSE AU CONDUIT D'EVACUATION DE LA -Unis, seulement les conduits métalliques flexibles (souples) qui sont conformes au "Outline for Clothes Dryer Transition Duct, Subject 2158A" doivent être utilisé. • N'installez jamais de conduit métallique flexible - GE DPGT650EHMG | Owners Manual - Page 49
Instructions d'installation ÉVACUATION DE LA SÉCHEUSE AVERTISSEMENT - Pour réduire le risque d'incendie et de blessure : • Cette sécheuse doit être évacuée vers l'extérieur. • N'utilisez qu'un - GE DPGT650EHMG | Owners Manual - Page 50
Instructions d'installation BRANCHEMENT DU CORDON D'ALIMENTATION DE LA SÉCHEUSE (suite) D Pour un raccordement à 3 fils UNIQUEMENT : Assurez-vous que le fil vert de terre est branché sur - GE DPGT650EHMG | Owners Manual - Page 51
. Faites passer le cordon d'alimentation à conducteur en cuivre #10 AWG minimum, 30 A, 240 V, 3 ou 4 fils, homologué UL, à travers le protecteur de cordon. INSTRUCTIONS DE MISE À LA TERRE La sécheuse doit être branchée à un réseau de fils en métal permanents et mis à la terre; ou un conducteur de - GE DPGT650EHMG | Owners Manual - Page 52
Instructions d'installation RACCORDEMENT D'UNE SÉCHEUSE ÉLECTRIQUE (non applicable aux sécheuses à gaz) OUTILS ET MATÉRIAUX NÉCESSAIRES POUR LE BRANCHEMENT DE L'ALIMENTATION ÉLECTRIQUE ❒ Tournevis plat ou droit ( - GE DPGT650EHMG | Owners Manual - Page 53
Instructions d'installation RACCORDEMENT D'UNE SÉCHEUSE À GAZ (suite) DÉTECTION DES FUITES AVERTISSEMENT - N'utilisez jamais une flamme vive pour vérifier la présence de fuites de gaz. Contrô - GE DPGT650EHMG | Owners Manual - Page 54
Instructions d'installation RACCORDEMENT DE LA SÉCHEUSE À L'ALIMENTATION EN GAZ A Installez un coude femelle 9,6 mm (3/8 po) NPT à l'extrémité du raccord d'entrée de gaz de la sécheuse. - GE DPGT650EHMG | Owners Manual - Page 55
Instructions d'installation RACCORDEMENT D'UNE SÉCHEUSE À GAZ (suite) EXIGENCES RELATIVES AU GAZ utiliser uniquement avec du gaz naturel. Grâce au kit de conversion WE25X10014, votre agence de service locale peut transformer cette sécheuse pour une utilisation avec du gaz propane (LP). TOUTES LES - GE DPGT650EHMG | Owners Manual - Page 56
Instructions d'installation RACCORDEMENT D'UNE SÉCHEUSE À GAZ (non applicable aux sécheuses électriques) OUTILS ET MATÉRIAUX NÉCESSAIRES POUR LE BRANCHEMENT DE L'ALIMENTATION EN GAZ ❒ Tournevis à tête plate ( - GE DPGT650EHMG | Owners Manual - Page 57
Instructions d'installation PLACEMENT DE VOTRE SÉCHEUSE (suite) EXIGENCES RELATIVES À UNE INSTALLATION ENCASTRÉE • Votre sécheuse est homologuée pour une installation encastrée, comme indiqué sur l'étiquette située à l'arriè - GE DPGT650EHMG | Owners Manual - Page 58
Instructions d'installation DÉBALLAGE DE VOTRE SÉCHEUSE Inclinez la sécheuse latéralement et enlevez les coussinets d'expédition en mousse en les poussant sur les côtés et en - GE DPGT650EHMG | Owners Manual - Page 59
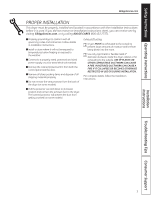
ces instructions à titre de référence. • L'installation de la sécheuse doit être effectuée par un technicien qualifié. • L'air de cette sécheuse doit être évacué vers l'extérieur. • Avant d'enlever ou de jeter une ancienne sécheuse, démontez la porte de la sécheuse. • Les informations de service - GE DPGT650EHMG | Owners Manual - Page 60
d'évacuation doit être nettoyé une fois par an par du personnel de service qualifié. Extérieur : Essuyez les produits de lessive renversés, et enlevez la tambour de séchage fournit la plus haute fiabilité disponible dans une sécheuse GE. Si le tambour de séchage est rayé ou ébréché pendant une - GE DPGT650EHMG | Owners Manual - Page 61
des taches d'assouplissant. Les feuilles d'assouplissant de tissus Bounce® pour sécheuses ont été approuvées pour toutes les sécheuses GE si elles sont utilisées conformément aux instructions du fabricant. Ne surchargez pas la sécheuse car c'est une perte d'énergie et cela peut provoquer des faux - GE DPGT650EHMG | Owners Manual - Page 62
Mesures de sécurité Fonctionnement Caractéristiques. Vis Remplacement de la lampe de tambour Avant de changer la lampe de tambour, assurez-vous de débrancher le cordon d'alimentation de la sécheuse ou de déconnecter la sécheuse du réseau domestique de distribution électrique en enlevant le - GE DPGT650EHMG | Owners Manual - Page 63
Fonctionnement Mesures de sécurité Options de cycle. REMARQUE : Certaines caractéristiques peuvent ne pas être offertes sur tous les modèles de sécheuses. Lock (verrouillage) Vous pouvez verrouiller les commandes pour en éviter la sélection. Ou vous pouvez verrouiller les commandes après le dé - GE DPGT650EHMG | Owners Manual - Page 64
Mesures de sécurité Fonctionnement Options de cycle. REMARQUE : Certaines caractéristiques peuvent ne pas être offertes sur tous les modèles de sécheuses. www.electromenagersge.ca Wrinkle Care (défroisser) Fait culbuter le tambour sans chauffage pendant 10 secondes tous les 5 minutes, jusqu'à 3 - GE DPGT650EHMG | Owners Manual - Page 65
Fonctionnement Mesures de sécurité Installation Le panneau de contrôle de votre sécheuse. 5 TEMP (TEMPÉRATURE) Vous pouvez modifier la température de votre cycle de séchage. HIGH (haute) Pour les cotons normaux à lourds. MEDIUM HIGH Pour les cotons normaux. (moyenne haute) MEDIUM (moyenne) Pour - GE DPGT650EHMG | Owners Manual - Page 66
Mesures de sécurité Fonctionnement Installation www.electromenagersge.ca 1 Power (alimentation) Un appui sur cette touche « réveille » l'écran. Si l'écran est actif, appuyez sur cette touche pour mettre la sécheuse en mode d'attente. REMARQUE : Un appui sur POWER (alimentation) ne débranche pas l' - GE DPGT650EHMG | Owners Manual - Page 67
Fonctionnement Mesures de sécurité Le panneau de contrôle de votre sécheuse. Panneau de contrôle Dans ce manuel, les caractéristiques et l'apparence peuvent varier selon votre modèle. 1 6 453 27 Installation Conseils de dépannage Soutien au consommateur 6 - GE DPGT650EHMG | Owners Manual - Page 68
Mesures de sécurité Fonctionnement www.electromenagersge.ca LORSQUE VOUS UTILISEZ LA SÉCHEUSE (suite) ■ Ne faites pas fonctionner l'appareil s'il est endommagé, défectueux, partiellement démonté ou si des pièces sont manquantes ou défectueuses, ou si le cordon d'alimentation ou la fiche sont - GE DPGT650EHMG | Owners Manual - Page 69
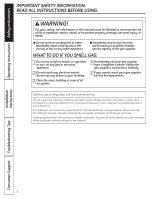
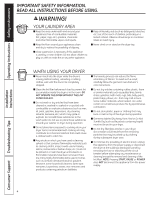
Fonctionnement Mesures de sécurité MESURES DE SÉCURITÉ IMPORTANTES. LISEZ D'ABORD TOUTES LES DIRECTIVES. AVERTISSEMENT! AUTOUR DE VOTRE SÉCHEUSE ■ Conservez la zone sous et autour de vos appareils libre de tous matériaux combustibles (charpies, papiers, chiffons, etc.), essence, produits - GE DPGT650EHMG | Owners Manual - Page 70
ADÉQUATE Avant d'utiliser votre sécheuse, assurez-vous qu'elle a été adéquatement installée, conformément aux Instructions d'installation. Si vous n'avez reçu les instructions d'installation, vous pouvez les commander sur www.electromenagersge.ca ou en appelant le 800.561.3344. ■ Mettez - GE DPGT650EHMG | Owners Manual - Page 71
Fonctionnement Mesures de sécurité MESURES DE SÉCURITÉ IMPORTANTES. LISEZ D'ABORD TOUTES LES DIRECTIVES. AVERTISSEMENT! Pour votre sécurité, suivez les directives fournies dans le présent manuel afin de minimiser les risques d'incendie, d'explosion et de chocs électriques et prévenir des dégâts - GE DPGT650EHMG | Owners Manual - Page 72
Raccordement d'une sécheuse électrique 21-23 Conseils de dépannage 33 Soutien au consommateur Garantie 35 Soutien au consommateur 36 Manuel de l'utilisateur & Instructions d'installation DPGT650 UPGT650 Imprimé à la Corée Inscrivez ici les numéros de modèle et de série : Modèle Série Ces
-
 1
1 -
 2
2 -
 3
3 -
 4
4 -
 5
5 -
 6
6 -
 7
7 -
8
-
9
-
10
-
11
-
12
-
13
-
14
-
15
-
16
-
17
-
18
-
19
-
20
-
21
-
22
-
23
-
24
-
25
-
26
-
27
-
28
-
29
-
30
-
31
-
32
-
33
-
34
-
35
-
36
-
37
-
38
-
39
-
40
-
41
-
42
-
43
-
44
-
45
-
46
-
47
-
48
-
49
-
50
-
51
-
52
-
53
-
54
-
55
-
56
-
57
-
58
-
59
-
60
-
61
-
62
-
63
-
64
-
65
-
66
-
67
-
68
-
69
-
70
-
71
-
72
 |
 |

Safety Instructions
. . . . . . . . . . . 2–5
Operating Instructions
Controls
. . . . . . . . . . . . . . . . . . . . . . . . . . .6–8
Cycle Options . . . . . . . . . . . . . . . . . . . .9–10
Dryer Features . . . . . . . . . . . . . . . . . . . . . .11
Loading and Using
the Dryer . . . . . . . . . . . . . . . . . . . . . . . .12, 13
Installation Instructions
Before You Begin
. . . . . . . . . . . . . . .14–16
Connecting a Gas Dryer . . . . . . . .17–20
Connecting an
Electric Dryer . . . . . . . . . . . . . . . . . . .21–23
Exhausting the Dryer . . . . . . . . . . .24–28
Final Setup . . . . . . . . . . . . . . . . . . . . . .29, 30
Reversing the Door Swing
. . . . . .31, 32
Troubleshooting Tips
. . . . . . . . . .33
Consumer Support
Consumer Support . . . . . . . . . . . . . . . . . 36
Warranty (Canada) . . . . . . . . . . . . . . . . . 35
Warranty (U.S.) . . . . . . . . . . . . . . . . . . . . . 34
GEAppliances.com
Dryers
175D1807P640
49-90378
04-09 JR
DPGT650
UPGT650
Profile
Write the model and serial
numbers here:
Model #
______________
Serial #________________
They are on the label on the front
of the dryer behind the door.
Owner’s Manual
and Installation
Instructions
Printed in Korea