GE DPSR610GG Owners Manual
GE DPSR610GG Manual
 |
View all GE DPSR610GG manuals
Add to My Manuals
Save this manual to your list of manuals |
GE DPSR610GG manual content summary:
- GE DPSR610GG | Owners Manual - Page 1
Profile Dryers ge.com Safety Instructions 2-4 Operating Instructions Control Panels 5, 7 Control Settings 6, 8 Dryer Features 9 Loading and Using the Dryer . . . .11 Reversing the Door 10 Venting the Dryer 12 Troubleshooting Tips . . . 13, 14 Consumer Support Consumer Support 16 Warranty 15 - GE DPSR610GG | Owners Manual - Page 2
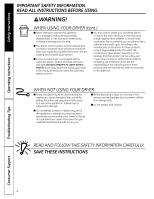
to the outdoors. Troubleshooting Tips Consumer Support PROPER INSTALLATION This dryer must be properly installed and located in accordance with the Installation Instructions before it is used. If you did not receive an Installation Instructions sheet, you can receive one by visiting ge.com or by - GE DPSR610GG | Owners Manual - Page 3
Instructions Operating Instructions ge top of the dryer during operation. I Garments labeled Dry Away from Heat or Do Not Tumble dryer uses. I To minimize the possibility of electric shock, unplug this appliance from the power supply or disconnect the dryer Troubleshooting Tips Consumer Support 3 - GE DPSR610GG | Owners Manual - Page 4
or attempt any servicing unless specifically recommended in this Owner's Manual or in published user-repair instructions that you understand and have the skills to carry out. READ AND FOLLOW THIS SAFETY INFORMATION CAREFULLY. SAVE THESE INSTRUCTIONS Troubleshooting Tips Consumer Support 4 - GE DPSR610GG | Owners Manual - Page 5
ge.com Step 4 • Clean lint filter • Add clothes • Select Dry Cycle • Shut door • Push START Quick Start Guide NOTE: When making a selection with any knob, simply point the knob anywhere within the shaded range for that setting. Model DPSE810 D Operating Instructions Troubleshooting -heat - GE DPSR610GG | Owners Manual - Page 6
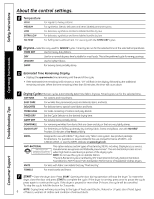
the timer will count down. Operating Instructions Troubleshooting Tips E Drying Cycles-Sensor cycles dryer is paused for more than 24 hours, the cycle will be cancelled. To stop the cycle, hold the button for 3 seconds. 6 NOTE: Drying times will vary according to the type of heat used (Electric - GE DPSR610GG | Owners Manual - Page 7
ge.com Step 4 • Clean lint filter • Add clothes • Select Dry Cycle • Shut door • Push START Quick Start Guide NOTE: When making a selection with any knob, simply point the knob anywhere within the shaded range for that setting. Model DPSR610 Operating Instructions Troubleshooting Support - GE DPSR610GG | Owners Manual - Page 8
dryer. To restart the dryer, close the door and press START to complete the cycle. NOTE: Drying times will vary according to the type of heat used (Electric, Natural or LP gas), size of load, types of fabrics, wetness of clothes and condition of exhaust ducts. Troubleshooting Tips Consumer Support - GE DPSR610GG | Owners Manual - Page 9
the dryer drum provides the highest reliability available in a GE dryer. If the dryer drum should be scratched or dented during normal use, the drum will not rust or corrode. These surface blemishes will not affect the function or durability of the drum. Troubleshooting Tips Consumer Support 9 - GE DPSR610GG | Owners Manual - Page 10
hinge at the bottom. Tighten the two top screws of each hinge. Reinsert the plastic plugs on the side from which the door was removed. Troubleshooting Tips Consumer Support 10 - GE DPSR610GG | Owners Manual - Page 11
Safety Instructions Operating Instructions About loading and using the dryer. Always follow the fabric manufacturer's care label when laundering. ge.com Sorting and Loading Hints As a general rule, if clothes are sorted properly for the washer, they are sorted properly for the dryer. Do not add - GE DPSR610GG | Owners Manual - Page 12
. Carefully follow the details on Exhausting in the Installation Instructions. I Use only rigid metal 4 ″ diameter ductwork inside the dryer cabinet. Use only rigid metal or flexible metal 4″ conform to local building codes. Correct Venting Incorrect Venting 12 Troubleshooting Tips Consumer Support - GE DPSR610GG | Owners Manual - Page 13
Safety Instructions Operating Instructions Before you call for service... Troubleshooting Tips Save time and money! Review the charts on the following pages, or visit ge.com. You may not need to call for service. ge.com Problem Dryer doesn't start Dryer doesn't heat Dryer shakes or makes noise - GE DPSR610GG | Owners Manual - Page 14
Safety Instructions Operating Instructions Before you call for service... Problem Clothes take dryer • Some items may be pressed back into shape after drying. • If you are concerned about shrinkage in a particular item, do not machine wash or tumble dry it. Troubleshooting Tips Consumer Support - GE DPSR610GG | Owners Manual - Page 15
Instructions Operating Instructions GE Dryer Warranty. All warranty support provided by our Factory Service Centers, or an authorized Customer Care® technician. To schedule service, on-line, 24 hours a day, visit us at ge.com or call 800.GE.CARES (800.432.2737). Please have serial number and model - GE DPSR610GG | Owners Manual - Page 16
Website 24 hours a day, any day of the year! For greater convenience and faster service, you can now download Owner's Manuals, order parts or even schedule service on-line. Schedule Service ge.com Expert GE repair service is only one step away from your door. Get on-line and schedule your - GE DPSR610GG | Owners Manual - Page 17
Secador Praofiles ge.com Instrucciones de seguridad 2-4 Instrucciones de operación Ajustes de para la solución de problemas 13, 14 Soporte al consumidor Garantía 15 Soporte al consumidor 16 Manual del propietario DPSE810 DPSR610 Escriba el número de modelo y de serie aquí: No. de modelo No - GE DPSR610GG | Owners Manual - Page 18
¡ADVERTENCIA! Por su seguridad, debe seguir las indicaciones de este manual para minimizar el riesgo de incendio o explosión, descarga eléctrica, una Hoja de instrucciones de instalación, puede obtener una visitando ge.com o llamando al 800.GE.CARES (800.432.2737). I Conecte la secadora a tierra - GE DPSR610GG | Owners Manual - Page 19
ge.com puedan quemar o derretir. I Las prendas de vestir etiquetadas "Dry away from heat" (Secar alejadas del calor) o "Do not tumble dry" (No secadora. Esto podría ocasionar irritación en la piel debido a las partículas restantes que se podrían adherir a la ropa durante usos subsecuentes de - GE DPSR610GG | Owners Manual - Page 20
lo pise, tropiece o lo pueda dañar. I No intente hacer reparaciones o reemplazar ninguna parte de éste electrodoméstico ni intente llevar a cabo ningún tipo de servicio a no ser que lo recomiende el Manual del propietario o instrucciones publicadas que usted entienda y tenga la habilidad de llevar - GE DPSR610GG | Owners Manual - Page 21
Seguridad Panel de control-para modelo DPSE810. Paso 1 Paso 2 Paso 3 ge.com Paso 4 • Limpie el filtro de pelusa • Agregue ropa • Seleccione el ciclo de secado Guía rápida • Cierre la puerta • Presione START NOTA: Al hacer una - GE DPSR610GG | Owners Manual - Page 22
Para telas delicadas, sintéticas y artículos etiquetados como tumble dry low (secado con giro lento). EXTRA LOW (EXTRA BAJA) Para telas delicadas, sintéticas y artículos etiquetados como tumble dry low (secado con giro lento). NO HEAT (SIN CALOR) Para esponjar artículos sin calor. Para utilizar - GE DPSR610GG | Owners Manual - Page 23
Seguridad Panel de control-para modelo DPSR610. Paso 1 Paso 2 Paso 3 ge.com Paso 4 • Limpie el filtro de pelusa • Agregue ropa • Seleccione el ciclo de secado Guía rápida • Cierre la puerta • Presione START NOTA: Al hacer una - GE DPSR610GG | Owners Manual - Page 24
esponjar artículos sin calor. Para utilizar únicamente con los ciclos TIMED DRY (SECADO CRONOMETRADO). LOW HEAT (CALOR BAJO) Para telas delicadas, sintéticas y artículos etiquetados como tumble dry low (secado con giro lento). C Wrinkle Care (Cuidado para minimizar arrugas) Use esta opción para - GE DPSR610GG | Owners Manual - Page 25
del tambor. Quite la bombilla y reemplace con una bombilla del mismo tamaño. ge.com La rejilla de secado (en algunos modelos) La rejilla de secado se el tambor giratorio de la secadora proporciona la alta confiabilidad en una secadora GE. Si el tambor giratorio de la secadora llegara a rayarse o a - GE DPSR610GG | Owners Manual - Page 26
4 Remueva los tornillos restantes del lado de la apertura del que la puerta se removió. Con estos tornillos, asegure las bisagras en la parte inferior. Apriete los dos tornillos superiores de cada bisagra. Reinserte los tapones en el lado de donde la puerta se removió. Solucionar problemas Soporte - GE DPSR610GG | Owners Manual - Page 27
ge.com Ideas para la clasificación y carga de la ropa Como regla general Low / Baja No heat/air / Sin calor/Con aire ETIQUETAS DE LA LEJÍA Símbolos de blanqueador Cualquier blanqueador Sólo blanqueador sin cloro (cuando se necesita) (cuando se necesita) No use blanqueador Special instructions - GE DPSR610GG | Owners Manual - Page 28
Seguridad Operación Ventilación de la secadora. Para obtener el mejor desempeño, la secadora debe estar ventilada adecuadamente. La secadora utilizará más energía y funcionará más tiempo si no se ventila siguiendo las especificaciones indicadas más abajo. Siga cuidadosamente los detalles en la - GE DPSR610GG | Owners Manual - Page 29
permanente y combinaciones pueden causar estática • Intente utilizar un suavizador de telas. • Bounce® Fabric Conditioner Dryer Sheets ha sido aprobado para ser usado con todas las Secadoras GE y cuando se usen de acuerdo con las instrucciones del fabricante. • Intente utilizar un suavizador de - GE DPSR610GG | Owners Manual - Page 30
Antes de llamar para solicitar servicio... Seguridad Operación Problema Secar las prendas toma demasiado tiempo Las prendas están arrugadas Las prendas se encogen Posible causa Qué hacer Clasificación incorrecta • Separe las prendas pesadas de las livianas (generalmente una carga de lavado - GE DPSR610GG | Owners Manual - Page 31
línea y las 24 horas, visite la página ge.com o llame al 800.GE.CARES (1.800.432.2737). Cuando llame para solicitar servicio y el panel de control principal electrónico, si alguna de estas partes llegaran a fallar debido a defectos General. Garante: General Electric Company. Louisville, KY 40225 15 - GE DPSR610GG | Owners Manual - Page 32
durante horas normales de oficina. GE Consumer Home Services estará aún ahí cuando su garantía termine. Piezas y accesorios ge.com Aquellos individuos con la en este manual cubren los procedimientos a seguir por cualquier usuario. Cualquier otra reparación debería, por regla general, referirse a
-
 1
1 -
 2
2 -
 3
3 -
 4
4 -
 5
5 -
 6
6 -
 7
7 -
8
-
9
-
10
-
11
-
12
-
13
-
14
-
15
-
16
-
17
-
18
-
19
-
20
-
21
-
22
-
23
-
24
-
25
-
26
-
27
-
28
-
29
-
30
-
31
-
32
 |
 |

ge.com
DPSE810
DPSR610
Owner’s Manual
Dryers
175D1807P558
49-90290-1
09-06 JR
Safety Instructions
. . . . . . . . 2–4
Operating Instructions
Control Panels
. . . . . . . . . . . . . . . .5, 7
Control Settings . . . . . . . . . . . . . . .6, 8
Dryer Features . . . . . . . . . . . . . . . . . .9
Loading and Using the Dryer
. . . .11
Reversing the Door . . . . . . . . . . . . .10
Venting the Dryer
. . . . . . . . . . . . . .12
Troubleshooting Tips
. . . 13, 14
Consumer Support
Consumer Support . . . . . . . . . . . . . 16
Warranty
. . . . . . . . . . . . . . . . . . . . . 15
Write the model and serial
number here:
Model #
__________________
Serial #
__________________
You can find them on a label
on the front of the dryer
behind the door.
Profile