GE DWXR463EG Owners Manual
GE DWXR463EG Manual
 |
View all GE DWXR463EG manuals
Add to My Manuals
Save this manual to your list of manuals |
GE DWXR463EG manual content summary:
- GE DWXR463EG | Owners Manual - Page 1
Instructions 2-4 Operating Instructions Control Panel 5, 6 Control Settings 7 Features 8 Loading and Using the Dryer 10-11 Reversing the Door 9 Venting the Dryer 11 Troubleshooting Tips . . . 12, 13 Consumer Support Consumer Support . . . . . Back Cover Warranty 15 Owner's Manual Write - GE DWXR463EG | Owners Manual - Page 2
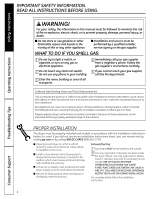
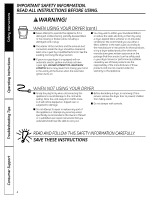
service agency or the gas supplier. WHAT TO DO IF YOU SMELL GAS: 1 Do not try to light a match, or cigarette, or turn on any gas or electrical appliance. 4 Immediately call your gas supplier from a neighbor's phone. Follow the gas supplier's instructions carefully. 2 Do not touch any electrical - GE DWXR463EG | Owners Manual - Page 3
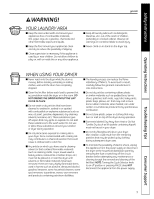
by clothing during subsequent dryer uses. I To minimize the possibility of electric shock, unplug this appliance from the power supply or disconnect the dryer at the household pressing PAUSE does NOT disconnect the appliance from the power supply. Troubleshooting Tips Consumer Support 3 - GE DWXR463EG | Owners Manual - Page 4
appliance or attempt any servicing unless specifically recommended in this Owner's Manual or in published user-repair instructions that you understand and have the skills to carry out. READ AND FOLLOW THIS SAFETY INFORMATION CAREFULLY. SAVE THESE INSTRUCTIONS Troubleshooting Tips Consumer Support - GE DWXR463EG | Owners Manual - Page 5
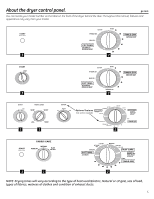
front of the dryer behind the door. Throughout this manual, features and appearance may vary from your model. MEDIUM HEAT AUTOMATIC REGULAR HEAT 3 2 3 3 1 2 Optional features (on some models) 2 3 1 2 NOTE: Drying times will vary according to the type of heat used (Electric, Natural or LP - GE DWXR463EG | Owners Manual - Page 6
the dryer behind the door. Throughout this manual, features and appearance may vary from your model. Optional features (on some models) 3 1 2 3 1 2 1 2 3 Optional features (on some models) 1 2 3 NOTE: Drying times will vary according to the type of heat used (Electric - GE DWXR463EG | Owners Manual - Page 7
Instructions Operating Instructions About the control settings. IMPORTANT: Clean the lint filter each time you use the dryer. ge. from items that are clean and dry or that are very lightly damp. QUICK FLUFF For freshening or fluffing up already dry clothing Troubleshooting Tips Consumer Support 7 - GE DWXR463EG | Owners Manual - Page 8
the light bulb, be sure to unplug the dryer power cord or disconnect the dryer at the household distribution panel by removing the fuse or switching off the circuit breaker. Reach above dryer opening from inside the drum. Remove the bulb and replace with the same size bulb. Troubleshooting Tips - GE DWXR463EG | Owners Manual - Page 9
Instructions About reversing the door. ge.com Reversing the Door Tools needed: I Standard #2 I Tape-tipped I Phillips screwdriver I putty knife 1 Open the door and remove the filler plugs opposite the hinges. With the door completely open, remove the bottom screw from each hinge on the dryer - GE DWXR463EG | Owners Manual - Page 10
Conditioner Dryer Sheets have been approved for use in all GE Dryers when used in accordance with the manufacturer's instructions. Do 1 Turn off electrical supply by disconnecting the plug from the wall socket. 2 Disconnect the duct from the dryer. 3 Vacuum Troubleshooting Tips Consumer Support 10 - GE DWXR463EG | Owners Manual - Page 11
Safety Instructions Operating Instructions ge.com Venting the Dryer For the best drying performance, the dryer needs to be properly vented. The dryer will use more energy and run longer conform to local building codes. Correct Venting Incorrect Venting 11 Troubleshooting Tips Consumer Support - GE DWXR463EG | Owners Manual - Page 12
Safety Instructions Operating Instructions Before you call for service... Troubleshooting Tips Save time and money! Review the charts on the following pages, or visit ge.com. You may not need to call for service. Problem Dryer doesn't start Dryer doesn't heat Dryer shakes or makes noise Greasy - GE DWXR463EG | Owners Manual - Page 13
Safety Instructions Operating Instructions ge.com Problem Clothes take too long to dry Clothes dryer • Some items may be pressed back into shape after drying. • If you are concerned about shrinkage in a particular item, do not machine wash or tumble dry it. Troubleshooting Tips Consumer Support - GE DWXR463EG | Owners Manual - Page 14
Notes. 14 Consumer Support Troubleshooting Tips Operating Instructions Safety Instructions - GE DWXR463EG | Owners Manual - Page 15
which vary from state to state. To know what your legal rights are, consult your local or state consumer affairs office or your state's Attorney General. Warrantor: General Electric Company. Louisville, KY 40225 Troubleshooting Tips Consumer Support 15 - GE DWXR463EG | Owners Manual - Page 16
Consumer Support. GE Appliances Website ge.com Have a question or need assistance with your appliance? Try the GE Appliances Website 24 hours a day, any day of the year! For greater convenience and faster service, you can now download Owner's Manuals, order parts or even schedule service on-line. - GE DWXR463EG | Owners Manual - Page 17
Secadoras ge.com Instrucciones de seguridad 2-4 Instrucciones de operación Ajustes de control 7 Cómo cambiar la 13 Soporte al consumidor Garantía 15 Soporte al consumidor . . . . . cubierta trasera Manual del propietario Escriba los números del modelo y de serie aquí: No. de modelo __________ - GE DWXR463EG | Owners Manual - Page 18
comunes ¡ADVERTENCIA! Por su seguridad, debe seguir las indicaciones de este manual para minimizar el riesgo de incendio o explosión, descarga eléctrica, o de Instrucciones de instalación, puede obtener una copia visitando ge.com o llamando al 800.GE.CARES (800.432.2737). I Conecte la secadora a - GE DWXR463EG | Owners Manual - Page 19
Instrucciones de seguridad Instrucciones de operación ge.com ¡ADVERTENCIA! SU ÁREA DE SECADO I Mantenga el á fibra de vidrio en su secadora. Esto podría ocasionar irritación en la piel debido a las partículas restantes que se podrían adherir a la ropa durante usos subsecuentes de la secadora. I - GE DWXR463EG | Owners Manual - Page 20
lo pise, tropiece o lo pueda dañar. I No intente hacer reparaciones o reemplazar ninguna parte de éste electrodoméstico ni intente llevar a cabo ningún tipo de servicio a no ser que lo recomiende el Manual del propietario o instrucciones publicadas que usted entienda y tenga la habilidad de llevar - GE DWXR463EG | Owners Manual - Page 21
Información sobre el tablero de control de la secadora. ge.com Puede ubicar su número de modelo en la etiqueta de la parte frontal de la secadora, detrás de la puerta. A lo largo de este manual, las funciones y la apariencia podrían ser diferentes a su modelo. MEDIUM HEAT AUTOMATIC REGULAR HEAT - GE DWXR463EG | Owners Manual - Page 22
Información sobre el tablero de control de la secadora. Puede ubicar su número de modelo en la etiqueta de la parte frontal de la secadora, detrás de la puerta. A lo largo de este manual, las funciones y la apariencia podrían ser diferentes a su modelo. Funciones opcionales (en algunos modelos) 3 - GE DWXR463EG | Owners Manual - Page 23
Instrucciones de seguridad Instrucciones de operación Información sobre los ajustes de control. ge.com IMPORTANTE: limpie el filtro de pelusa cada vez que utilice la secadora. 1 Cuidado de las telas/Temperatura (en algunos modelos) REGULAR Para telas de - GE DWXR463EG | Owners Manual - Page 24
de secadora durante el uso normal, acero inoxidable para proveer la más alta no se oxidará ni corroerá. Estas confiabilidad disponible en una secadora GE. imperfecciones de la superficie no afectarán 8 Aunque se abolle o raye el tambor de la el funcionamiento o durabilidad del tambor. - GE DWXR463EG | Owners Manual - Page 25
operación Acerca de cambiar el sentido de apertura de la puerta. ge.com Cómo cambiar el sentido de apertura de la puerta Herramientas la puerta se removió. Con estos tornillos, asegure las bisagras en la parte inferior. Apriete los dos tornillos superiores de cada bisagra. Reinserte los tapones - GE DWXR463EG | Owners Manual - Page 26
Ideas para la clasificación y carga de la ropa Como regla general, si la ropa es clasificada apropiadamente para la lavadora, estará acondicionadoras Bounce® se han aprobado para usarse con todas las secadoras GE de acuerdo con las instrucciones del fabricante. No sobrecargue. Esto desperdicia - GE DWXR463EG | Owners Manual - Page 27
Instrucciones de seguridad Instrucciones de operación ge.com Ventilación de la secadora Para obtener el mejor desempeño, la secadora necesita tener una ventilación adecuada. La secadora consumirá más energía y tendrá que funcionar durante - GE DWXR463EG | Owners Manual - Page 28
y dinero! Revise las tablas en las páginas siguientes o visítenos a ge.com. Tal vez no necesite llamar al servicio técnico. Solución a problemas Intente utilizar un suavizante de telas. • Bounce® Fabric Conditioner Dryer Sheets (Suavizante de telas en láminas para secadora de Bounce) ha sido aprobado - GE DWXR463EG | Owners Manual - Page 29
Instrucciones de seguridad Instrucciones de operación ge.com Solución a problemas comunes Problema Secar las prendas toma demasiado tiempo Las prendas están arrugadas Las prendas se encogen Causas probables Qué hacer Clasificación de - GE DWXR463EG | Owners Manual - Page 30
Notas. 14 Soporte al consumidor Solución a problemas comunes Instrucciones de operación Instrucciones de seguridad - GE DWXR463EG | Owners Manual - Page 31
estén dañados, o que funcionen según el Manual del propietario. I Cambio de los fusibles de que no dispone de servicio por parte de un proveedor de servicio autorizado de GE, podría tener que hacerse cargo oficina del Attorney General en su localidad. Garante: General Electric Company. Louisville, - GE DWXR463EG | Owners Manual - Page 32
normales de oficina. GE Consumer Home Services estará aún ahí cuando su garantía termine. Piezas y accesorios ge.com Aquellos individuos con o escríbanos a: General Manager, Customer Relations GE Appliances, Appliance Park Louisville, KY 40225 Registre su electrodoméstico ge.com ¡Registre su
-
 1
1 -
 2
2 -
 3
3 -
 4
4 -
 5
5 -
 6
6 -
 7
7 -
8
-
9
-
10
-
11
-
12
-
13
-
14
-
15
-
16
-
17
-
18
-
19
-
20
-
21
-
22
-
23
-
24
-
25
-
26
-
27
-
28
-
29
-
30
-
31
-
32
 |
 |
Owner’s Manual
Dryers
175D1807P596
49-90328
04-07 JR
Safety Instructions
. . . . . . . . 2–4
Operating Instructions
Control Panel . . . . . . . . . . . . . . . . . 5, 6
Control Settings . . . . . . . . . . . . . . . . . 7
Features
. . . . . . . . . . . . . . . . . . . . . . . 8
Loading and Using
the Dryer . . . . . . . . . . . . . . . . . . .10–11
Reversing the Door . . . . . . . . . . . . . . 9
Venting the Dryer
. . . . . . . . . . . . . .11
Troubleshooting Tips
. . . 12, 13
Consumer Support
Consumer Support . . . . . Back Cover
Warranty
. . . . . . . . . . . . . . . . . . . . . 15
ge.com
Write the model and serial
numbers here:
Model #
________________
Serial #
________________
You can find them on a label
on the front of the dryer behind the
door.