GE GMR04AAMWW Use and Care Manual
GE GMR04AAMWW Manual
 |
View all GE GMR04AAMWW manuals
Add to My Manuals
Save this manual to your list of manuals |
GE GMR04AAMWW manual content summary:
- GE GMR04AAMWW | Use and Care Manual - Page 1
Refrigerators ge.com Safety Information 2, 3 Operating Instructions Care and Cleaning 6-8 Control Settings 4 Refrigerator Features 5 Replacing the Light Bulb . . . . .6 Installation Instructions . . .9-11 Troubleshooting Tips . . . .12, 13 Consumer Support Consumer Support . .Back Cover - GE GMR04AAMWW | Use and Care Manual - Page 2
Troubleshooting Tips Installation Instructions Operating Instructions Safety Instructions IMPORTANT SAFETY INFORMATION. READ ALL INSTRUCTIONS BEFORE USING. WARNING! Use this appliance only for its intended purpose as described in this Owner's Manual. SAFETY PRECAUTIONS When using electrical - GE GMR04AAMWW | Use and Care Manual - Page 3
Instructions Operating Instructions Installation Instructions Troubleshooting Tips Consumer Support ge grounding type appliance extension cord having a grounding type plug and outlet and that the electrical rating of at either end. When moving the refrigerator away from the wall, be careful not - GE GMR04AAMWW | Use and Care Manual - Page 4
Consumer Support Troubleshooting Tips Installation Instructions Operating Instructions Safety Instructions About the control on the refrigerator. The control will look like one of the above. Control Settings The temperature control maintains the temperature in the refrigerator. Setting the control - GE GMR04AAMWW | Use and Care Manual - Page 5
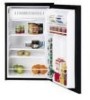
Safety Instructions Operating Instructions Installation Instructions Troubleshooting Tips Consumer Support About the refrigerator features. ge.com Shelves To remove a shelf, lift up the back slightly and pull forward. Some models have multi-position shelves that can be moved to different levels. - GE GMR04AAMWW | Use and Care Manual - Page 6
Consumer Support Troubleshooting Tips Installation Instructions Operating Instructions Safety Instructions Care and cleaning of the refrigerator. Cleaning the Outside Keep the outside clean. Wipe with a clean cloth lightly dampened with kitchen appliance wax or mild liquid dish detergent. Dry and - GE GMR04AAMWW | Use and Care Manual - Page 7
defrost cycle by manually removing ice, NEVER use a sharp or metallic instrument to chip away the ice as it may damage the cooling coils. (A punctured cooling coil will cause serious problems and void the warranty.) Do no use any electrical device in defrosting your refrigerator. After defrosting - GE GMR04AAMWW | Use and Care Manual - Page 8
Consumer Support Troubleshooting Tips Installation Instructions Operating Instructions Safety Instructions Care and cleaning of the refrigerator. Defrosting (on manual defrost models only) Defrost whenever frost on the wall of the ice tray compartment becomes 1/4″ thick. Never use a sharp or - GE GMR04AAMWW | Use and Care Manual - Page 9
Safety Instructions Operating Instructions Installation Instructions Troubleshooting Tips Consumer Support Preparing to install the refrigerator. ge.com Read these instructions completely and carefully. Refrigerator Location I Do not install the refrigerator where the temperature will go below - GE GMR04AAMWW | Use and Care Manual - Page 10
Consumer Support Troubleshooting Tips Installation Instructions Operating Instructions Safety Instructions Preparing to install the refrigerator. Hinge cover Plug buttons or screws Plug button Hinge Spacer Bottom hinge Leveling legs Door Reversal (on some models) 1. Remove the small plug - GE GMR04AAMWW | Use and Care Manual - Page 11
ge.com Upper hinge Top plate Door top cap Bottom hinge Leveling legs Door Reversal (on some models) 4 Cubic Foot Models the door is aligned with the refrigerator cabinet before continuing. 13. Replace Instructions Operating Instructions Installation Instructions Troubleshooting Tips Consumer Support - GE GMR04AAMWW | Use and Care Manual - Page 12
Consumer Support Troubleshooting Tips Installation Instructions Operating Instructions Safety Instructions Before you call for service... Troubleshooting Tips Save time and money! Review the chart below first and you may not need to call for service. Problem Refrigerator does not operate Vibration - GE GMR04AAMWW | Use and Care Manual - Page 13
Instructions Installation Instructions Troubleshooting Tips Consumer Support Troubleshooting Tips ge.com Problem Refrigerator too warm Refrigerator has odor Moisture forms on outside of refrigerator Moisture collects inside (in humid weather, air carries moisture into refrigerator Foot Models). - GE GMR04AAMWW | Use and Care Manual - Page 14
Consumer Support Troubleshooting Tips Installation Instructions Operating Instructions Safety Instructions Notes. 14 - GE GMR04AAMWW | Use and Care Manual - Page 15
Instructions Troubleshooting Tips Consumer Support Refrigerator Warranty. (For customers in the United States) All warranty service provided by our Factory Service Centers, or an authorized Customer Care® technician. To schedule service, on-line, 24 hours a day, visit us at ge.com, or call 800.GE - GE GMR04AAMWW | Use and Care Manual - Page 16
Support. GE Appliances Website ge.com Have a question or need assistance with your appliance? Try the GE Appliances Website 24 hours a day, any day of the year! For greater convenience and faster service, you can now download Owner's Manuals, order parts, catalogs, or even schedule service
-
 1
1 -
 2
2 -
 3
3 -
 4
4 -
 5
5 -
 6
6 -
 7
7 -
8
-
9
-
10
-
11
-
12
-
13
-
14
-
15
-
16
 |
 |

162D9639P009
49-60439
11-05 JR
ge.com
Write the model and serial numbers here:
Model #
__________________________
Serial #
__________________________
Find these numbers on a label inside
the refrigerator on the side wall.
Refrigerators
2 Cubic Foot Models
3 Cubic Foot Models
4 Cubic Foot Models
6 Cubic Foot Models
Owner’s Manual
& Installation
Instructions
Safety Information
. . . . . . . .2, 3
Operating Instructions
Care and Cleaning . . . . . . . .6–8
Control Settings . . . . . . . . . . . .4
Refrigerator Features . . . . . . . .5
Replacing the Light Bulb . . . . .6
Installation Instructions
. . .9–11
Troubleshooting Tips
. . . .12, 13
Consumer Support
Consumer Support . .Back Cover
Warranty . . . . . . . . . . . . . . . . .15
ATTENTION:
Defrosting—Do not use sharp, pointed
objects to remove frost or ice from
surfaces of the freezer compartment.
Doing so could puncture the cooling
coil, causing the unit to lose its ability
to maintain cold temperatures and
voiding the warranty. See the
Care and
Cleaning
section for instructions on
defrosting the freezer compartment.