GE GSCS3PGXSS Use and Care Manual
GE GSCS3PGXSS - 22.7 cu. Ft. Refrigerator Manual
 |
UPC - 084691174967
View all GE GSCS3PGXSS manuals
Add to My Manuals
Save this manual to your list of manuals |
GE GSCS3PGXSS manual content summary:
- GE GSCS3PGXSS | Use and Care Manual - Page 1
4 TurboCool 4 Water Filter 5 Installation Instructions Installing the Refrigerator 20-23 Moving the Refrigerator 16-19 Preparing to Install the Refrigerator 15 Water Line Installation 24-26 Troubleshooting Tips 27-30 Normal Operating Sounds 27 Consumer Support Consumer Support Back Cover - GE GSCS3PGXSS | Use and Care Manual - Page 2
servicing be performed by a qualified individual. I Do not refreeze frozen foods which have thawed completely. NOTE: Turning the refrigerator off via the controls on the touch panel does not shut off electrical power to the refrigerator. Installation Instructions Consumer Support Troubleshooting - GE GSCS3PGXSS | Use and Care Manual - Page 3
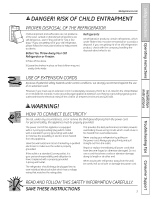
refrigeration product, check with the company handling the disposal about what to do. Installation Instructions Troubleshooting Tips Consumer Support prong (grounding) wall outlet to minimize the possibility of electric shock hazard from this appliance. Have the wall outlet and circuit checked by a - GE GSCS3PGXSS | Use and Care Manual - Page 4
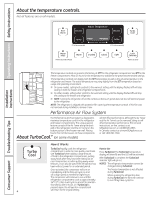
About the temperature controls. Not all features are on all models. Installation Instructions Consumer Support Troubleshooting Tips The temperature controls are preset in the factory at 37°F for the refrigerator compartment and 0°F for the freezer compartment. Allow 24 hours for the temperature - GE GSCS3PGXSS | Use and Care Manual - Page 5
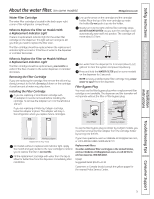
additional filter cartridges in the United States, visit our Website at GEAppliances.com, or call GE Parts and Accessories, 800.626.2002. MSWF Suggested Retail $36.95-41.95 Customers in Canada should consult the yellow pages for the nearest Mabe Service Center. Troubleshooting Tips Consumer Support - GE GSCS3PGXSS | Use and Care Manual - Page 6
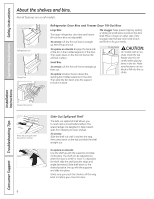
your needs. Do not block CAUTION: On models with an ice chute inside the top freezer door bin, be careful when placing items in the bin. Make sure that items do not block or fall into the ice chute. Installation Instructions Consumer Support Troubleshooting Tips Freezer tilt-out bin Press tab and - GE GSCS3PGXSS | Use and Care Manual - Page 7
the way back in before you close the door. Installation Instructions Troubleshooting Tips Consumer Support Slide-Out Freezer Shelves To remove, slide out to the than the lowest point on the bin. Door Wine/Beverage Rack (on some models) This rack holds up to 5 cans or one bottle of wine. The - GE GSCS3PGXSS | Use and Care Manual - Page 8
close the refrigerator door and check the alignment at the top of the doors. To remove the base grille, open the doors, remove the screw at each end of the base grille and then pull the grille straight out. 7/16″ Socket Wrench Raise Installation Instructions Consumer Support Troubleshooting Tips - GE GSCS3PGXSS | Use and Care Manual - Page 9
water that may accumulate in the bottom of the drawers should be wiped dry. On some models, the bottom drawer has full extension slides that allow full access to the drawer. GEAppliances.com Installation Instructions Troubleshooting Tips Consumer Support , the refrigerator will need to be - GE GSCS3PGXSS | Use and Care Manual - Page 10
dispenser models. If the refrigerator is operated before the water Models with a shelf above the ice bin Shelf Ice Bin To access ice, pull the bin forward. Shelf Ice Bin To reach the power switch, pull the shelf straight out. Always be sure to replace the shelf. Consumer Support Troubleshooting - GE GSCS3PGXSS | Use and Care Manual - Page 11
Instructions Operating Instructions Installation Instructions About the ice and water dispenser. (on some models) GEAppliances.com Spill Shelf To Use the Dispenser Select CUBED ICE , CRUSHED ICE or WATER to, but not touching, the dispenser opening. Troubleshooting Tips Consumer Support 11 - GE GSCS3PGXSS | Use and Care Manual - Page 12
Instructions Consumer Support Troubleshooting Tips Lift and pull forward again to remove the bin. Drive Mechanism Care and cleaning of the refrigerator. Dispenser drip area. Cleaning the Outside The dispenser drip area (on some models), beneath the grille, should be wiped dry. Water - GE GSCS3PGXSS | Use and Care Manual - Page 13
, do not rest the front or back of the refrigerator against the hand truck. This could damage the refrigerator. Handle only from the sides of the refrigerator. Be sure the refrigerator stays in an upright position during moving. Installation Instructions Troubleshooting Tips Consumer Support 13 - GE GSCS3PGXSS | Use and Care Manual - Page 14
pull it out. After replacing the bulb with an appliance bulb of the same or lower wattage, replace the shield. Plug the refrigerator back in. Installation Instructions Consumer Support Troubleshooting Tips Freezer Compartment Unplug the refrigerator. Remove the shelf just above the light shield - GE GSCS3PGXSS | Use and Care Manual - Page 15
the Consumer. • Note to Consumer - Keep these instructions for future reference. • Skill level - Installation of this appliance requires basic mechanical skills. • Completion time - Refrigerator Installation 30 minutes Water Line Installation 30 minutes • Proper installation is the responsibility - GE GSCS3PGXSS | Use and Care Manual - Page 16
NOT remove the handles. If all entrances are more than 38″ wide, skip to Installing the Refrigerator. 3 DISCONNECT THE WATER COUPLING (on some models) If the refrigerator has a water dispenser, there is a water line from the cabinet into the bottom hinge on the freezer door that must be disconnected - GE GSCS3PGXSS | Use and Care Manual - Page 17
Installation Instructions 4 DISCONNECT THE POWER COUPLING (on some models) If the refrigerator has a water dispenser, there is a power REFRIGERATOR DOORS Bottom freezer hinge 5 DISCONNECT THE ELECTRICAL CONNECTORS (on some models) If the refrigerator has a refreshment center, there are electrical - GE GSCS3PGXSS | Use and Care Manual - Page 18
Instructions MOVING THE REFRIGERATOR (CONT.) 7 REMOVE THE FREEZER DOOR (cont.) D As one person slowly lifts the freezer door up and off the bottom hinge, the second person should carefully guide the water line and power line (harness) through the bottom hinge. 8 REMOVE THE REFRIGERATOR - GE GSCS3PGXSS | Use and Care Manual - Page 19
Installation Instructions 8 REMOVE THE REFRIGERATOR DOOR (cont .) D Lift the refrigerator door up and off the bottom hinge. If the refrigerator has a refreshment center, one person should slowly lift the door up and off the bottom hinge and the second person should carefully guide the electrical - GE GSCS3PGXSS | Use and Care Manual - Page 20
Installation Instructions INSTALLING THE REFRIGERATOR REFRIGERATOR LOCATION • Do not install the refrigerator where the temperature will go below 60°F (16°C) because it will not run often enough to maintain proper temperatures. • Do not install the refrigerator where the temperature will go above - GE GSCS3PGXSS | Use and Care Manual - Page 21
Installation Instructions 1 CONNECTING THE REFRIGERATOR TO THE HOUSE WATER LINE (icemaker and dispenser models) A cold water supply is required for automatic icemaker and dispenser operation. If there is not a cold water supply, you will need to provide one. See "Installing the Water Line" section. - GE GSCS3PGXSS | Use and Care Manual - Page 22
Installation Instructions INSTALLING THE REFRIGERATOR (CONT.) 4 PUT THE REFRIGERATOR IN PLACE Move the refrigerator to its final location. 5 LEVEL THE REFRIGERATOR The refrigerator can be leveled by adjusting the rollers located near the bottom hinges. 6 LEVEL THE DOORS Adjust the refrigerator - GE GSCS3PGXSS | Use and Care Manual - Page 23
Installation Instructions 7 REPLACE THE BASE GRILLE Replace the grille by installing the two Phillips head screws. 9 8 SET THE CONTROLS Set the controls to the recommended setting. Power switch NOTE: In lower water pressure conditions, the water valve may turn on up to 3 times to deliver enough - GE GSCS3PGXSS | Use and Care Manual - Page 24
Installation Instructions INSTALLING THE WATER LINE (ICEMAKER & DISPENSER MODELS) BEFORE YOU BEGIN Recommended copper water supply kits are WX8X2, WX8X3 or WX8X4, depending on the amount of tubing you need. Approved plastic water supply lines are GE SmartConnect™ Refrigerator Tubing (WX08X10002, - GE GSCS3PGXSS | Use and Care Manual - Page 25
is that supplied in GE SmartConnect™ Refrigerator Tubing kits. Do not use any other plastic water supply line because the line is under pressure at all times. Certain types of plastic will crack or rupture with age and cause water damage to your home. • A GE water supply kit (containing tubing - GE GSCS3PGXSS | Use and Care Manual - Page 26
Instructions INSTALLING THE WATER LINE (CONT.) 4 FASTEN THE SHUTOFF VALVE Fasten the shutoff valve to the cold water pipe with the pipe clamp. Pipe Clamp Saddle-Type Shutoff Valve Vertical Cold Water securely. For plastic tubing from a GE SmartConnect™ Refrigerator Tubing kit, insert the molded - GE GSCS3PGXSS | Use and Care Manual - Page 27
activate to control refrigerator components. I Expansion and contraction of cooling coils during and after defrost can cause a cracking or popping sound. I On models with an icemaker, and About the ice and water dispenser sections. Installation Instructions Troubleshooting Tips Consumer Support 27 - GE GSCS3PGXSS | Use and Care Manual - Page 28
Operating Instructions Safety Instructions Before you call for service... Troubleshooting Tips Save time and money! Review the charts on the following pages first and you may not need to call for service. Installation Instructions Problem Refrigerator does not operate Vibration or rattling ( - GE GSCS3PGXSS | Use and Care Manual - Page 29
(about dispenser (on some models) one and a half gallons). Water is not dispensed Water in reservoir is • Call for service. (on some models) but frozen. icemaker is working Refrigerator control setting • Set to a warmer setting. is too cold. 29 Troubleshooting Tips Consumer Support - GE GSCS3PGXSS | Use and Care Manual - Page 30
call for service... Troubleshooting Tips Installation Instructions Problem Possible Causes What To Do No water or ice cube production Supply line or shutoff valve is clogged. • Call a plumber. Water filter clogged. Dispenser is LOCKED. • Replace filter cartridge or remove filter and install - GE GSCS3PGXSS | Use and Care Manual - Page 31
instructions, parts and service availability, and standard warranty are included with the product when shipped. This drinking water system must be maintained according to manufacturer's instructions, including replacement of filter Manufactured for: General Electric Company, Louisville, KY 40225 31 - GE GSCS3PGXSS | Use and Care Manual - Page 32
Notes. 32 Consumer Support Troubleshooting Tips Installation Instructions Operating Instructions Safety Instructions - GE GSCS3PGXSS | Use and Care Manual - Page 33
Please place in envelope and mail to: Veuillez mettre dans une enveloppe et envoyez à : OWNERSHIP REGISTRATION P.O. BOX 1780 MISSISSAUGA, ONTARIO L4Y 4G1 (FOR CANADIAN CONSUMERS ONLY) 33 - GE GSCS3PGXSS | Use and Care Manual - Page 34
34 - GE GSCS3PGXSS | Use and Care Manual - Page 35
35 - GE GSCS3PGXSS | Use and Care Manual - Page 36
refrigerator is warranted to be free of defects in material and workmanship. What is covered How Long Warranted (From Date of Sale) Parts Repair or Replace at Mabe's Option Labour Compressor GE Profile: Ten (10) Years GE Profile: Ten (10) Years GE Profile: Five (5) Years GE and All Other GE - GE GSCS3PGXSS | Use and Care Manual - Page 37
of the refrigerator Any part of the water filter cartridge which fails due to a defect in materials or workmanship. During this limited thirty-day warranty, GE will also provide, free of charge, a replacement water filter cartridge. GE PROFILE MODELS ONLY: Five Years (GE Profile models only) From - GE GSCS3PGXSS | Use and Care Manual - Page 38
Fonctionnement Mesures de sécurité Installation Mesures de sécurit 39, 40 Fonctionnement Clayettes et bacs 43, 44 Entretien et nettoyage du réfrigérateur 49, 50 Le distributeur d'eau et de glaçons . . . . . .48, 49 Le filtre à eau 42 Les commandes 41 Les portes du réfrigérateur 45 Les - GE GSCS3PGXSS | Use and Care Manual - Page 39
Conseils de dépannage DANGER! RISQUES POUR LES ENFANTS COMMENT VOUS DÉBARRASSER CONVENABLEMENT DE VOTRE ANCIEN RÉFRIGÉRATEUR Les enfants pris au piège ou morts d'asphyxie sont toujours d'actualité. Les réfrigérateurs abandonnés sont toujours aussi dangereux, même si on n'attend que «quelques jours - GE GSCS3PGXSS | Use and Care Manual - Page 40
Fonctionnement Mesures de sécurité MESURES DE SÉCURITÉ IMPORTANTES. LISEZ D'ABORD TOUTES LES DIRECTIVES. AVERTISSEMENT! RACCORDEMENT ÉLECTRIQUE Ne coupez ni retirez en aucun cas la troisième broche (mise à la terre) de la fiche du cordon d'alimentation. Pour votre sécurité, cet appareil doit ê - GE GSCS3PGXSS | Use and Care Manual - Page 41
une telle opération affectera le rendement en ce qui concerne la température. (Pour recevoir les instructions de démontage de ces éléments en ligne 24 heures par jour, veuillez contacter GE sur le site Web www.electromenagersge.ca ou appelez le 1.800.561.3344.) Fonctionnement La commande TurboCool - GE GSCS3PGXSS | Use and Care Manual - Page 42
support de cartouche. Placez le haut de la nouvelle cartouche à l'intérieur du support bredouillement. Pressez et maintenez appuyée la touche WATER FILTER (filtre à eau) sur le distributeur pendant adresse GEAppliances.com, ou appelez le Service des pièces et accessoires GE au 800.626.2002. MSWF Prix - GE GSCS3PGXSS | Use and Care Manual - Page 43
de la porte. Puis faites glisser le bac vers le bas dans les supports pour le fixer en place. L'ergot aide à empêcher que de petits extérieur. Remise en place ou relocalisation : Alignez la clayette avec les supports et faites glisser en place. La clayette peut être repositionnée lorsque - GE GSCS3PGXSS | Use and Care Manual - Page 44
Pour retirer, faites-la glisser jusqu'à la position d'arrêt, soulevez l'avant au delà de la position d'arrêt et faites-la glisser en dehors du support. Prenez soin de pousser les clayettes jusqu'au fond pour refermer la porte. Clayettes de congélateur fixes Pour retirer, levez-la par le - GE GSCS3PGXSS | Use and Care Manual - Page 45
Mesures de sécurité Fonctionnement Les portes du réfrigérateur. www.electromenagersge.ca Lorsque la porte est partiellement ouverte, elle se ferme automatiquement. Au delà de cette position d'arrêt la porte restera ouverte. Portes du réfrigérateur Les portes de votre réfrigérateur ne sont pas - GE GSCS3PGXSS | Use and Care Manual - Page 46
au contenant. Réglez la temperature à la position froid pour ramener le contenant à une temperature Le réglage de temperature variable normale de refrigeration et l'utiliser comme contrôle la circulation d'air en provenance espace supplémentaire pour les legumes. de la canalisation d'air du - GE GSCS3PGXSS | Use and Care Manual - Page 47
Mesures de sécurité Fonctionnement Machine à glaçons automatique. www.electromenagersge.ca Il faut prévoir entre 12 et 24 heures avant qu'un réfrigérateur nouvellement installé commence à produire des glaçons. Interrupteur d'alimentation Machine à glaçons Voyant témoin in Bras régulateur vert d' - GE GSCS3PGXSS | Use and Care Manual - Page 48
de glaçons. (sur certains modèles) Pour utiliser le distributeur Bac de trop-plein Sélectionnez CUBED ICE (glaçons), CRUSHED ICE (glace concassée) ou WATER (eau). Appuyez doucement le verre contre le haut du bras de distribution. La clayette de trop-plein n'est pas munie d'un système d'écoulement - GE GSCS3PGXSS | Use and Care Manual - Page 49
liquide doux pour la vaisselle. Séchez et polissez avec un linge doux et propre. N'essuyez pas le réfrigérateur avec un linge à vaisselle sale ou une serviette humide : ils pourraient laisser un résidu qui pourra endommager la peinture. N'utilisez pas de tampons à récurer, de produits nettoyants en - GE GSCS3PGXSS | Use and Care Manual - Page 50
place en le poussant, veillez à ne pas le faire rouler sur le cordon d'alimentation ou sur la conduite d'eau de la machine à glaçons. Départ en vacances Lorsque vous vous absentez pendant une période prolongée, videz et débranchez le réfrigérateur. Nettoyez l'intérieur avec une solution d'eau et de - GE GSCS3PGXSS | Use and Care Manual - Page 51
Mesures de sécurité Fonctionnement Remplacement des ampoules. www.electromenagersge.ca REMARQUE : La mise en arrêt du réfrigérateur à l'aide des commandes de l'écran tactile n'entraîne pas sa mise hors tension. Votre pare-lumière rassemblera une des suivantes : Taquets OU Poche Compartiment ré - GE GSCS3PGXSS | Use and Care Manual - Page 52
d'eau froide. Vous pouvez acheter une trousse d'alimentation d'eau GE (contenant la tuyauterie, le robinet d'arrêt, les joints et les instructions) chez votre revendeur ou en vous adressant à notre site Web à l'adresse www.electromenagersge.ca ou à notre service de Pièces et accessoires au numéro de - GE GSCS3PGXSS | Use and Care Manual - Page 53
Instructions d'installation DÉMÉNAGEMENT DU RÉFRIGÉRATEUR 1 CHARGEMENT DU RÉFRIGÉRATEUR réfrigération est doté d'un rafraîchisseur d'eau, alors il faut débrancher la conduite d'eau qui part de la carrosserie et s'insère dans la charnière inférieure de la porte du compartiment congélation. - GE GSCS3PGXSS | Use and Care Manual - Page 54
Instructions d'installation DÉMÉNAGEMENT DU RÉFRIGÉRATEUR (SUITE) 4 DÉBRANCHEZ LE RACCORD D'ALIMENTATION ÉLECTRIQUE (sur certains modèles) Si le compartiment réfrigération est doté d'un rafraîchisseur d'eau, alors il faut débrancher la conduite électrique (faisceau) qui part de la carrosserie et - GE GSCS3PGXSS | Use and Care Manual - Page 55
Instructions d'installation 7 ENLEVEZ LA PORTE DU COMPARTIMENT CONGÉLATION (suite) D Pendant qu'une personne soulève lentement la porte du compartiment congélation pour la dégager - GE GSCS3PGXSS | Use and Care Manual - Page 56
Instructions d'installation DÉMÉNAGEMENT DU RÉFRIGÉRATEUR (SUITE) 8 ENLEVEZ LA PORTE DU COMPARTIMENT RÉFRIGÉ porte pour la dégager de la charnière inférieure, pendant qu'une deuxième personne guide minutieusement les conduites électriques (faisceaux) à travers la charnière inférieure. 9 REMISE EN - GE GSCS3PGXSS | Use and Care Manual - Page 57
Instructions d'installation INSTALLATION DU RÉFRIGÉRATEUR EMPLACEMENT DU RÉFRIGÉRATEUR • N'installez jamais votre réfrigérateur dans un emplacement où la température ambiante sera inférieure à 16° C ( - GE GSCS3PGXSS | Use and Care Manual - Page 58
Instructions d'installation INSTALLATION DU RÉFRIGÉRATEUR (SUITE) 1 BRANCHEMENT DU RÉFRIGÉRATEUR le sur la conduite d'eau près du réfrigérateur. Si vous utilisez une trousse GE SmartConnect™ Refrigerator Tubing, vous aurez besoin d'un tuyau additionnel (WX08X10002) pour brancher le filtre. Ne - GE GSCS3PGXSS | Use and Care Manual - Page 59
Instructions d'installation 4 PLACEZ LE RÉFRIGÉRATEUR DANS SON EMPLACEMENT Transportez le réfrigérateur jusqu'à sa destination. 5 METTEZ LE RÉFRIGÉRATEUR DE NIVEAU La mise à niveau du ré - GE GSCS3PGXSS | Use and Care Manual - Page 60
Instructions d'installation INSTALLATION DU RÉFRIGÉRATEUR (SUITE) 7 REPLACEZ LA GRILLE DE BASE Replacez la grille de base en installant les deux vis à tête cruciforme (Phillips). 9 METTEZ - GE GSCS3PGXSS | Use and Care Manual - Page 61
glaçons. Suivez soigneusement ces instructions pour minimiser le risque de dommages en cuivre ou trousse GE SmartConnect™ Refrigerator Tubing, diamètre GE (contenant un tuyau en cuivre, un robinet d'arrêt et les joints énumérés ci-dessous) chez votre distributeur local ou en le commandant au service - GE GSCS3PGXSS | Use and Care Manual - Page 62
Instructions d'installation INSTALLATION DE LA CONDUITE D'EAU (SUITE) CE DONT VOUS AUREZ BESOIN arrêt et au robinet d'eau du réfrigérateur. OU • Si vous utilisez une trousse GE SmartConnect™ Refrigerator Tubing, les garnitures nécessaires sont déjà montées au tuyau. Installez le robinet d'arrêt - GE GSCS3PGXSS | Use and Care Manual - Page 63
Instructions d'installation 4 FIXEZ LE ROBINET D'ARRÊT Fixez le robinet d'arrêt à la conduite le robinet. Serrez fort l'écrou de compression. Pour le tuyau en matière plastique d'une trousse GE SmartConnect™ Refrigerator Tubing, insérez l'extrémité moulée du tuyau dans le robinet d'arrêt et serrez - GE GSCS3PGXSS | Use and Care Manual - Page 64
Fonctionnement Mesures de sécurité Installation Bruits normaux de fonctionnement. Les réfrigérateurs plus récents font des bruits différents de ceux des anciens. Les réfrigérateurs modernes présentent plus de fonctions et sont plus avancés sur le plan technologique. Entendez-vous ce que j'entends - GE GSCS3PGXSS | Use and Care Manual - Page 65
Mesures de sécurité Fonctionnement Avant d'appeler un réparateur... Conseils de dépannage - Économisez du temps et de l'argent! Consultez d'abord les tableaux qui suivent et vous pourrez peut-être éviter de faire appel à un réparateur. www.electromenagersge.ca Installation Problème Le réfrigé - GE GSCS3PGXSS | Use and Care Manual - Page 66
Fonctionnement Mesures de sécurité Avant d'appeler un réparateur... Installation Problème Causes possibles Correctifs La machine à glaçons ne fonctionne pas L'interrupteur d'alimentation de la • Réglez l'interrupteur d'alimentation à la position machine à glaçons est à la position O (arr - GE GSCS3PGXSS | Use and Care Manual - Page 67
Mesures de sécurité Fonctionnement www.electromenagersge.ca Problème Causes possibles Correctifs La machine à glaçons fonctionne, mais ne distribue pas d'eau L'eau du réservoir est gelée. Le réglage de commande est trop froid. • Appelez un réparateur. • Réglez le commande de température sur - GE GSCS3PGXSS | Use and Care Manual - Page 68
Fonctionnement Mesures de sécurité Avant d'appeler un réparateur... Problème Lueur orange dans le congélateur Le réfrigérateur ne s'arrête jamais mais les températures sont normales Le réfrigérateur émet un signal sonore La température présente n'est pas égale à celle affichée Causes possibles Le - GE GSCS3PGXSS | Use and Care Manual - Page 69
Notes. 69 Mesures de sécurité Fonctionnement Installation Conseils de dépannage Soutien au consommateur - GE GSCS3PGXSS | Use and Care Manual - Page 70
GE Profile : Cinq (5) ans GE et toutes autre marques : Un (1) an Un (1) an Un (1) an Un (1) an TERMES ET CONDITIONS : La présente garantie ne s'applique qu'à l'utilisation domestique par une seule famille au Canada, lorsque le réfrigérateur a été installé conformément aux instructions service - GE GSCS3PGXSS | Use and Care Manual - Page 71
trop lent. Avis spéciaux Les directives d'installation, la disponibilité de pièces et de service ainsi que la garantie standard sont expédiées avec le produit. Ce système d'eau é, Réducation de spores, Réduction de asbestos NSF® Fabriquée pour : General Electric Company, Louisville, KY 40225 71 - GE GSCS3PGXSS | Use and Care Manual - Page 72
par Internet au site www.electromenagersge.ca 24 heures par jour, tous les jours de l'année. Service de réparations Service de réparations GE est tout près de vous. Pour faire réparer votre électroménager GE, il suffit de nous téléphoner. 1.800.561.3344 Studio de conception réaliste Sur demande - GE GSCS3PGXSS | Use and Care Manual - Page 73
de modelo y de serie: No. de modelo No. de serie Usted los verá en una etiqueta en el interior del compartimiento de refrigerador en la parte superior en el lado derecho. 73 Solucionar problemas Servicio al consumidor - GE GSCS3PGXSS | Use and Care Manual - Page 74
aparato sólo para los fines que se describen en este Manual del propietario. PRECAUCIONES DE SEGURIDAD Cuando use electrodomésticos, , evite el contacto con las partes móviles del mecanismo de expulsión, o con el elemento calefactor localizado en la parte inferior del dispositivo para hacer hielo - GE GSCS3PGXSS | Use and Care Manual - Page 75
Seguridad Operación GEAppliances.com ¡ADVERTENCIA! COMO CONECTAR LA ELECTRICIDAD Bajo ninguna circunstancia debe cortar o quitar la tercera punta (tierra) de la clavija. Para su seguridad personal, este aparato deberá conectarse debidamente a tierra. El cable eléctrico de este aparato está - GE GSCS3PGXSS | Use and Care Manual - Page 76
con nosotros visitándonos a GEAppliances.com llamándonos al 800.GE.CARES.) Acerca de TurboCool™(en algunos modelos). Cómo funciona TurboCool El compresor continuará funcionando hasta que el compartimiento del refrigerador se refrigere a aproximadamente 34º F (1º C), luego hará el ciclo de - GE GSCS3PGXSS | Use and Care Manual - Page 77
el sistema y para prevenir salpicaduras. Presione la tecla WATER FILTER en el dispensador y manténgala presionada durante tres GE.CARES (1.800.432.2737). Filtros de recambio: Para pedir cartuchos adicionales en los Estados Unidos, visite nuestro sitio Web, GEAppliances.com, o llame a GE para partes - GE GSCS3PGXSS | Use and Care Manual - Page 78
Los recipientes de la puerta del refrigerador y los recipientes inclinables de puerta de congelador más grandes son ajustables. Para extraerlos: Levante la parte frontal del recipiente hacia arriba, luego levántelo y sáquelo. La tapa deslizante ayuda a prevenir que un golpecito haga derramarse algo - GE GSCS3PGXSS | Use and Care Manual - Page 79
Seguridad GEAppliances.com No todos los modelos tienen todas las características. Entrepaño QuickSpace™ (en algunos modelos) Este entrepaño se divide en dos y la mitad se desliza debajo de sí mismo para guardar artículos muy altos ubicados en el entrepaño que se encuentra más abajo. Este entrepa - GE GSCS3PGXSS | Use and Care Manual - Page 80
Seguridad Operación Puertas del refrigerador. La puerta se cerrará automáticamente sólo cuando está parcialmente abierta. Más allá de la posición de tope de parada, la puerta permanecerá abierta. Puertas del refrigerador Es posible que Ud. note una diferencia entre el manejo de las puertas de su - GE GSCS3PGXSS | Use and Care Manual - Page 81
Seguridad Gavetas y cacerolas. No todos los modelos tienen todas las características. Gavetas para las frutas y los vegetales El exceso de agua que pueda acumularse en el fondo de las gavetas deben ser secadas. En algunos modelos, la gaveta inferior tiene deslizadores de extensión total que - GE GSCS3PGXSS | Use and Care Manual - Page 82
Seguridad El dispositivo automático para hacer hielo. Un refrigerador recién instalado puede tardar hasta 12 a 24 horas antes de empezar a hacer hielo. Interruptor de alimentación Luz de alimentación verde Dispositivo para hacer hielo Brazo detector Dispositivo automático para hacer hielo El - GE GSCS3PGXSS | Use and Care Manual - Page 83
Seleccione CUBED ICE (cubos de hielo), CRUSHED ICE (hielo triturado) o WATER (agua). Presione el vaso suavemente contra el brazo del dispensador. El recogedor Esto es normal y, por regla general, sucede cuando ha dispensado hielo picado repetidamente. La nieve se evaporará por sí misma. - GE GSCS3PGXSS | Use and Care Manual - Page 84
los entrepaños de vidrio con cuidado. Chocar vidrio templado puede hacer que se rompe en pedazos. 84 Esta solución limpia y neutraliza olores. No lave partes plásticas del refrigerador Enjuague y seque. en el lavaplatos. Servicio al consumidor Solucionar problemas - GE GSCS3PGXSS | Use and Care Manual - Page 85
pegándolos con cinta adhesiva en su lugar para evitar daños. Al usar una carretilla para mover el refrigerador, no haga descansar la parte frontal o trasera del refrigerador contra la carretilla. Esto podría dañar el refrigerador. Manéjelo sólo desde los laterales del refrigerador. Asegúrese de - GE GSCS3PGXSS | Use and Care Manual - Page 86
ño justo por encima de la cubierta de luz. (El entrepaño será más fácil de quitar si se vacía primero.) Remueva los tornillos de la parte superior del protector superior. Para quitar la cubierta, presione en los lados y levántela hacia arriba y afuera. Reemplace la bombilla con una bombilla de - GE GSCS3PGXSS | Use and Care Manual - Page 87
á conectada a una línea de agua fría. Un kit de suministro de GE (que contiene una tubería, una válvula de cierre, accesorios e instrucciones) , o visitando nuestro sitio a GEAppliances.com o en nuestro Departamento de Partes y Accesorios, llamando al 800.626.2002. HERRAMIENTAS QUE USTED NECESITARÁ - GE GSCS3PGXSS | Use and Care Manual - Page 88
Instrucciones para la instalación CÓMO MOVER EL REFRIGERADOR 1 CÓMO CARGAR EL REFRIGERADOR EN UNA CARRETILLA DE MANO Deje toda la cinta adhesiva y las almohadillas hasta que el refrigerador llegue a su destino final. Para mover el refrigerador use una carretilla de mano con almohadillas. Coloque - GE GSCS3PGXSS | Use and Care Manual - Page 89
Instrucciones para la instalación 4 DESCONECTE EL ACOPLAMIENTO ENERGÉTICO (en algunos modelos) Si el refrigerador tiene un dispensador de agua, entonces hay una línea de suministro eléctrico (alambrado) que va desde el gabinete hacia la bisagra del fondo de la puerta que debe ser desconectado. Para - GE GSCS3PGXSS | Use and Care Manual - Page 90
. Cabeza hexagonal de 5/16" C Abra la puerta del refrigerador a 90.° 90° E Coloque la puerta en una superficie donde no se ralle con la parte interna hacia arriba. 90° 8 REMUEVA LA PUERTA DEL REFRIGERADOR A Remueva la cubierta de la bisagra de la puerta del refrigerador apretándola y levantándola - GE GSCS3PGXSS | Use and Care Manual - Page 91
ximo indicado por la marca. 90° Modelos con Centro para Refrescar solamente E Coloque la puerta en una superficie donde no se ralle con la parte interna hacia arriba. Marca • No pellizque la tubería o el alambrado mientras se encuentre remplazando las puertas en las bisagras del fondo. • Cuando se - GE GSCS3PGXSS | Use and Care Manual - Page 92
Instrucciones para la instalación CÓMO INSTALAR EL REFRIGERADOR LOCALIZACIÓN DEL REFRIGERADOR • No coloque el refrigerador donde la temperatura esté por debajo de 60° F (16° C) porque no operará con la suficiente frecuencia como para mantener las temperaturas apropiadas. • No instale el refrigerador - GE GSCS3PGXSS | Use and Care Manual - Page 93
agua, recomendamos que instale uno si su suministro de agua tiene arena o partículas que pudieran obstruir la pantalla de la válvula de agua del refrigerador tuberías de GE SmartConnect™, inserte el extremo moldeado de la tubería en la conexión del refrigerador en la parte posterior del refrigerador - GE GSCS3PGXSS | Use and Care Manual - Page 94
localizados cerca de las bisagras inferiores. 6 CÓMO NIVELAR LAS PUERTAS Ajuste la puerta del refrigerador para que las puertas estén niveladas en la parte superior. Para alinear: A Usando una llave de 7/16″, gire el tornillo ajustable de la puerta hacia la derecha para levantar la puerta, y a la - GE GSCS3PGXSS | Use and Care Manual - Page 95
Instrucciones para la instalación 7 REEMPLACE LA PARRILLA DE LA BASE Reemplace la parrilla de la base instalando los dos tornillos de cabeza Phillips. 9 INICIE LA MÁQUINA DE HIELOS Fije el interruptor de la máquina de hielos en la posición I (encendido). La máquina de hielos no empezará a operar - GE GSCS3PGXSS | Use and Care Manual - Page 96
de GE, el único kit de instalación aprobado es el RVKit. Para otros sistemas de osmosis de agua reversos, siga las instrucciones en el manual del las tuberías) en la plomería de la casa podría dañar las partes del refrigerador y traer consigo fugas de agua e inundación. Llame a un plomero - GE GSCS3PGXSS | Use and Care Manual - Page 97
podría causar daños a la casa. • Un kit de suministro de agua GE (contiene tubería, válvula de cierre y el accesorio mostrado más adelante) está disponible una línea horizontal, cerciórese de que la conexión sea hecha en la parte superior o en el lado, en vez del fondo, para evitar la acumulación de - GE GSCS3PGXSS | Use and Care Manual - Page 98
en la válvula. Apriete la tuerca de compresión con seguridad. Para tuberías plásticas de un kit de tubería para refrigeradores SmartConnect™ GE, inserte el extremo moldeado de la tubería en una válvula de cierre y apriete la tuerca de compresión hasta que quede apretada a mano, entonces - GE GSCS3PGXSS | Use and Care Manual - Page 99
I El compresor puede causar un chasquido o un gorjeo cuando intenta volver a arrancar (esto puede tomar hasta 5 minutos). I El tablero de control electrónico puede causar un sonido de chasquido cuando se activa el relé para controlar los componentes del refrigerador. I Expansión y contracción de las - GE GSCS3PGXSS | Use and Care Manual - Page 100
Seguridad Antes de solicitar un servicio... Solucionar problemas ¡Ahorre tiempo y dinero! Revise las tablas en las siguientes páginas y tal vez no necesitará de solicitar un servicio. Operación Instalación Problema Causas Posibles El refrigerador no funciona Refrigerador en ciclo de - GE GSCS3PGXSS | Use and Care Manual - Page 101
GEAppliances.com Seguridad Operación Instalación Problema Dispositivo automático para hacer hielo no funciona Causas Posibles Qué hacer El interruptor de alimentación eléctrica del dispositivo automático para hacer hielo está en la posición O (apagado). • Coloque el interruptor de alimentaci - GE GSCS3PGXSS | Use and Care Manual - Page 102
agua en el depósito está congelada. El control de temperatura demasiado frío. El agua chorrea del dispensador Cartucho del filtro recién instalado. No sale agua y el dispositivo para hacer hielo no funciona Está tapada la línea de agua o la llave de paso. Filtro de agua tapado. El refrigerador - GE GSCS3PGXSS | Use and Care Manual - Page 103
Seguridad Operación GEAppliances.com Problema El refrigerador nunca se apaga pero las temperaturas están bien Causas Posibles El sistema de congelación mantiene al compresor funcionando durante la puerta está siendo abierta. Qué hacer • Esto es normal. El refrigerador se apagará si la puerta - GE GSCS3PGXSS | Use and Care Manual - Page 104
Por el período de: GE reemplazará: MODELOS GE y GE PROFILE: Un año A partir de la fecha de la compra original Cualquier parte del refrigerador que falle debido a del consumidor local o la oficina del Attorney General en su localidad. 104 Garante: General Electric Company. Louisville, KY 40225 - GE GSCS3PGXSS | Use and Care Manual - Page 105
menor o igual al límite permitido para el agua que sale del sistema, como se especifica en NSF/ANSI 42/53 . de 68° ± 5°F (20° ± 2,5°C) ** Medición en partículas/ml. Las partículas usadas eran de 0,5-1 micrón. *** Unidades de turbidez Nefelométrica- General Electric Company, Louisville, KY 40225 105 - GE GSCS3PGXSS | Use and Care Manual - Page 106
Notas. 106 Servicio al consumidor Solucionar problemas Instalación Operación Seguridad - GE GSCS3PGXSS | Use and Care Manual - Page 107
GE Appliances 24 horas al día, cualquier día del año! Para mayor conveniencia y servicio más rápido, ya puede descargar los Manuales horas normales de oficina. GE Consumer Home Services estará aún ahí cuando escríbanos a: General Manager, Customer Relations GE Appliances, Appliance Park Louisville, - GE GSCS3PGXSS | Use and Care Manual - Page 108
Consumer Support. GE Appliances Website In the U.S.: GEAppliances.com Have a question or need assistance with your appliance? Try the GE Appliances Website, any day of the year! For greater convenience and faster service, you can now download Owner's Manuals, order parts or even schedule service
-
 1
1 -
 2
2 -
 3
3 -
 4
4 -
 5
5 -
 6
6 -
 7
7 -
8
-
9
-
10
-
11
-
12
-
13
-
14
-
15
-
16
-
17
-
18
-
19
-
20
-
21
-
22
-
23
-
24
-
25
-
26
-
27
-
28
-
29
-
30
-
31
-
32
-
33
-
34
-
35
-
36
-
37
-
38
-
39
-
40
-
41
-
42
-
43
-
44
-
45
-
46
-
47
-
48
-
49
-
50
-
51
-
52
-
53
-
54
-
55
-
56
-
57
-
58
-
59
-
60
-
61
-
62
-
63
-
64
-
65
-
66
-
67
-
68
-
69
-
70
-
71
-
72
-
73
-
74
-
75
-
76
-
77
-
78
-
79
-
80
-
81
-
82
-
83
-
84
-
85
-
86
-
87
-
88
-
89
-
90
-
91
-
92
-
93
-
94
-
95
-
96
-
97
-
98
-
99
-
100
-
101
-
102
-
103
-
104
-
105
-
106
-
107
-
108
 |
 |
GEAppliances.com
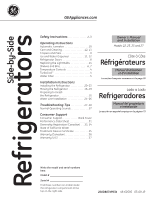
Refrigerators
Side-by-Side
200D8074P034
49-60595
03-09 JR
La section française commence à la page 38
La sección en español empieza en la página 73
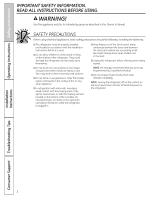
Safety Instructions
. . . . . . . . . . . . . . . . .2–3
Operating Instructions
Automatic Icemaker
. . . . . . . . . . . . . . . . . . . .10
Care and Cleaning . . . . . . . . . . . . . . . . . . .12, 13
Crispers and Pans . . . . . . . . . . . . . . . . . . . . . . . .9
Ice and Water Dispenser
. . . . . . . . . . . .11, 12
Refrigerator Doors
. . . . . . . . . . . . . . . . . . . . . . .8
Replacing the Light Bulbs
. . . . . . . . . . . . . . .14
Shelves and Bins . . . . . . . . . . . . . . . . . . . . . . .6, 7
Temperature Controls . . . . . . . . . . . . . . . . . . . .4
TurboCool
™
. . . . . . . . . . . . . . . . . . . . . . . . . . . . . .4
Water Filter . . . . . . . . . . . . . . . . . . . . . . . . . . . . . .5
Installation Instructions
Installing the Refrigerator . . . . . . . . . . . .20–23
Moving the Refrigerator
. . . . . . . . . . . . .16–19
Preparing to Install
the Refrigerator . . . . . . . . . . . . . . . . . . . . . . . . .15
Water Line Installation
. . . . . . . . . . . . . .24–26
Troubleshooting Tips
. . . . . . . . . . . .27–30
Normal Operating Sounds . . . . . . . . . . . . . . .27
Consumer Support
Consumer Support . . . . . . . . . . . . .Back Cover
Performance Data Sheet . . . . . . . . . . . . . . . .31
Ownership Registration (Canadian)
. . .33, 34
State of California Water
Treatment Device Certificate . . . . . . . . . . . .35
Warranty (Canadian) . . . . . . . . . . . . . . . . . . . .36
Warranty (U.S.)
. . . . . . . . . . . . . . . . . . . . . . . . .37
Réfrigérateurs
Côte à Côte
Refrigeradores
Lado a Lado
Models 22, 23, 25 and 27
Write the model and serial numbers
here:
Model # __________________________
Serial #
__________________________
Find these numbers on a label inside
the refrigerator compartment at the
top on the right side.
Owner’s Manual
and Installation
Manuel d’utilisation
et d’installation
Manual del propietario
e instalación