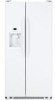
GE GSS20GEWWW Use and Care Manual
GE GSS20GEWWW - 20.0 cu. Ft. Refrigerator Manual
 |
UPC - 084691167068
View all GE GSS20GEWWW manuals
Add to My Manuals
Save this manual to your list of manuals |
GE GSS20GEWWW manual content summary:
- GE GSS20GEWWW | Use and Care Manual - Page 1
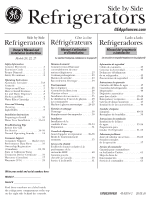
Refrigerators Owner's Manual and Installation Instructions Models 20, 22, 25 Safety Information Connect Electricity 3 Extension Cords 2 Proper Disposal 2 Safety Precautions 2 Operating Instructions Automatic Icemaker 7-8 Controls 6 Crispers and Pans 5 How to Install Features 4 Ice and Water - GE GSS20GEWWW | Use and Care Manual - Page 2
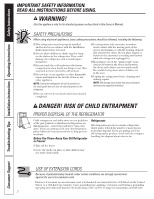
Consumer Support Troubleshooting Tips Installation Instructions Operating Instructions Safety Instructions IMPORTANT SAFETY INFORMATION. READ ALL INSTRUCTIONS BEFORE USING. WARNING! Use this appliance only for its intended purpose as described in this Owner's Manual. SAFETY PRECAUTIONS When using - GE GSS20GEWWW | Use and Care Manual - Page 3
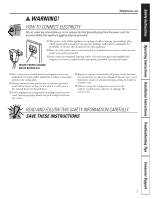
Instructions Operating Instructions Installation Instructions Troubleshooting Tips Consumer Support GEAppliances.com WARNING! HOW TO CONNECT ELECTRICITY unplug your refrigerator by pulling on the power cord. Always grip plug firmly and pull straight out from the outlet. ■ Repair or replace - GE GSS20GEWWW | Use and Care Manual - Page 4
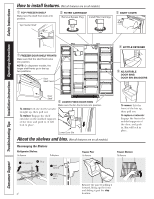
Consumer Support Troubleshooting Tips Installation Instructions Operating Instructions Safety Instructions How to install features. (Not all features are on all models.) ¿ TOP FREEZER SHELF Make sure the shelf front locks into position. ¡ FILTER CARTRIDGE Remove Bypass Plug Install Filter - GE GSS20GEWWW | Use and Care Manual - Page 5
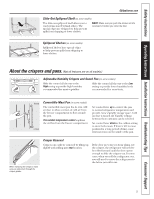
Safety Instructions Operating Instructions Installation Instructions Troubleshooting Tips Consumer Support GEAppliances.com Slide-Out Spillproof Shelf (on some models) The slide-out spillproof shelf allows you to reach items stored behind others. The special edges are designed to help prevent - GE GSS20GEWWW | Use and Care Manual - Page 6
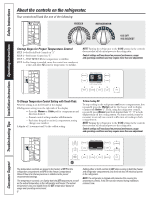
Consumer Support Troubleshooting Tips Installation Instructions Operating Instructions Safety Instructions 012 12 012 12 89 89 89 89 About the controls on the refrigerator. Your controls will look like one of the following: 34 5 67 FREEZER 34 5 67 FRESH FOOD 9 IS COLDEST 0 IS OFF FREEZER 34 - GE GSS20GEWWW | Use and Care Manual - Page 7
Installation Instructions Troubleshooting Tips Consumer Support About the water filter cartridge. (On some models.) GEAppliances.com Water Filter Cartridge The water filter cartridge is located in the back upper right corner of the refrigerator compartment. When to Replace the Filter on Models - GE GSS20GEWWW | Use and Care Manual - Page 8
chute. ■ Sometimes a small mound of snow will form on the door in the ice chute. This condition is normal and usually occurs when you have dispensed crushed ice repeatedly. The snow will eventually evaporate. ■ The first glass of water dispensed may be warmer than the following ones. This is normal - GE GSS20GEWWW | Use and Care Manual - Page 9
or products containing chlorine on stainless steel doors and handles. For best results, GE recommends using stainless steel cleaner PM10X311 with the WX10X307 polishing cloth, or for convenience the SS cleaning wipes, part number WX10X10001. Do not wipe the refrigerator with a soiled dish cloth or - GE GSS20GEWWW | Use and Care Manual - Page 10
THE ICEMAKER (on some models) If the refrigerator has an icemaker, it will have to be connected to a cold water line. A GE water supply kit is available at extra cost from your dealer, by visiting our Website at GEAppliances.com (in Canada, at www.GEAppliances.ca), or from Parts and Accessories, 800 - GE GSS20GEWWW | Use and Care Manual - Page 11
System AND the refrigerator also has a water filter, use the refrigerator's filter bypass plug. Using the refrigerator's water filtration cartridge in conjunction with the RO filter can result in hollow ice cubes and slower water flow from the water dispenser. This water line installation is - GE GSS20GEWWW | Use and Care Manual - Page 12
. • If your refrigerator does not have a water filter, we recommend installing one if your water supply has sand or particles that could clog the screen of the refrigerator's water valve. Install it in the water line near the refrigerator. If using a GE SmartConnect™ Refrigerator Tubing kit, you - GE GSS20GEWWW | Use and Care Manual - Page 13
On models using the refrigeration connection at the water valve, remove the plastic flexible cap. 8 TURN THE WATER ON AT THE SHUTOFF VALVE Tighten any connections that leak. Place the compression nut and ferrule (sleeve) onto the end of the tubing as shown. On a GE SmartConnect™ Refrigerator - GE GSS20GEWWW | Use and Care Manual - Page 14
the defrost cycle. ■ A water dripping noise may occur during the defrost cycle as ice melts from the evaporator and flows into the drain pan. ■ Closing the door may cause a gurgling sound due to pressure equalization. Before you call for service... Troubleshooting Tips Save time and money! Review - GE GSS20GEWWW | Use and Care Manual - Page 15
. Food transmitting odor/taste to ice cubes. Interior of refrigerator needs cleaning. Water filter clogged. Door left open. Temperature control not set cold enough. Door gasket on hinge side sticking or folding over. Defrost heater is on. Icemaker or water supply turned off. Ice cubes are frozen to - GE GSS20GEWWW | Use and Care Manual - Page 16
24 hours for the refrigerator to completely cool down. • Dispense water until all water in system is replenished. •Allow several hours for replenished supply to chill. Water dispenser does not work (on some models) Water supply line turned off or not connected. Water filter clogged. Air may be - GE GSS20GEWWW | Use and Care Manual - Page 17
(including evaporator, condenser tubing and refrigerant) All Other Parts How Long Warranted (From Date of Sale) GE Profile: Ten (10) Years GE and All Other Brands: One (1) Year GE Profile: Five (5) Years GE and All Other Brands: One (1) Year One (1) Year Parts Repair or Replace at Mabe's Option - GE GSS20GEWWW | Use and Care Manual - Page 18
of the refrigerator Any part of the water filter cartridge which fails due to a defect in materials or workmanship. During this limited thirty-day warranty, GE will also provide, free of charge, a replacement water filter cartridge. GE PROFILE MODELS ONLY: Five Years (GE Profile models only) From - GE GSS20GEWWW | Use and Care Manual - Page 19
Notices ■ Installation instructions, parts and service availability, and standard warranty are included with the product when shipped. ■ This drinking water system must be maintained according to manufacturer's instructions, including replacement of filter cartridges. ■ Do not use with water that is - GE GSS20GEWWW | Use and Care Manual - Page 20
Consumer Support Troubleshooting Tips Installation Instructions Operating Instructions Safety Instructions Notes. 20 - GE GSS20GEWWW | Use and Care Manual - Page 21
✁ Cut here - GE GSS20GEWWW | Use and Care Manual - Page 22
Please place in envelope and mail to: Veuillez mettre dans une enveloppe et envoyez à : OWNERSHIP REGISTRATION P.O. BOX 1780 MISSISSAUGA, ONTARIO L4Y 4G1 (FOR CANADIAN CONSUMERS ONLY) ✁ Cut here - GE GSS20GEWWW | Use and Care Manual - Page 23
n'entraîne pas sa mise hors tension. Installation Conseils de dépannage Service à la clientèle DANGER! RISQUES POUR LES ENFANTS COMMENT VOUS DÉ CONVENABLEMENT DE VOTRE ANCIEN RÉFRIGÉRATEUR Les enfants pris au piège ou morts d'asphyxie sont toujours d'actualité. Les réfrigérateurs abandonn - GE GSS20GEWWW | Use and Care Manual - Page 24
le faire rouler sur le cordon d'alimentation afin de ne pas l'endommager. VEUILLEZ LIRE ET SUIVRE ATTENTIVEMENT CES MESURES DE SÉCURITÉ. CONSERVEZ CES DIRECTIVES Installation Service à la clientèle Conseils de dépannage 24 - GE GSS20GEWWW | Use and Care Manual - Page 25
DU CASIER À PRODUITS LAITIERS Fonctionnement Installation Conseils de dépannage Service à la clientèle Δ FRONTONS DE BALCONNET DU CONGÉLATEUR Portillon de contenants inférieurs de porte relocaliser : Engagez le bac dans les supports moulés de la porte puis poussez vers l'intérieur. Le bac sera - GE GSS20GEWWW | Use and Care Manual - Page 26
des légumes. pour la conservation des fruits. HIGH LOW Normale Plus froide Bac à viande transformable (sur certains mod du bac. Guides du bac Lorsque vous remettez les bacs en place, assurez-vous que vous les glissez dans les guides. Enlèvement Service à la clientèle Conseils de dépannage 26 - GE GSS20GEWWW | Use and Care Manual - Page 27
67 89 89 9 IS COLDEST 0 IS OFF FREEZER FRESH FOOD FREEZER REFRIGERATOR 34 5 67 34 5 67 89 89 www.electromenagersge.ca 09ISISOCFOFLDEST 9 pourront nécessiter plusieurs ajustements. Fonctionnement Installation Conseils de dépannage Service à la clientèle Pour changer le réglage de contr - GE GSS20GEWWW | Use and Care Manual - Page 28
dérivation du filtre sur les modèles Water by Culligan, vous devez d'abord retirer l'adaptateur du filtre du support de la cartouche en le faisant pivoter États-Unis, visitez notre site Web à l'adresse ge.com, ou appelez le Service des pièces et accessoires GE au 800.626.2002. Modèle de filtre MWF - GE GSS20GEWWW | Use and Care Manual - Page 29
de l'eau plus froide, ajoutez tout simplement de la glace concassée ou des cubes de glace avant de verser de l'eau. 29 Conseils de dépannage Service à la clientèle - GE GSS20GEWWW | Use and Care Manual - Page 30
. Pour de meilleurs résultats, GE recommande l'utilisation du nettoyant pour frigérateur avec un linge à vaisselle sale ou une serviette humide : ils à glaçons (sur certains modèles). Départ en vacances Lorsque vous vous absentez pendant une période Service à la clientèle Conseils de dépannage - GE GSS20GEWWW | Use and Care Manual - Page 31
érateur sur un plancher suffisamment solide pour le supporter lorsqu'il est plein. ALIMENTATION D'EAU À GE (contenant la tuyauterie, le robinet d'arrêt, les joints et les instructions) chez votre revendeur, ou en vous adressant à notre site Web à l'adresse www.electromenagersge.ca ou à notre service - GE GSS20GEWWW | Use and Care Manual - Page 32
. Suivez soigneusement ces instructions pour minimiser le risque Les trousses GE SmartConnect™ Refrigerator Tubing sont disponibles dans les dimensions suivantes : GE (contenant un tuyau, un robinet d'arrêt et les joints énumérés ci-dessous) chez votre distributeur local ou en le commandant au service - GE GSS20GEWWW | Use and Care Manual - Page 33
Instructions d'installation 1 FERMEZ L'ALIMENTATION PRINCIPALE D'EAU 2 PERCEZ UN TROU POUR le robinet. Serrez fort l'écrou de compression. Pour le tuyau en matière plastique d'une trousse GE SmartConnect™ Refrigerator Tubing, insérez l'extrémité moulée du tuyau dans le robinet d'arrêt et serrez l'é - GE GSS20GEWWW | Use and Care Manual - Page 34
Instructions d'installation 7 BRANCHEZ LE TUYAU À VOTRE RÉFRIGÉRATEUR (suite) Sur certains modè le tuyau, serrez le raccord. Si vous utilisez un tuyau en matière plastique d'une trousse GE SmartConnect™ Refrigerator Tubing, insérez l'extrémité moulée du tuyau dans le raccord du réfrigérateur et - GE GSS20GEWWW | Use and Care Manual - Page 35
et tombe dans le bac de récupération. ■ Fermer la porte peut causer un gargouillement en raison de l'équilibrage de pression. Installation Conseils de dépannage Service à la clientèle 35 - GE GSS20GEWWW | Use and Care Manual - Page 36
élateur n'est pas réglée à une température assez froide. • Vérifiez qu'il n'y a pas un paquet qui empêche la porte de fermer. •Consultez Les commandes. Service à la clientèle Conseils de dépannage - GE GSS20GEWWW | Use and Care Manual - Page 37
l'intérieur. •Consultez Entretien et nettoyage. Il faut nettoyer le système • Consultez Entretien et nettoyage. d'évacuation de l'eau de dégivrage. 37 Conseils de dépannage Service à la clientèle - GE GSS20GEWWW | Use and Care Manual - Page 38
sol ou au fond du congélateur Air chaud à la base du réfrigérateur Cubed Ice (glaçons) était choisi mais Crushed Ice (glace concassée) a été distribuée (sur certains modèles) La machine à glaçons eau du réfrigérateur n'est pas branchée. Installation Service à la clientèle Conseils de dépannage 38 - GE GSS20GEWWW | Use and Care Manual - Page 39
GE et toutes autre marques : Un (1) an Un (1) an Un (1) an Un (1) an TERMES ET CONDITIONS : La présente garantie ne s'applique qu'à l'utilisation domestique par une seule famille au Canada, lorsque le réfrigérateur a été installé conformément aux instructions obtenir un service dans le force - GE GSS20GEWWW | Use and Care Manual - Page 40
me de Filtration d'eau GE SmartWater Ce système ,34% 98,67% 99,00% 98,95% 98,32% 94,50% 93,44% 91,67% 96,51% 95,83% 98,78% 98,65% 99,78 directives d'installation, la disponibilité de pièces et de service ainsi que la garantie standard sont expédiées avec General Electric Company, Louisville, KY 40225 EPA EST. - GE GSS20GEWWW | Use and Care Manual - Page 41
par Internet au site www.electromenagersge.ca 24 heures par jour, tous les jours de l'année. Service de réparations Service de réparations GE est tout près de vous. Pour faire réparer votre électroménager GE, il suffit de nous téléphoner. 1.800.561.3344 Studio de conception réaliste Sur demande - GE GSS20GEWWW | Use and Care Manual - Page 42
lo para los fines que se describen en este Manual del propietario. Seguirdad Operación Instalación PRECAUCIONES DE refrigerador tiene un dispositivo automático para hacer hielo, evite el contacto con las partes móviles del mecanismo de expulsión, o con el elemento calefactor que desprende los - GE GSS20GEWWW | Use and Care Manual - Page 43
Seguridad Operación GEAppliances.com ¡ADVERTENCIA! COMO CONECTAR LA ELECTRICIDAD Bajo ninguna circunstancia debe cortar o quitar la tercera punta (tierra) de la clavija. Para su seguridad personal, este aparato deberá conectarse debidamente a tierra. ■ El cable eléctrico de este aparato está - GE GSS20GEWWW | Use and Care Manual - Page 44
DE LOS ENTREPAÑOS DE LA PUERTA DEL CONGELADOR Cerciórese de que la parte frontal del entrepaño ajusta en su posición. NOTA: En los modelos con dispensador Para retirar Entrepaños del congelador: Para retirar Levante y hale 44 Inclínelo Inserte el gancho superior Bájelo para asegurarlo en su - GE GSS20GEWWW | Use and Care Manual - Page 45
Sobre las gavetas de almacenamiento. (No todos los modelos tienen todos los accesorios) Gavetas preservadoras de humedad ajustable y bandeja de refrigerios HIGH LOW (en algunos modelos) Deslice el control hasta llegar a la posición Deslice el control hasta llegar a la posición High (alto) para - GE GSS20GEWWW | Use and Care Manual - Page 46
. Los controles tendrán uno de los siguientes aspectos: 34 5 67 FREEZER 34 5 67 FRESH FOOD 9 IS COLDEST 0 IS OFF FREEZER 34 5 67 REFRIGERATOR 34 5 67 09ISISOCFOFLDEST 9 IS0CIOSLODFEFST 012 12 Pasos de inicio para un correcto control de la temperatura PASO 1: Coloque el Control de alimentos - GE GSS20GEWWW | Use and Care Manual - Page 47
Si va a reemplazar un (el aspecto puede variar) cartucho Water by Culligan, deje el adaptador colocado. Este adaptador permanecerá en los Estados Unidos, visite nuestro sitio Web, GEAppliances.com, o llame a GE para partes y accesorios al 800.626.2002. Modelo de filtro MWF Llene el cartucho - GE GSS20GEWWW | Use and Care Manual - Page 48
hielos está disponible a un costo adicional. Consulte en la parte posterior del refrigerador el kit específico para hielos que su en la salida del hielo situada en la puerta. Esto es normal y, por regla general, sucede cuando ha dispensado hielo picado repetidamente. La nieve se evaporará por sí - GE GSS20GEWWW | Use and Care Manual - Page 49
manijas de acero inoxidable. Para obtener los mejores resultados, GE le recomienda el uso del producto de limpieza para acero inoxidable cuidado. Chocar vidrio templado puede hacer que se rompe en pedazos. No lave partes plásticas del refrigerador en el lavaplatos. Atrás del refrigerador Se deberá - GE GSS20GEWWW | Use and Care Manual - Page 50
Seguridad Operación Cuidado y limpieza del refrigerador. Preparación para vacaciones En el caso de vacaciones o ausencias prolongadas, quite los alimentos y desenchufe el refrigerador. Limpie el interior con solución de bicarbonato de una cucharada (15 ml) de bicarbonato por un cuarto (1 litro) - GE GSS20GEWWW | Use and Care Manual - Page 51
Modelos 20, 22 y 25 Si tiene preguntas, llame al 1.800.GE.CARES o bien visite nuestra página Web: GEAppliances.com ANTES DE aire y las conexiones de plomería y eléctricas. • Lados 1/8″ (4 mm) • Parte superior 1″ (25 mm) • Parte posterior 1″ (25 mm) Un espacio de 3/4″ (19 mm) se necesita para abrir - GE GSS20GEWWW | Use and Care Manual - Page 52
Instrucciones para la instalación ALINEACIÓN DE LAS PUERTAS Después de nivelar, asegúrese de que las puertas estén al mismo nivel en la parte superior. Para emparejar las puertas, ajuste la puerta del refrigerador. Usando una llave de cubo de 5/16″, gire el tornillo de ajuste de la puerta - GE GSS20GEWWW | Use and Care Manual - Page 53
la tubería) en la tubería de la casa puede causar daños a las partes del refrigerador y conducir a un goteo o inundación por el agua. Llame a NECESITA • Kit de tubería de cobre para el refrigerador o SmartConnect™ de GE, 1/4″ de diámetro externo para conectar el refrigerador al suministro de agua. - GE GSS20GEWWW | Use and Care Manual - Page 54
ÍA DEL AGUA (CONT.) QUÉ NECESITA (CONT.) • Un kit de suministro de agua de GE (contiene tubería, válvula de cierre y accesorios enumerados abajo) está disponible a un costo adicional en su tienda o por medio de Partes y Accesorios, 800.626.2002. • Un suministro de agua fría. La presión del agua - GE GSS20GEWWW | Use and Care Manual - Page 55
recomandamos la instalación de uno si su suministro de agua tiene arena o partículas que podrían obstruir la malla de la válvula de agua del refrigerador. Si usa un kit de tubería para el refrigerador SmartConnect™ de GE, necesitará un tubo adicional (WX08X10002) para conectar el filtro. No - GE GSS20GEWWW | Use and Care Manual - Page 56
de plástico de un kit de tubería para el refrigerador SmartConnect™ de GE, inserte el extremo moldeado de la tubería en la conexión del refrigerador Organice el cable de la tubería de manera que no vibre contra la parte trasera del refrigerador o contra la pared. Empuje el refrigerador hacia la pared - GE GSS20GEWWW | Use and Care Manual - Page 57
■ El compresor puede causar un chasquido o un gorjeo cuando intenta volver a arrancar (esto puede tomar hasta 5 minutos). ■ El tablero de control electrónico puede causar un sonido de chasquido cuando se activa el relé para controlar los componentes del refrigerador. ■ Expansión y contracción de las - GE GSS20GEWWW | Use and Care Manual - Page 58
tal vez no necesitará de solicitar un servicio. Problema El refrigerador no funciona Vibraciones o sacudidas (una vibración ligera es normal) El motor opera durante períodos prolongados o se arranca y se para con frecuencia. (Refrigeradores modernos con más espacio de almacenamiento y un congelador - GE GSS20GEWWW | Use and Care Manual - Page 59
agua chorrea del dispensador No sale agua No sale agua y el dispositivo para la puerta abierta. •Vea Los controles. •Aplique vaselina en la parte frontal de la junta. •Eso es normal. • Enciende el 24 horas para que se enfríe el refrigerador. • Dispense el agua hasta que todo el sistema del agua se - GE GSS20GEWWW | Use and Care Manual - Page 60
aire fluye para enfriar el motor. En el proceso de refrigeración es normal que salga calor de la base del refrigerador. Algunos recubrimientos de piso estan sensitivos y se descoloran a estas temperaturas normales y seguras. La última selección fue Crushed Ice (hielo picado). • Reemplace el fusible - GE GSS20GEWWW | Use and Care Manual - Page 61
producto está situado en un área que no dispone de servicio por parte de un proveedor de servicio autorizado de GE, podría tener que hacerse cargo de los costes de envío o consumidor local o la oficina del Attorney General en su localidad. Garante: General Electric Company. Louisville, KY 40225 61 - GE GSS20GEWWW | Use and Care Manual - Page 62
GE el agua que sale del sistema, como se 015 mg/L + 10% 0,0160 mg/L 0,00100 mg/L 0,001000 mg/L 93,44% 91,67% Benceno 0,005 mg/L 0,015 mg/L + 10% 0,0145 mg . de 20° ± 3°C ** Medición en partículas/ml. Las partículas usadas eran de 0,5-1 micrón. *** Unidades por General Electric, Appliance Park, - GE GSS20GEWWW | Use and Care Manual - Page 63
o llamar al (800.626.2224) durante horas normales de oficina. GE Consumer Home Services estará aún ahí cuando su garantía termine. Piezas y accesorios descritas en este manual cubren los procedimientos a seguir por cualquier usuario. Cualquier otra reparación debería, por regla general, referirse a - GE GSS20GEWWW | Use and Care Manual - Page 64
take advantage of all our on-line support services designed for your convenience. In Canada: www.GEAppliances.ca Schedule Service In the U.S.: GEAppliances.com Expert GE repair service is only one step away from your door. Get on-line and schedule your service at your convenience any day of the
-
 1
1 -
 2
2 -
 3
3 -
 4
4 -
 5
5 -
 6
6 -
 7
7 -
8
-
9
-
10
-
11
-
12
-
13
-
14
-
15
-
16
-
17
-
18
-
19
-
20
-
21
-
22
-
23
-
24
-
25
-
26
-
27
-
28
-
29
-
30
-
31
-
32
-
33
-
34
-
35
-
36
-
37
-
38
-
39
-
40
-
41
-
42
-
43
-
44
-
45
-
46
-
47
-
48
-
49
-
50
-
51
-
52
-
53
-
54
-
55
-
56
-
57
-
58
-
59
-
60
-
61
-
62
-
63
-
64
 |
 |
Réfrigérateurs
Côte à côte
Manuel d’utilisation
et d’installation
La section française commence à la page 23
Safety Information
Connect Electricity . . . . . . . . . . . . .3
Extension Cords . . . . . . . . . . . . . . .2
Proper Disposal . . . . . . . . . . . . . . . .2
Safety Precautions . . . . . . . . . . . . . .2
Operating Instructions
Automatic Icemaker . . . . . . . . . .7–8
Controls
. . . . . . . . . . . . . . . . . . . . .6
Crispers and Pans . . . . . . . . . . . . . .5
How to Install Features . . . . . . . . . .4
Ice and Water Dispenser
. . . . . . . .8
Shelves and Bins . . . . . . . . . . . . . . .4
Water Filter Cartridge . . . . . . . . . . .7
Care and Cleaning
Cleaning . . . . . . . . . . . . . . . . . . . . . .9
Light Bulbs
. . . . . . . . . . . . . . . . . . .9
Installation Instructions
Preparing to Install
. . . . . . . . . . .10
Water Line Installation . . . . . .11–13
Troubleshooting Tips
Before You Call
For Service . . . . . . . . . . . . . . . .14–16
Normal Operating Sounds . . . . . .14
Consumer Support
Consumer Support
. . . .Back Cover
Performance Data Sheet
. . . . . . .19
Ownership Registration
(Canadian)
. . . . . . . . . . . . . . .21, 22
State of California Water
Treatment Device Certificate . . . .19
Warranty (Canadian) . . . . . . . . . .17
Warranty (U.S.) . . . . . . . . . . . . . . .18
GEAppliances.com
Refrigerators
Side by Side
197D3351P020
49-60514-2
05-09 JR
Write your model and serial numbers here:
Model # _____________________
Serial #
_____________________
Find these numbers on a label inside
the refrigerator compartment at the top
on the right side behind the controls.
Refrigeradores
Lado a lado
Models 20, 22, 25
Owner’s Manual and
Installation Instructions
Manual del propietario
e instalación
La sección en español empieza en la página 42
Refrigerators
Side by Side
Mesures de sécurité
Comment vous débarrasser
convenablement de votre
ancien réfrigérateur
. . . . . . . . . . . . . . . .23
Cordons prolongateurs . . . . . . . . . . . . . .23
Mesures de sécurité . . . . . . . . . . . . . . . . .23
Raccordement électrique . . . . . . . . . . . .24
Fonctionnement
Bacs à légumes . . . . . . . . . . . . . . . . . . . . .26
Cartouche du filtre à eau . . . . . . . . . . . .28
Clayettes et bacs . . . . . . . . . . . . . . . . . . . .25
Installation des accessoires . . . . . . . . . . .25
Le distributeur d’eau et de glaçons
. . . .29
Les commandes . . . . . . . . . . . . . . . . . . . .27
Machine à glaçons automatique
. . . . .28–29
Entretien et nettoyage
Nettoyage
. . . . . . . . . . . . . . . . . . . . . . . . .30
Remplacement des ampoules . . . . . . . .30
Installation
Installation de la
conduite d’eau . . . . . . . . . . . . . . . . . .32–34
Préparation . . . . . . . . . . . . . . . . . . . . . . . .31
Conseils de dépannage
Avant d’appeler un réparateur . . . . .36–38
Bruits de fonctionnement
normaux . . . . . . . . . . . . . . . . . . . . . . . . . .35
Service à la clientèle
Feuillet de données relatives à la
performance de la
cartouche HWF . . . . . . . . . . . . . . . . . . . .40
Garantie pour la
clientèle au Canada . . . . . . . . . . . . . . . . .39
Service à la clientèle
. . . . . . . . . . . . . . . .41
Información de seguridad
Cables de extensión
. . . . . . . . . . . . . . . . 42
Conectar la electricidad . . . . . . . . . . . . . 43
Deshacerse debidamente
de su refrigerador . . . . . . . . . . . . . . . . . . 42
Precauciones de seguridad. . . . . . . . . . . 42
Instrucciones de operación
Cartucho del filtro de agua . . . . . . . . . . 47
Controles del refrigerador . . . . . . . . . . . 46
Dispensador . . . . . . . . . . . . . . . . . . . . . . . 48
Dispositivo automático
para hacer hielo. . . . . . . . . . . . . . . . . 47–48
Entrepaños y recipientes . . . . . . . . . 44–45
Gavetas de almacenamiento
. . . . . . . . . 45
Instalación de las características
. . . . . . 44
Cuidado y limpieza
Limpieza . . . . . . . . . . . . . . . . . . . . . . . 49–50
Reemplazo de bombillas
. . . . . . . . . . . . 50
Instrucciones de instalación
Instalación de la línea
de agua . . . . . . . . . . . . . . . . . . . . . . . . 53–56
Preparación para
instalar el refrigerador . . . . . . . . . . . 51–52
Solucionar problemas
Antes de solicitar un servicio . . . . . . 58–60
Sonidos normales
de la operación
. . . . . . . . . . . . . . . . . . . . 57
Servicio al consumidor
Garantía para consumidores
en los Estados Unidos . . . . . . . . . . . . . . . 61
Hoja de datos de
funcionamiento
. . . . . . . . . . . . . . . . . . . 62
Servicio al consumidor . . . . . . . . . . . . . . 63