GE GTDP400GMWS Use and Care Manual
GE GTDP400GMWS Manual
 |
UPC - 084691226994
View all GE GTDP400GMWS manuals
Add to My Manuals
Save this manual to your list of manuals |
GE GTDP400GMWS manual content summary:
- GE GTDP400GMWS | Use and Care Manual - Page 1
Safety Instructions 2-4 Operating Instructions Control Panel 5, 6 Control Settings 7 Features 8 Loading and Using the Dryer 10-11 Reversing the Door 9 Venting the Dryer 11 Troubleshooting Tips . . . 12, 13 Consumer Support Consumer Support 16 Warranty 15 Owner's Manual Write the model and - GE GTDP400GMWS | Use and Care Manual - Page 2
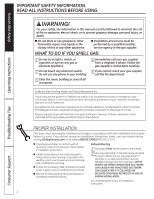
appliance. n Installation and service must be performed by a qualified installer, service agency or the gas supplier. WHAT TO DO IF yOu SMEll GAS: 1 Do not try to light a match, or cigarette, or turn on any gas or electrical appliance. 2 Do not touch any electrical switch; do not use any phone - GE GTDP400GMWS | Use and Care Manual - Page 3
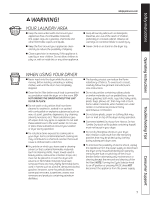
. Observe all warnings on container labels to avoid injury. n Never climb on or stand on the dryer top. Operating Instructions Troubleshooting Tips WHEN USING YOUR DRYER n Never reach into the dryer while the drum is moving. Before loading, unloading or adding clothes, wait until the drum has - GE GTDP400GMWS | Use and Care Manual - Page 4
or attempt any servicing unless specifically recommended in this Owner's Manual or in published user-repair instructions that you understand and have the skills to carry out. READ AND fOLLOW THIS SAfETY INfORmATION CAREfULLY. SAVE THESE INSTRuCTIONS Troubleshooting Tips Consumer Support 4 - GE GTDP400GMWS | Use and Care Manual - Page 5
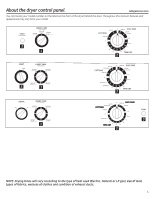
model number on the label on the front of the dryer behind the door. Throughout this manual, features and appearance may vary from your model. START PUSH TO START Cycle Only 1 DELICATES LOW HEAT LESS DRY OPTIMUM 60 START 3 NOTE: Drying times will vary according to the type of heat used (Electric, - GE GTDP400GMWS | Use and Care Manual - Page 6
START FABRIC CARE 4 Heat Settings COTTONS REGULAR HEAT EASY CARE MEDIUM HEAT WRINKLE CARE Extended Cool Air Tumble OFF ON SIGNAL MEDIUM OFF LOUD AIR FLUFF DELICATES NO HEAT LOW HEAT Time Dry Cycle Only 3 1 2 NOTE: Drying times will vary according to the type of heat used (Electric - GE GTDP400GMWS | Use and Care Manual - Page 7
of no heat tumbling. 3 Start-Close the dryer door. Select START. Opening the door during operation will stop the dryer. To restart the dryer, close the door and select START to complete the cycle. Color logic (on some models) Select the correct FABRIC CARE setting. Match the particular color below - GE GTDP400GMWS | Use and Care Manual - Page 8
rack must be used with the TIMED CyClE. n Do not use this drying rack when there are other clothes in the dryer. Consumer Support Stainless Steel Drum (on some models) The stainless steel used to make the dryer drum provides the highest reliability available in a GE dryer. If the dryer drum - GE GTDP400GMWS | Use and Care Manual - Page 9
Safety Instructions Operating Instructions About reversing started in new holes. 2 Loosen top screw from each hinge on the dryer face half way. With one hand holding the top of the door and the other hand holding the bottom, remove the door from the dryer Troubleshooting Tips Consumer Support 9 - GE GTDP400GMWS | Use and Care Manual - Page 10
Safety Instructions Operating Instructions loading and using the dryer. Always follow the fabric manufacturer's care label when laundering. Sorting and Loading Hints As a general rule, if clothes are sorted properly for the washer, they are sorted properly for the dryer. Do not add fabric - GE GTDP400GMWS | Use and Care Manual - Page 11
and run longer if it is not vented to the below specifications. Carefully follow the details on Exhausting in the Installation Instructions. n Use only rigid metal 4" diameter ductwork inside the dryer cabinet. Use only rigid metal or UL listed flexible metal 4" diameter ductwork for exhausting - GE GTDP400GMWS | Use and Care Manual - Page 12
Safety Instructions Operating Instructions Before you call for service... Troubleshooting Tips Save time and money! Review the charts on the following pages, or visit GEAppliances.com. You may not need to call for service. Problem Dryer doesn't start Dryer doesn't heat Dryer shakes or makes noise - GE GTDP400GMWS | Use and Care Manual - Page 13
wall damper operates easily. • Check the Installation Instructions to make sure the dryer venting is correct. • Replace fuses or reset circuit breakers. Since most dryers use 2 fuses/breakers, make sure both are operating. • Do not put more than one washer load in the dryer at a time. • If you are - GE GTDP400GMWS | Use and Care Manual - Page 14
Notes. 14 Consumer Support Troubleshooting Tips Operating Instructions Safety Instructions - GE GTDP400GMWS | Use and Care Manual - Page 15
serial number and model number available when calling for service. Staple your receipt here. Proof of the original purchase date is needed to obtain support under the warranty. For The Period Of: GE Will Replace: One year from the date of the original purchase Any part of the dryer which fails - GE GTDP400GMWS | Use and Care Manual - Page 16
Support. GE Appliances Website GEAppliances.com Have a question or need assistance with your appliance? Try the GE Appliances Website 24 hours a day, any day of the year! For greater convenience and faster service, you can now download Owner's Manuals, order parts or even schedule service - GE GTDP400GMWS | Use and Care Manual - Page 17
de la secadora 5, 6 Ventilación de la secadora 11 Solución a problemas comunes 12, 13 Soporte al consumidor Garantía 15 Soporte al consumidor 16 Manual del propietario Escriba los números del modelo y de serie aquí: No. de modelo __________ No. de serie Estos números se encuentran en una - GE GTDP400GMWS | Use and Care Manual - Page 18
su seguridad, debe seguir las indicaciones de este manual para minimizar el riesgo de incendio o explosión, gas. 2 No toque ningún interruptor eléctrico; no use ningún teléfono en el edificio. 3 Desocupe el habitaci visitando GEAppliances.com o llamando al 800.GE.CARES (800.432.2737). n Conecte - GE GTDP400GMWS | Use and Care Manual - Page 19
n Nunca trepe ni se ponga de pie sobre la parte superior de la secadora. CUANDO USE SU SECADORA n Nunca introduzca sus manos en el interior en su secadora. Esto podría ocasionar irritación en la piel debido a las partículas restantes que se podrían adherir a la ropa durante usos subsecuentes de - GE GTDP400GMWS | Use and Care Manual - Page 20
suavizante para secadora o un acondicionador antiestático. Recomendamos que usted use un suavizante de telas en el ciclo de lavado, de acuerdo o reemplazar ninguna parte de éste electrodoméstico ni intente llevar a cabo ningún tipo de servicio a no ser que lo recomiende el Manual del propietario o - GE GTDP400GMWS | Use and Care Manual - Page 21
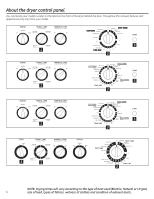
parte frontal de la secadora, detrás de la puerta. A lo largo de este manual, las funciones y la apariencia podrían ser diferentes a su modelo. START PUSH TO START CARE MEDIUM HEAT AIR FLUFF NO HEAT Time Dry Cycle Only 1 DELICATES LOW HEAT LESS DRY OPTIMUM DRY COTTONS MORE DRY OFF MORE DRY EASY - GE GTDP400GMWS | Use and Care Manual - Page 22
mero de modelo en la etiqueta de la parte frontal de la secadora, detrás de la puerta. A lo largo de este manual, las funciones y la apariencia podrían ser AIR FLUFF NO HEAT Time Dry Cycle Only 1 DELICATES LOW HEAT START 3 2 START START FABRIC CARE 4 Heat Settings COTTONS REGULAR HEAT EASY CARE - GE GTDP400GMWS | Use and Care Manual - Page 23
tumble dry low (centrifugado de secado lento). LOW HEAT (CALOR BAJO) FLUFF (ESPONJADO) Para esponjar artículos sin utilizar calor. Use el ciclo de la secadora. Para reiniciar la secadora, cierre la puerta y seleccione START (INICIAR) para completar el ciclo. Solución a problemas comunes Soporte - GE GTDP400GMWS | Use and Care Manual - Page 24
la secadora solamente se debe usar con los ciclos SECADO CON TIEMPO. n No use esta rejilla cuando esté secando otra ropa en la secadora. Tambor de acero se oxidará ni corroerá. Estas confiabilidad disponible en una secadora GE. imperfecciones de la superficie no afectarán 8 Aunque se abolle - GE GTDP400GMWS | Use and Care Manual - Page 25
Paso 1. 4 Remueva los tornillos restantes del lado de la apertura del que la puerta se removió. Con estos tornillos, asegure las bisagras en la parte inferior. Apriete los dos tornillos superiores de cada bisagra. Reinserte los tapones en el lado de donde la puerta se removió. Solución a problemas - GE GTDP400GMWS | Use and Care Manual - Page 26
y carga de la ropa Como regla general, si la ropa es clasificada apropiadamente para han aprobado para usarse con todas las secadoras GE de acuerdo con las instrucciones del fabricante. No inoxidable: Para limpiar las superficies de acero inoxidable, use un trapo húmedo con zun limpiador suave, no - GE GTDP400GMWS | Use and Care Manual - Page 27
metro con aprobación UL para ducto de ventilación hacia el exterior. n No utilice plástico u otra red de conductos de material combustible. n Use la longitud más corta posible. n No aplaste ni pliegue. n Evite descansar el conducto sobre objetos filosos. n La ventilación debe complir con los códigos - GE GTDP400GMWS | Use and Care Manual - Page 28
utilizar un suavizante de telas. • Bounce® Fabric Conditioner Dryer Sheets (Suavizante de telas en láminas para secadora de Bounce) ha sido aprobado para ser usado en Secadoras GE siempre y cuando se usen de acuerdo con las instrucciones del fabricante. - GE GTDP400GMWS | Use and Care Manual - Page 29
Instrucciones de seguridad Instrucciones de operación GEAppliances.com Problema Secar las prendas toma demasiado tiempo Las prendas están arrugadas Las prendas se encogen Causas probables Qué hacer Clasificación de carga inadecuada • Separe los artículos pesados de los livianos (generalmente - GE GTDP400GMWS | Use and Care Manual - Page 30
Notas. 14 Soporte al consumidor Solución a problemas comunes Instrucciones de operación Instrucciones de seguridad - GE GTDP400GMWS | Use and Care Manual - Page 31
estén dañados, o que funcionen según el Manual del propietario. n Cambio de los fusibles de que no dispone de servicio por parte de un proveedor de servicio autorizado de GE, podría tener que hacerse cargo oficina del Attorney General en su localidad. Garante: General Electric Company. Louisville, - GE GTDP400GMWS | Use and Care Manual - Page 32
GE Appliances 24 horas al día, cualquier día del año! Para mayor conveniencia y servicio más rápido, ya puede descargar los Manuales durante horas normales de oficina. GE Consumer Home Services estará aún ahí cuando o escríbanos a: General Manager, Customer Relations GE Appliances, Appliance Park
-
 1
1 -
 2
2 -
 3
3 -
 4
4 -
 5
5 -
 6
6 -
 7
7 -
8
-
9
-
10
-
11
-
12
-
13
-
14
-
15
-
16
-
17
-
18
-
19
-
20
-
21
-
22
-
23
-
24
-
25
-
26
-
27
-
28
-
29
-
30
-
31
-
32
 |
 |

Owner’s Manual
Dryers
234D1157P002
49-90407
05/28/10 GE
Safety Instructions
. . . . . . . . 2–4
Operating Instructions
Control Panel . . . . . . . . . . . . . . . . . . 5, 6
Control Settings . . . . . . . . . . . . . . . . . . 7
Features . . . . . . . . . . . . . . . . . . . . . . . . . 8
Loading and Using
the Dryer . . . . . . . . . . . . . . . . . . . .10–11
Reversing the Door
. . . . . . . . . . . . . . 9
Venting the Dryer . . . . . . . . . . . . . . .11
Troubleshooting Tips
. . . 12, 13
Consumer Support
Consumer Support . . . . . . . . . . . . . . 16
Warranty
. . . . . . . . . . . . . . . . . . . . . . 15
GEAppliances.com
Write the model and serial
numbers here:
Model #
________________
Serial #
________________
You can find them on a label
on the front of the dryer behind the
door.