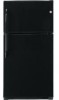
GE GTS21KBXBB Use and Care Manual
GE GTS21KBXBB - 21 cu. Ft. Top Freezer Refrigerator Manual
 |
UPC - 084691179184
View all GE GTS21KBXBB manuals
Add to My Manuals
Save this manual to your list of manuals |
GE GTS21KBXBB manual content summary:
- GE GTS21KBXBB | Use and Care Manual - Page 1
Light Bulb 11 Installation Instructions Icemaker Installation 13-16 Preparing to Install the Refrigerator 12 Reversing the Door Swing . . . .21-25 Water Line Installation 17-21 Troubleshooting Tips 26-29 Normal Operating Sounds 26 Consumer Support Consumer Support . . . . .Back Cover Warranty - GE GTS21KBXBB | Use and Care Manual - Page 2
Consumer Support Troubleshooting Tips Installation Instructions Operating Instructions Safety Instructions IMPORTANT SAFETY INFORMATION. READ ALL INSTRUCTIONS BEFORE USING. WARNING! Use this appliance only for its intended purpose as described in this Owner's Manual. SAFETY PRECAUTIONS When using - GE GTS21KBXBB | Use and Care Manual - Page 3
Safety Instructions Operating Instructions Installation Instructions Troubleshooting Tips Consumer Support GEAppliances.com DANGER! RISK OF CHILD ENTRAPMENT PROPER DISPOSAL OF THE REFRIGERATOR Child entrapment and suffocation are not problems of the past. Junked or abandoned refrigerators are - GE GTS21KBXBB | Use and Care Manual - Page 4
Support Troubleshooting Tips Installation Instructions Operating Instructions Safety Instructions IMPORTANT SAFETY INFORMATION. READ ALL INSTRUCTIONS BEFORE USING. WARNING! HOW TO CONNECT ELECTRICITY length or at either end. When moving the refrigerator away from the wall, be careful not to roll - GE GTS21KBXBB | Use and Care Manual - Page 5
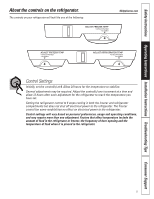
Safety Instructions Operating Instructions Installation Instructions Troubleshooting Tips Consumer Support About the controls on the refrigerator. The controls on your refrigerator will look like one of the following: GEAppliances.com 4 4 4 Control Settings Initially, set the control(s) at 4. - GE GTS21KBXBB | Use and Care Manual - Page 6
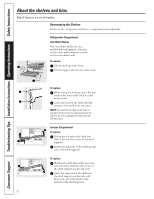
Consumer Support Troubleshooting Tips Installation Instructions Operating Instructions Safety Instructions About the shelves and bins. Not all features are on all models. Rearranging the Shelves Shelves in the refrigerator and freezer compartments are adjustable. Lift up and out Refrigerator - GE GTS21KBXBB | Use and Care Manual - Page 7
Safety Instructions Operating Instructions Installation Instructions Troubleshooting Tips Consumer Support About the crispers humidity recommended for most vegetables. Slide the control all the way to the LOW setting to provide lower humidity levels recommended for most fruits. Snack Pan This - GE GTS21KBXBB | Use and Care Manual - Page 8
Consumer Support Troubleshooting Tips Installation Instructions Operating Instructions Safety Instructions About crisper removal. Not slide the drawers out. In some cases, when you roll the refrigerator out, you will need to move the refrigerator to the left or right as you roll it out. To remove - GE GTS21KBXBB | Use and Care Manual - Page 9
Safety Instructions Operating Instructions Installation Instructions Troubleshooting Tips Consumer Support About the automatic icemaker. A newly-installed refrigerator may take 12-24 hours to begin making ice. GEAppliances.com There are 2 types of icemakers: Power Switch Icemaker Green Power - GE GTS21KBXBB | Use and Care Manual - Page 10
Consumer Support Troubleshooting Tips Installation Instructions Operating Instructions Safety Instructions Care and cleaning of the refrigerator. available at most appliance parts stores. Behind the Refrigerator Be careful when moving the refrigerator Pull the refrigerator straight out and - GE GTS21KBXBB | Use and Care Manual - Page 11
Safety Instructions Operating Instructions Installation Instructions Troubleshooting Tips Consumer Support GEAppliances.com Preparing for Vacation For long vacations or absences, remove food and unplug the refrigerator. Move the refrigerator control to the 1 (off) position and clean the interior - GE GTS21KBXBB | Use and Care Manual - Page 12
have to be connected to a cold water line. A GE water supply kit (containing tubing, shutoff valve, fittings and instructions) is available at extra cost from your dealer or by visiting our Website at GEAppliances.com or Parts and Accessories, 800.626.2002. REFRIGERATOR LOCATION • Do not install the - GE GTS21KBXBB | Use and Care Manual - Page 13
Installation Instructions ICEMAKER INSTALLATION INSTRUCTIONS BEFORE YOU BEGIN Read each step thoroughly before proceeding. • CAUTION - Unplug the Refrigerator. To eliminate the danger of electric shock during installation, you must unplug the refrigerator from its electrical outlet. TOOLS YOU - GE GTS21KBXBB | Use and Care Manual - Page 14
Installation Instructions ICEMAKER INSTALLATION INSTRUCTIONS (CONT.) 5 INSTALL THE ICEMAKER FILL CUP Install the of the icemaker. (Check the rear of the refrigerator to make sure the fill tube has not been pushed out of the back of the refrigerator). • The icemaker mounting screws are located in - GE GTS21KBXBB | Use and Care Manual - Page 15
LINE CLAMP • Attach the metal water line clamp (strain relief) to the refrigerator. Drive the screw from the kit through the clamp at the indent into the metal clamp is for the house water line (see the Water Line Installation Instructions). It is not to be used for the tubing from the water valve - GE GTS21KBXBB | Use and Care Manual - Page 16
(CONT.) 14 WATER VALVE INSTALLED Refer to the Water Line Installation Instructions for connection to the home water supply. After water line installation is installation for warranty purposes. Apply it to the back of the refrigerator. The icemaker installation inside the freezer is now complete. 16 - GE GTS21KBXBB | Use and Care Manual - Page 17
installation is not warranted by the refrigerator or icemaker manufacturer. Follow these instructions carefully to minimize the risk of expensive water damage. Water hammer (water banging in the pipes) in house plumbing can cause damage to refrigerator parts and lead to water leakage or flooding - GE GTS21KBXBB | Use and Care Manual - Page 18
Instructions INSTALLING THE WATER LINE (CONT.) WHAT YOU WILL NEED (CONT.) Install the shutoff valve on the nearest frequently used drinking water line. • A GE water supply kit (containing tubing, shutoff valve and fittings listed below) is available at extra cost from your dealer or from Parts - GE GTS21KBXBB | Use and Care Manual - Page 19
Installation Instructions 4 FASTEN THE SHUTOFF VALVE Fasten the shutoff valve to fully inserted into the valve. Tighten the compression nut securely. For plastic tubing from a GE SmartConnect™ Refrigerator Tubing kit, insert the molded end of the tubing into the shutoff valve and tighten - GE GTS21KBXBB | Use and Care Manual - Page 20
Instructions INSTALLING THE WATER LINE (CONT.) 9 CONNECT THE TUBING TO THE REFRIGERATOR NOTES: • Before making the connection to the refrigerator, be sure the refrigerator , tighten the fitting. For plastic tubing from a GE SmartConnect™ Refrigerator Tubing kit, insert the molded end of the tubing - GE GTS21KBXBB | Use and Care Manual - Page 21
the instructions all the way through before starting. • Handle parts carefully to avoid scratching paint. • Set screws down by their related parts to side, follow these same instructions and reverse all references to left and right. Unplug the refrigerator from its electrical outlet. Empty all door - GE GTS21KBXBB | Use and Care Manual - Page 22
Installation Instructions REVERSING THE DOOR SWING (CONT.) 1 REMOVE FREEZER DOOR Tape of the center hinge pin. Set the door on a non-scratching surface with the inside up. 2 REMOVE REFRIGERATOR DOOR Tape the door shut with masking tape. Remove the center hinge by removing two hinge screws with a - GE GTS21KBXBB | Use and Care Manual - Page 23
Installation Instructions 5 TRANSFER DOOR STOPS On each door, move the metal door stop from the right to the left. Move any screws from the left to the right. Door Stop Door Stop Left Side Right Side 6 REVERSING DOOR HANDLES - TRANSFER FREEZER DOOR HANDLE TO THE RIGHT SIDE OF THE REFRIGERATOR - GE GTS21KBXBB | Use and Care Manual - Page 24
Installation Instructions REVERSING THE DOOR SWING (CONT.) 7 REVERSING DOOR HANDLES - TRANSFER REFRIGERATOR DOOR HANDLE TO THE RIGHT SIDE OF THE FREEZER DOOR 1. Remove the two screws securing the top end of the handle with a Phillips screwdriver. 7 REVERSING DOOR HANDLES - TRANSFER REFRIGERATOR - GE GTS21KBXBB | Use and Care Manual - Page 25
Instructions 8 REHANG THE REFRIGERATOR DOOR Lower the refrigerator hinge so the pin fits into the door socket. Support the door on the handle side and make sure tighten all screws and replace top hinge cover. If both doors are too low: 1. Remove the hinge cover on top of the freezer door and - GE GTS21KBXBB | Use and Care Manual - Page 26
Consumer Support Troubleshooting Tips Installation Instructions Operating Instructions Safety Instructions Normal operating sounds. Newer refrigerators sound different from older refrigerators. Modern refrigerators have more features and use newer technology. Do you hear what I hear? These sounds - GE GTS21KBXBB | Use and Care Manual - Page 27
Installation Instructions Troubleshooting Tips Consumer Support Before you call for service... Troubleshooting Tips Save time and money! Review the charts on the following pages first and you may not need to call for service. GEAppliances.com Problem Freezer door pops open when refrigerator door - GE GTS21KBXBB | Use and Care Manual - Page 28
Installation Instructions Operating Instructions Safety Instructions Before you call for service... Troubleshooting Tips Problem Automatic icemaker (on some models) does not work Ice cubes have odor/taste Slow ice cube freezing Moisture forms on cabinet surface between the doors Refrigerator has - GE GTS21KBXBB | Use and Care Manual - Page 29
Safety Instructions Operating Instructions Installation Instructions Troubleshooting Tips Consumer Support GEAppliances.com Problem Hot air from bottom of refrigerator Food freezing in the refrigerator Orange glow in the freezer Door bins do not fit in the door Controls do not light up Water has - GE GTS21KBXBB | Use and Care Manual - Page 30
GE and All Other Brands: One (1) Year One (1) Year TERMS AND CONDITIONS: This warranty applies only for single family domestic use in Canada when the Refrigerator has been properly installed according to the instructions supplied by Mabe and is connected to an adequate and proper utility service - GE GTS21KBXBB | Use and Care Manual - Page 31
Instructions Troubleshooting Tips Consumer Support Refrigerator Warranty. (For customers in the United States) All warranty service provided by our Factory Service Centers, or an authorized Customer Care® technician. To schedule service, on-line, visit us at GEAppliances.com, or call 800.GE - GE GTS21KBXBB | Use and Care Manual - Page 32
37 Machine à glaçons automatique . . . .40 Réglages 36 Soins et nettoyage Remplacement de l'ampoule électrique 42 Soins et nettoyage 41, 42 Instructions d'installation Installation de la conduite d'eau 48-52 Installation de la machine à glaçons 44-47 Inversion du sens d'ouverture des portes 53 - GE GTS21KBXBB | Use and Care Manual - Page 33
devez bien installer et placer votre réfrigérateur, conformément aux Instructions d'installation avant de l'utiliser. ■ Ne permettez jamais aux enfants branché. NOTE : Nous vous recommandons fortement de faire accomplir tout service par un technicien qualifié. ■ Vous ne coupez pas l'alimentation du - GE GTS21KBXBB | Use and Care Manual - Page 34
SÉCURITÉ. LISEZ TOUTES LES INSTRUCTIONS AVANT D'UTILISER VOTRE RÉFRIGÉRATEUR. DANGER! RISQUE DE PRISE AU PIÈGE D'ENFANT BONNE MISE AU REBUT ». Si vous vous débarrassez de votre vieux réfrigérateur, suivez les instructions suivantes pour prévenir tout accident. Avant de jeter votre vieux réfrigé - GE GTS21KBXBB | Use and Care Manual - Page 35
réfrigérateur du mur, faites attention de ne pas écraser ou d'endommager le cordon d'alimentation. LISEZ ET SUIVEZ SOIGNEUSEMENT CES MESURES DE SÉCURITÉ. CONSERVEZ CES INSTRUCTIONS Installation Conseils de dépannage Soutien au consommateur 35 - GE GTS21KBXBB | Use and Care Manual - Page 36
Mesures de sécurité Fonctionnement Réglages de votre réfrigérateur. es réglages de votre réfrigérateur ressemblent à l'un des réglages suivants : 4 4 4 Réglages de votre réfrigérateur Initialement, mettez le(s) réglage(s) en position 4. Attendez 24 heures que la température se stabilise. - GE GTS21KBXBB | Use and Care Manual - Page 37
l'autre côté entre dans un rail situé sur la paroi arrière de l'armoire. Enlèvement : Faites basculer la clayette vers le haut à l'avant. Soulevez le support pour l'enlever du rail. Remise en place : Tout en faisant basculer la clayette vers le haut, insérez le crochet du haut situé à l'arrière - GE GTS21KBXBB | Use and Care Manual - Page 38
le réglage en position HIGH (élevée) pour obtenir l'humidité maximum qui est recommandée pour la plupart des légumes. Faites glisser le réglage en position LOW (basse) pour obtenir l'humidité minimum qui est recommandée pour la plupart des fruits. Bac à casse-croûte Vous pouvez mettre ce bac - GE GTS21KBXBB | Use and Care Manual - Page 39
Mesures de sécurité Fonctionnement Enlèvement du bacs à légumes. Tous les modèles n'ont pas toutes ces caractéristiques. Pour enlever le couvercle en verre Pour enlever le cadre Enlèvement du bac à légumes Videz la clayette inférieure avant d'essayer d'enlever les bacs de rangement. Pour - GE GTS21KBXBB | Use and Care Manual - Page 40
réfrigérateur. Ce réfrigérateur est compatible avec les modèles de machines à glaçons (accessoire) IM4A ou IM6. Consultez le feuillet d'instructions « L » fourni avec la trousse de montage à l'intérieur du compartiment congélateur. Afin de faciliter l'installation de la machine à glaçons, les - GE GTS21KBXBB | Use and Care Manual - Page 41
Mesures de sécurité Soins et nettoyage de votre réfrigérateur. www.electromenagersge.ca Nettoyage de l'extérieur Les poignées de porte et les garnitures. Nettoyez avec un linge trempé dans de l'eau savonneuse. Séchez avec un linge doux. Conservez l'extérieur propre. Essuyez avec un linge propre - GE GTS21KBXBB | Use and Care Manual - Page 42
Mesures de sécurité Fonctionnement Soins et nettoyage de votre réfrigérateur. (suite) Préparation de départ en vacances Pour de longues vacances ou absences, enlevez tous vos aliments et débranchez votre réfrigérateur. Mettez le bouton de réglage du compartiment congé - GE GTS21KBXBB | Use and Care Manual - Page 43
d'eau froide. Vous pouvez acheter une trousse d'alimentation d'eau GE (contenant la tuyauterie, le robinet d'arrêt, les joints et les instructions) chez votre revendeur ou en vous adressant à notre site Web à l'adresse www.electromenagersge.ca ou à notre service de Pièces et accessoires au numéro de - GE GTS21KBXBB | Use and Care Manual - Page 44
soulever l'avant du réfrigérateur et dans le sens inverse pour l'abaisser. Sens des aiguilles d'une montre pour soulever le réfrigérateur INSTRUCTIONS D'INSTALLATION DE LA MACHINE À GLAÇONS AVANT DE COMMENCER Lisez soigneusement chaque étape avant de commencer. • MISE EN GARDE - Débranchez le - GE GTS21KBXBB | Use and Care Manual - Page 45
Instructions d'installation INSTRUCTIONS D'INSTALLATION DE LA MACHINE À GLAÇONS (SUITE) 1 INSTALLATION DU TUBE DE REMPLISSAGE D'EAU • Si un orifice d'entrée pour tube de remplissage d'eau se trouve déjà à l'arriè - GE GTS21KBXBB | Use and Care Manual - Page 46
Instructions d'installation INSTRUCTIONS D'INSTALLATION DE LA MACHINE À GLAÇONS (SUITE) 6 BRANCHEZ LA MACHINE À GLAÇONS En tenant la machine à glaçons en place, insérez la fiche de - GE GTS21KBXBB | Use and Care Manual - Page 47
arrière de l'armoire du réfrigérateur. • Vous devez utiliser ce collier de serrage en métal sur la conduite d'eau de la maison (consultez Instructions d'installation de la conduite d'eau). Vous ne pouvez pas l'utiliser sur la conduite allant du robinet d'eau jusqu'à la machine à glaçons. Vis Collier - GE GTS21KBXBB | Use and Care Manual - Page 48
dont vous avez besoin. Nous approuvons les conduites d'eau en matière plastique GE SmartConnect™ Refrigerator Tubing (WX08X10002, WX08X10006, WX08X10015 et WX08X10025). Si vous installez un système d'eau GE Reverse Osmosis dans votre réfrigérateur, la seule installation approuvée est celle de - GE GTS21KBXBB | Use and Care Manual - Page 49
Instructions d'installation CE DONT VOUS AUREZ BESOIN • Tuyaux en cuivre ou trousse GE SmartConnect™ Refrigerator Tubing, diamètre exté alimentation d'eau GE (contenant un tuyau, un robinet d'arrêt et les joints énumérés ci-dessous) chez votre distributeur local ou en le commandant au service de piè - GE GTS21KBXBB | Use and Care Manual - Page 50
Instructions d'installation INSTALLATION DE LA CONDUITE D'EAU (SUITE) Installez le robinet d'arrêt sur la canalisation d'eau potable la plus fréquemment utilisée. 1 FERMEZ L'ALIMENTATION PRINCIPALE D'EAU - GE GTS21KBXBB | Use and Care Manual - Page 51
Instructions d'installation 7 BRANCHEZ LE TUYAU AU ROBINET Placez un écrou de tenant le tuyau, serrez le raccord. Si vous utilisez un tuyau en matière plastique d'une trousse GE SmartConnect™ Refrigerator Tubing, insérez l'extrémité moulée du tuyau dans le robinet d'arrêt et serrez l'écrou - GE GTS21KBXBB | Use and Care Manual - Page 52
Instructions d'installation INSTALLATION DE LA CONDUITE D'EAU (SUITE) 9 BRANCHEZ LE TUYAU À VOTRE RÉFRIGÉRATEUR (SUITE) L'une des illustrations ci-dessous va ressembler au branchement de votre ré - GE GTS21KBXBB | Use and Care Manual - Page 53
Instructions d'installation INVERSION DU SENS D'OUVERTURE DES PORTES NOTES IMPORTANTES Pour inverser le sens d'ouverture des portes : • Lisez toutes les directives avant de commencer. • Manipulez les - GE GTS21KBXBB | Use and Care Manual - Page 54
Instructions d'installation INVERSION DU SENS D'OUVERTURE DES PORTES (SUITE) 2 ENLEVEZ LA é et en tirant son bas directement vers vous. Rondelle en matière plastique Axe de charnière Support de la charnière centrale Porte du compartiment réfrigération Enlevez le ruban-cache et faites basculer la - GE GTS21KBXBB | Use and Care Manual - Page 55
Instructions d'installation 5 FAITES PASSER LES BUTÉES DE PORTE À GAUCHE Sur chaque porte, faites passer la butée de porte en métal de droite à gauche. Faites passer - GE GTS21KBXBB | Use and Care Manual - Page 56
Instructions d'installation INVERSION DU SENS D'OUVERTURE DES PORTES (SUITE) 7 CHANGEMENT DE CÔTÉ DES POIGNÉES DE PORTE - TRANSFERT DE LA PORTE DU COMPARTIMENT RÉFRIGÉRATION AU CÔTÉ DROIT - GE GTS21KBXBB | Use and Care Manual - Page 57
Instructions d'installation 8 ACCROCHEZ À NOUVEAU LA PORTE DU COMPARTIMENT RÉFRIGÉRATION Faites descendre place en haut de l'axe de la charnière. Rondelle en matière plastique Axe de charnière Support de charnière centrale 10 AJUSTEMENT DES PORTES (LE CAS ÉCHÉANT) Si la porte du compartiment cong - GE GTS21KBXBB | Use and Care Manual - Page 58
Mesures de sécurité Fonctionnement Bruits normaux de fonctionnement. Les réfrigérateurs plus récents font des bruits différents de ceux des anciens. Les réfrigérateurs modernes présentent plus de fonctions et sont plus avancés sur le plan technologique. Entendez-vous ce que j'entends ? Ces bruits - GE GTS21KBXBB | Use and Care Manual - Page 59
Mesures de sécurité Fonctionnement Installation Avant d'appeler un réparateur... www.electromenagersge.ca En cas de panne Économisez votre temps et votre argent! Consultez les tableaux des pages suivantes, vous éviterez peut-être d'appeler un réparateur. Problème La porte du compartiment congé - GE GTS21KBXBB | Use and Care Manual - Page 60
Mesures de sécurité Fonctionnement Installation Avant d'appeler un réparateur... En cas de panne Problème Du givre ou des cristaux de glace se forment sur les aliments congelés (du givre à l'intérieur des paquets d'aliments est normal) Vibration fréquente Petits glaçons ou glaçons creux à l'inté - GE GTS21KBXBB | Use and Care Manual - Page 61
Mesures de sécurité www.electromenagersge.ca Fonctionnement Installation Problème De l'humidité se forme sur la surface de l'armoire du réfrigérateur entre les portes Le réfrigérateur sent De l'humidité se forme à l'intérieur (quand il fait humide, l'air transporte de l'humidité à l'intérieur du - GE GTS21KBXBB | Use and Care Manual - Page 62
Mesures de sécurité Fonctionnement Avant d'appeler un réparateur... En cas de panne Problème Les commandes ne s'allument pas Mauvais goût/odeur de l'eau L'eau versée dans le premier verre est chaude La machine à glaçons ne distribue ni eau ni glaçons Causes possibles Solutions Certains modèles - GE GTS21KBXBB | Use and Care Manual - Page 63
GE et toutes autre marques : Un (1) an Un (1) an Un (1) an Un (1) an TERMES ET CONDITIONS : La présente garantie ne s'applique qu'à l'utilisation domestique par une seule famille au Canada, lorsque le réfrigérateur a été installé conformément aux instructions pour obtenir un service dans le cadre - GE GTS21KBXBB | Use and Care Manual - Page 64
-nous par Internet au site electromenagersge.ca 24 heures par jour, tous les jours de l'année. Service de réparations Service de réparations GE est tout près de vous. Pour faire réparer votre électroménager GE, il suffit de nous téléphoner. 1.800.561.3344 Studio de conception réaliste Sur demande - GE GTS21KBXBB | Use and Care Manual - Page 65
95 Escriba aquí el modelo y el número de serie: Modelo Serie Encuentre estos números en la etiqueta gris en el lado izquierdo, cerca de la parte superior del compartimiento del refrigerador. 65 Consejos para la solución de problemas Soporte al consumidor - GE GTS21KBXBB | Use and Care Manual - Page 66
fin para el cual fue diseñado como se describe en este Manual del propietario. PRECAUCIONES DE SEGURIDAD Al usar aparatos eléctricos, se evite el contacto con las partes en movimiento del mecanismo eyector, o con el elemento calefactor localizado en la parte inferior del dispositivo para hacer - GE GTS21KBXBB | Use and Care Manual - Page 67
Información de seguridad Instrucciones de operación GEAppliances.com ¡PELIGRO! RIESGO DE QUE LOS NIÑOS SE QUEDEN ATRAPADOS ELIMINACIÓN APROPIADA DEL REFRIGERADOR Los problemas de que los niños se queden atrapados y se sofoquen no son cosas del pasado. Los refrigeradores desechados o abandonados - GE GTS21KBXBB | Use and Care Manual - Page 68
Información de seguridad Instrucciones de operación IMPORTANTE INFORMACIÓN DE SEGURIDAD. LEA TODAS LAS INSTRUCCIONES ANTES DE SU USO. ¡ADVERTENCIA! CÓMO CONECTAR LA ELECTRICIDAD Bajo ninguna circunstancia, no corte ni retire la tercera pata (conexión a tierra) del cable de electricidad. Por - GE GTS21KBXBB | Use and Care Manual - Page 69
Información de seguridad Instrucciones de operación Sobre los controles del refrigerador. Los controles en su refrigerador lucirán como uno de los siguientes: GEAppliances.com 4 4 4 Niveles de los controles Inicialmente, fije el o los controles del refrigerador en 4. Permita que transcurran - GE GTS21KBXBB | Use and Care Manual - Page 70
hacia arriba Para volver a colocar: Mientras inclina el estante hacia arriba, introduzca el gancho superior de la parte trasera del estante en la ranura de la guía. Baje el frente del estante hasta que la parte inferior del estante se trabe en su lugar. NOTA: El estante ubicado a la derecha de la - GE GTS21KBXBB | Use and Care Manual - Page 71
ón HIGH (alto) para ofrecer la alta humedad recomendada para la mayoría de los vegetales. Lleve el control por completo hasta la posición LOW (bajo) para ofrecer los niveles bajos de humedad recomendados para la mayoría de las frutas. Contenedor de meriendas Este contenedor puede moverse a la - GE GTS21KBXBB | Use and Care Manual - Page 72
Información de seguridad OpIenrsattroiupncegrcIianocsitnróeunsctdieons Sobre retirar la gaveta preservadora de alimentos. No todas las características están presentes en todos los modelos. Para retirar la cubierta de vidrio Para retirar el marco Cómo retirar la gaveta preservadora de alimentos - GE GTS21KBXBB | Use and Care Manual - Page 73
una máquina de hielos automática, existe un kit accesorio para la máquina de hielos que está disponible por un costo adicional. Revise en la parte posterior del refrigerador en busca del kit para la máquina de hielos específica que necesita para su modelo. Este refrigerador acepta el accesorio de - GE GTS21KBXBB | Use and Care Manual - Page 74
extremas puede causar que se quiebren. Manipule los estantes de vidrio con cuidado. Golpear el vidrio templado puede causar que se quiebre. No lave ninguna parte plástica del refrigerador en la lavadora de platos. Lave las bandejas de hielo en agua tibia únicamente- no las ponga en la lavadora de - GE GTS21KBXBB | Use and Care Manual - Page 75
Compartimiento del refrigerador-Luz superior PRECAUCIÓN: La bombilla podría estar caliente. Desconecte el refrigerador. La bombilla está ubicada en la parte superior del compartimiento del refrigerador, cerca de la abertura. Reemplácela con una bombilla de electrodomésticos del mismo o de inferior - GE GTS21KBXBB | Use and Care Manual - Page 76
Modelos GTH21, GTL21 y GTS21 Si tiene preguntas, llame al 1.800.GE.CARES o bien visite nuestra página Web: GEAppliances.com ANTES DE de nivelación frontales en sentido de las agujas del reloj para levantar la parte frontal del refrigerador y en sentido contrario a las agujas del reloj para bajarla - GE GTS21KBXBB | Use and Care Manual - Page 77
llenado de agua, deslice el sello por el tubo y anexe el mismo a la parte trasera del borde de la entrada del tubo de agua. • Retire el refuerzo adhesivo y deslice el tubo sobre el hoyo central de la parte superior, en la parte trasera del refrigerador. Presione el mismo firmemente sobre la entrada - GE GTS21KBXBB | Use and Care Manual - Page 78
destornillador Phillips para retirar la cubierta de acceso del compartimiento del compresor. Esto requiere retirar los seis tornillos que unen la cubierta a la parte posterior de la caja del refrigerador. Asegúrese de guardar los tornillos ya que la cubierta de acceso se debe reinstalar más adelante - GE GTS21KBXBB | Use and Care Manual - Page 79
Inserte el tornillo del kit a través de la abrazadera en la hendidura en la parte de atrás del gabinete. • La abrazadera metálica es para la tubería del AGUA • Una la tubería plástica del agua a la parte posterior del gabinete con los sujetadores con adhesivo posterior, separando los sujetadores - GE GTS21KBXBB | Use and Care Manual - Page 80
la tubería) en la tubería de la casa puede causar daños a las partes del refrigerador y conducir a un goteo o inundación por el agua. Llame a NECESITA • Kit de tubería de cobre para el refrigerador o SmartConnect™ de GE, 1/4″ de diámetro externo para conectar el refrigerador al suministro de agua. - GE GTS21KBXBB | Use and Care Manual - Page 81
para la instalación QUÉ NECESITA (CONT.) • Un kit de suministro de agua de GE (contiene tubería, válvula de cierre y accesorios enumerados abajo) está disponible a un costo adicional en su tienda o por medio de Partes y Accesorios, 800.626.2002. • Un suministro de agua fría. La presión del agua - GE GTS21KBXBB | Use and Care Manual - Page 82
en la válvula. Apriete la tuerca de compresión firmemente. Para tubería de plástico de un kit de tubería para el refrigerador SmartConnect™ de GE, inserte el extremo moldeado de la tubería en la válvula de cierre y apriete la tuerca de compresión hasta que esté firmemente apretada a mano, luego - GE GTS21KBXBB | Use and Care Manual - Page 83
instalar un filtro de agua si su suministro de agua tiene arena o partículas que podrían obstruir la malla de la válvula de agua del como se muestra. En el kit de tubería para el refrigerador SmartConnect™ de GE, las tuercas ya vienen armadas con la tubería. Inserte el extremo de la tubería - GE GTS21KBXBB | Use and Care Manual - Page 84
CÓMO INSTALAR LA TUBERÍA DEL AGUA (CONT.) 11 CONECTE EL REFRIGERADOR Organice el cable de la tubería de manera que no vibre contra la parte trasera del refrigerador o contra la pared. Empuje el refrigerador hacia la pared. Verifique que haya una conexión a tierra adecuada antes del uso. IMPORTANTE - GE GTS21KBXBB | Use and Care Manual - Page 85
) o destornillador delgado 1 RETIRE LA PUERTA DEL CONGELADOR Pegue la puerta cerrada con cinta de enmascarar. Retire la cubierta de la bisagra en la parte superior de la puerta del congelador. Quite los cuatro tornillos con una llave de cubo y trinquete de 5/16″, luego levante la bisagra directo - GE GTS21KBXBB | Use and Care Manual - Page 86
superiores de los sujetadores metálicos en los orificios ovalados asegurando que una las pestañas plásticas en la parte posterior de la rejilla entre en cada uno de los orificios ovalados. Luego, presione la base de la rejilla hacia delante hasta que encaje en - GE GTS21KBXBB | Use and Care Manual - Page 87
Instrucciones para la instalación 6 CÓMO INVERTIR LAS MANIJAS DE LA PUERTA - CAMBIE LA MANIJA DE LA PUERTA DEL CONGELADOR AL LADO DERECHO DE LA PUERTA DEL REFRIGERADOR 1. Quite los dos tornillos que sujetan el extremo inferior de la manija con un destornillador Phillips. 2. Gire la manija hacia - GE GTS21KBXBB | Use and Care Manual - Page 88
Instrucciones para la instalación CÓMO INVERTIR EL VAIVÉN DE LA PUERTA (CONT.) 7 CÓMO INVERTIR LAS MANIJAS DE LA PUERTA - CAMBIE LA MANIJA DE LA PUERTA DEL REFRIGERADOR AL LADO DERECHO DE LA PUERTA DEL CONGELADOR 1. Quite los dos tornillos que sujetan el extremo superior de la manija con un - GE GTS21KBXBB | Use and Care Manual - Page 89
y coloque el perno de la bisagra central en el orificio de la parte superior de la puerta. Recuerde incluir la arandela. Coloque la puerta en su congelador está demasiado alta: Quite la tapa de la bisagra sobre la parte superior de la puerta del congelador y afloje los cuatro tornillos con una llave - GE GTS21KBXBB | Use and Care Manual - Page 90
Información de seguridad Instrucciones de operación Instrucciones para la instalación Sonidos normales de operación. Los refrigeradores más nuevos producen sonidos diferentes a los modelos más antiguos. Los refrigeradores modernos tienen más funciones y usan tecnología más reciente. ¿Usted - GE GTS21KBXBB | Use and Care Manual - Page 91
Información de seguridad Antes de llamar a solicitar servicio... GEAppliances.com Consejos para la solución de problemas ¡Ahorre tiempo y dinero! Revise las tablas en las siguientes páginas primero y quizás no necesite llamar a solicitar el servicio. Problema Se abre la puerta del congelador - GE GTS21KBXBB | Use and Care Manual - Page 92
Información de seguridad Instrucciones de operación Instrucciones para la instalación Antes de llamar a solicitar servicio... Consejos para la solución de problemas Problema Cubos pequeños o huecos La máquina de hielos automática no funciona (en algunos modelos) Los cubos de hielo tienen olor / - GE GTS21KBXBB | Use and Care Manual - Page 93
la bombilla. Motor de enfriamiento normal del flujo del aire. En el proceso de refrigeración, es normal que salga calor de la parte inferior del refrigerador. Algunas cubiertas de piso son sensibles y se decolorarán ante estas temperaturas normales y seguras. Los alimentos están muy •Mueva los - GE GTS21KBXBB | Use and Care Manual - Page 94
producto está situado en un área que no dispone de servicio por parte de un proveedor de servicio autorizado de GE, podría tener que hacerse cargo de los costes de envío o consumidor local o la oficina del Attorney General en su localidad. 94 Garante: General Electric Company. Louisville, KY 40225 - GE GTS21KBXBB | Use and Care Manual - Page 95
GE Appliances 24 horas al día, cualquier día del año! Para mayor conveniencia y servicio más rápido, ya puede descargar los Manuales durante horas normales de oficina. GE Consumer Home Services estará aún ahí cuando o escríbanos a: General Manager, Customer Relations GE Appliances, Appliance Park - GE GTS21KBXBB | Use and Care Manual - Page 96
Consumer Support. GE Appliances Website In the U.S.: GEAppliances.com Have a question or need assistance with your appliance? Try the GE Appliances Website 24 hours a day, any day of the year! For greater convenience and faster service, you can now download Owner's Manuals, order parts or even
-
 1
1 -
 2
2 -
 3
3 -
 4
4 -
 5
5 -
 6
6 -
 7
7 -
8
-
9
-
10
-
11
-
12
-
13
-
14
-
15
-
16
-
17
-
18
-
19
-
20
-
21
-
22
-
23
-
24
-
25
-
26
-
27
-
28
-
29
-
30
-
31
-
32
-
33
-
34
-
35
-
36
-
37
-
38
-
39
-
40
-
41
-
42
-
43
-
44
-
45
-
46
-
47
-
48
-
49
-
50
-
51
-
52
-
53
-
54
-
55
-
56
-
57
-
58
-
59
-
60
-
61
-
62
-
63
-
64
-
65
-
66
-
67
-
68
-
69
-
70
-
71
-
72
-
73
-
74
-
75
-
76
-
77
-
78
-
79
-
80
-
81
-
82
-
83
-
84
-
85
-
86
-
87
-
88
-
89
-
90
-
91
-
92
-
93
-
94
-
95
-
96
 |
 |

GEAppliances.com
Refrigerators
Top-Freezer
197D7733P001
49-60505-2
04-09 JR
Safety Instructions
. . . . . . . . . . . .2–4
Operating Instructions
Automatic Icemaker . . . . . . . . . . . . .9
Controls . . . . . . . . . . . . . . . . . . . . . . .5
Crispers and Pans . . . . . . . . . . . . .7, 8
Shelves and Bins . . . . . . . . . . . . . . . .6
Care and Cleaning
Care and Cleaning . . . . . . . . . .10, 11
Replacing the Light Bulb . . . . . . . .11
Installation Instructions
Icemaker Installation . . . . . . . .13–16
Preparing to Install
the Refrigerator
. . . . . . . . . . . . . . .12
Reversing the Door Swing . . . .21–25
Water Line Installation . . . . . . .17–21
Troubleshooting Tips
. . . . . . .26–29
Normal Operating Sounds . . . . . . .26
Consumer Support
Consumer Support
. . . . .Back Cover
Warranty for
Canadian Customers . . . . . . . . . . . .30
Warranty for U.S. Customers . . . . .31
Réfrigérateurs
Congélateur supérieur
Refrigeradores
Congelador superior
Models GTH21, GTL21
and GTS21
Manuel d’utilisation
et d’installation
Owner’s Manual and
Installation Instructions
Manual del propietario
e instalación
La section française commence à la page 32
La sección en español empieza en la página 65
Note to Installer –
Be sure to leave
these instructions with the Consumer.
Note to Consumer –
Keep these
instructions for future reference.
Note à l’installateur –
Assurez-vous
de laisser ces instructions au
consommateur.
Note au consommateur –
Conservez ces instructions pour
référence future.
Nota al instalador –
Asegúrese
de dejar estas instrucciones con el
consumidor.
Nota al consumidor –
Conserve
estas instrucciones para referencia futura.
Write the model and serial numbers here:
Model #
__________________________
Serial #
__________________________
Find these numbers on the gray label
on the left side, near the top of the
refrigerator compartment.