GE HO98064 User Manual
GE HO98064 Manual
 |
View all GE HO98064 manuals
Add to My Manuals
Save this manual to your list of manuals |
GE HO98064 manual content summary:
- GE HO98064 | User Manual - Page 1
EasyCam Pro User's Manual Table of Contents 1. Getting Started 02 a. Package Contents 02 b. System Requirements 02 c. EasyCam Pro Camera View Nomenclature 02 d. Verifying USB Presence 03 e. Windows Installation Of EasyCam Pro Camera And Driver 04 f. Installing Application Software Downloading - GE HO98064 | User Manual - Page 2
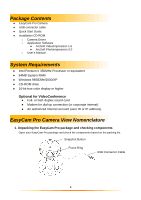
● EasyCam Pro Camera ● USB connector cable ● Quick Start Guide ● Installation CD-ROM ○ Camera Driver ○ Application Software ● ArcSoft VideoImpression 1.6 ● ArcSoft PhotoImpression 3.0 ○ User's Manual System Requirements ● Intel Pentium II 350MHz Processor or equivalent ● 64MB System RAM ● Windows - GE HO98064 | User Manual - Page 3
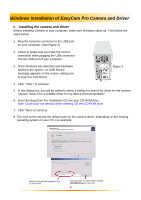
your computer main board. Figure 1 For computer main board with USB supported: Enter BIOS settings and enable USB, see the documentation that came computer. Normally, when the computer power is turned on, before starting windows, the computer will hint you to press some keys for displaying BIOS menu - GE HO98064 | User Manual - Page 4
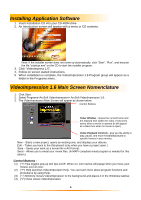
)." 6. Insert the EasyCam Pro Installation CD into your CD-ROM drive. Note: Close auto-run window while inserting CD into CD-ROM drive. 7. Click "Next" to continue. 8. The next screen shows the default path for the camera driver, depending on the existing operating system on your PC. For example - GE HO98064 | User Manual - Page 5
will search for the EasyCam Pro device and driver location. Note: The driver file should read: d:\driver\twnkcam.inf 11. Click "Next" from the above screen, Windows will copy Driver files into your system. 12. Click "Finish" to complete the EasyCam Pro driver installation. 13. Click "Start", "Shut - GE HO98064 | User Manual - Page 6
CD to start the installer program. 3. Click "VideoImpress 1.6". 4. Follow on screen waited instructions. 5. When installation is complete, the VideoImpression Main Screen will appear as shown below. Control Buttons Timer Window - shows the current frame and the elapsed time within the - GE HO98064 | User Manual - Page 7
The introduction screen will appear with a menu of software contents. 3. Click " New. " 4. Select " Capture ". The window shows a Live preview as seen from the camera. 5. Press the sanpshot button (located on top of the camera-see EasyCam Pro Camera Nomenclature on Page 2) to capture a single frame - GE HO98064 | User Manual - Page 8
Preview Live Video or Single Frame 1. Follow steps 1~3 in "Set the Focus" to enable live preview. 2. To stop preview, click on "Stop" ( ). 3. To resume preview, click on "Preview" ( ). Record a Video or Single Frame 1. Follow steps 1~3 in "Setting the Focus" to enable live preview. 2. To start video - GE HO98064 | User Manual - Page 9
typing over the existing text. Get - Opens a window that allows you to browse through your computer to the current album. You can add thumbnails for supported file formats on your hard drive or any to get images from TWAIN devices like digital cameras and scanners. After clicking this icon, select - GE HO98064 | User Manual - Page 10
Working with the Storyboard Note: The Storyboard shows you each step or part of the movie that you are creating. You can add a thumbnail to your Storyboard by drag-n-drop, or by highlighting a thumbnail and clicking on the Add To Storyboard icon. Text Thumbnail Image Transition Sound Tracks Text - GE HO98064 | User Manual - Page 11
set where you want the video to finish (the red mark). Note: If you are a PC user, you can adjust the starting/ending frame by right-clicking the video and selecting "Setting" in the pop-up window . Editing Audio To edit Audio, Play - Starts the audio. Pause - Interrupts the audio (Clicking the - GE HO98064 | User Manual - Page 12
frame you want to print. 2. Right-click the video and select "Print." Saving a Movie 1. Click on Save on the Main Screen. 2. In the Save As window, select the drive and folder that you want to save the movie to. 3. Give the file a name, and select what type of movie you want - GE HO98064 | User Manual - Page 13
Window Magnification Controls Toolbar Main Screen Options on the Main Screen: -Opens images from an album (Album), a disk drive (From Folder), or from photo-sharing website (Online Service). You can also acquire images from TWAIN devices (Camera access other programs (Cool Software). -Lets you save - GE HO98064 | User Manual - Page 14
Toolbar: - Resizes the image when the corner handles are dragged. You can also reposition the image by dragging it. - Rotates the image at the user's discretion. - Applies a mirror effect to your image by flipping it. - Rotates the image in 90-degree increments. - Cancels the last unsaved change you - GE HO98064 | User Manual - Page 15
1. Click the Get Photo button. 2. Click the Online Service button, and then click the Download button. 3. Follow the instructions onscreen to download images from the supported photosharing website. 4. Follow the instructions onscreen to download images. Note: You must have an account with the - GE HO98064 | User Manual - Page 16
album. You can give the new album a name by typing over "New Album 1"(PC), or "Untitled" (Mac). - Launches an Open dialog that allows you to browse your by holding down the Shift key while clicking on the first and last file (Windows only). - Launches a Find dialog allows you to find image files in - GE HO98064 | User Manual - Page 17
the active layer. - Removes color on a layer, making it a transparent background (white). - Duplicates a selected area of an image to another location. Right-click (PC), or Shift-click (Mac) to select the clone source, which will be indicated by a plus (+) sign. Then click and drag over the area of - GE HO98064 | User Manual - Page 18
the image. - Evenly redistributes the grayscale or color values of the pixels in an image. The effects are varied depending on the image, but in general, the lines in the highlight and shadow areas will be sharpened. - Inverts the grayscale or color brightness values for the entire layer. This will - GE HO98064 | User Manual - Page 19
-editing programs from the Cool Software section. To add a program icon will appear on the Cool Software Palette. Saving Images Once you've and even a new file type. Email (Windows only): If your email program is MAPI- manually select the image file(s) for inclusion in an email. To Desktop (Windows - GE HO98064 | User Manual - Page 20
the image, resize the image, and select the number of copies (Windows only) that you want printed. Additional options include Auto Rotate (the program PhotoImpression provides extensive online help. If you need more information or instructions on how to use a specific feature or tool, click the Help - GE HO98064 | User Manual - Page 21
for the shortcuts. 1.5 Click Next, follow the instructions in the Audio Tuning Wizard, and then click Finish install the NetMeeting from your PC directly, please log on to http://www.microsoft.com/windows/netmeeting/ to download. 2 How To Start With The Camera 2.1. Plug the camera into your PC - GE HO98064 | User Manual - Page 22
.msn.com to download. After the installation package is downloaded to your computer, it will start installing MSN Messenger. All you have to do is follow the instructions. 1.1.2 After the installation is completed, click Start, point to Programs, and click Windows Messenger. 1.2 For Windows XP Users - GE HO98064 | User Manual - Page 23
File Format Camera Control Settings Dimension Driver Compliance OS support CMOS with 300K Pixels 24 Bits, 16.7 million RGB true color USB V1.1 Automatic Automatic Manual, 10cm~ , Sharpness, Exposure 68mm(L)X85mm(W)X83.5mm(H) w/stand Video for Windows, WDM, TWAIN Microsoft Windows 98SE/2000/ME/XP 23
-
 1
1 -
 2
2 -
 3
3 -
 4
4 -
 5
5 -
 6
6 -
 7
7 -
8
-
9
-
10
-
11
-
12
-
13
-
14
-
15
-
16
-
17
-
18
-
19
-
20
-
21
-
22
-
23
 |
 |

1
EasyCam Pro
User’s Manual
Table of Contents
1. Getting Started
.............................................................................
02
a. Package Contents
.......................................................................................
02
b. System Requirements
..................................................................................
02
c. EasyCam Pro Camera View Nomenclature
...............................................
02
d. Verifying USB Presence
.............................................................................
03
e. Windows Installation Of EasyCam Pro Camera And Driver
.....................
04
f. Installing Application Software
...................................................................
06
2. Creating A Video And Single Frame Snapshot
...........................
06
a. VideoImpression 1.6 Main Screen Nomenclature
.......................................
06
b. Setting The Focus Of The EasyCam Pro Camera
.......................................
07
c. Capturing A Single Frame By Using Snapshot Button
...............................
07
d. Previewing Live Video Or Single Frame
....................................................
08
e. Recording A Video Or Single Frame
..........................................................
08
f. Playback Of A Video Or Single Frame
........................................................
08
g. Working With Albums
.................................................................................
09
h. Working With The Storyboard
....................................................................
10
i. Editing Single Frame Snapshots
..................................................................
11
j. Editing A Video
............................................................................................
11
k. Editing Audio
...............................................................................................
11
l. Printing A Snapshot Image Or A Still Image From A Video
.......................
12
m. Saving A Movie
..........................................................................................
12
3. Getting Started With PhotoImpression 3.0
..................................
13
a. Opening An Image From A Disc Drive
.......................................................
15
b. Acquiring Images From A TWAIN Device
..................................................
15
c. Downloading Images From The Internet
....................................................
15
d. Working With Albums
.................................................................................
16
e. Editing Images
.............................................................................................
17
f. Creative Project Templates
..........................................................................
19
g. Saving Images
.............................................................................................
19
h. Printing Images
...........................................................................................
20
i. Getting Help
.................................................................................................
20
4. How To Install NetMeeting
...........................................................
21
5. How To Install MSN Messenger
..................................................
22
6. Specifications
.................................................................................
23