GE JGRP20BEJBB Use and Care Manual
GE JGRP20BEJBB - 24 Inch Single Gas Wall Oven Manual
 |
UPC - 084691098768
View all GE JGRP20BEJBB manuals
Add to My Manuals
Save this manual to your list of manuals |
GE JGRP20BEJBB manual content summary:
- GE JGRP20BEJBB | Use and Care Manual - Page 1
instructions 18, 19 Special features of your oven control 8, 9 Timed baking 14 Type of margarine 15 Vent 11 Before You Call For Service Thermostat adjustment - do it yourself 15 Troubleshooting tips . . . . .23-25 Owner's Manual JGRP20 Consumer Support Accessories 26 Consumer Support - GE JGRP20BEJBB | Use and Care Manual - Page 2
light any appliance. ■ Do not touch any electrical switch; do not use any phone in your building. ■ Immediately call your gas supplier from a neighbor's phone. Follow the gas supplier's instructions. ■ If you cannot reach your gas supplier, call the fire department. - Installation and service must - GE JGRP20BEJBB | Use and Care Manual - Page 3
can be converted for use with either type of gas. See the Installation Instructions. ■ Do not attempt to repair or replace any part of your oven unless it is specifically recommended in this manual. All other service should be referred to a qualified technician. ■ Be sure all packaging materials - GE JGRP20BEJBB | Use and Care Manual - Page 4
INSTRUCTIONS BEFORE USING. SAFETY PRECAUTIONS ■ CAUTION: Items of interest to children should not be stored in cabinets above an oven-children climbing on the oven to reach items could be seriously injured. WARNING: NEVER use this appliance illness. Troubleshooting Tips Consumer Support 4 - GE JGRP20BEJBB | Use and Care Manual - Page 5
cleaner or oven liner of any kind should be used in or around any part of the oven. Residue from oven cleaners will damage the inside of the oven when the self-clean cycle is used. READ AND FOLLOW THIS SAFETY INFORMATION CAREFULLY. SAVE THESE INSTRUCTIONS 5 Troubleshooting Tips Consumer Support - GE JGRP20BEJBB | Use and Care Manual - Page 6
Using the oven controls. Safety Instructions Operating Instructions Troubleshooting Tips Oven Control, Clock and Timer Features and Settings BAKE Pad START Pad Touch this pad to select the bake function. Must be touched to start any cooking BAKE Light Flashes while in edit mode-you can - GE JGRP20BEJBB | Use and Care Manual - Page 7
Safety Instructions Operating Instructions Using the clock and timer. Not all features are on all models. To Set the Clock The clock must be set to the correct time of day for the automatic oven timing To Cancel the Timer Touch the TIMER/CLOCK pad twice. Troubleshooting Tips Consumer Support 7 - GE JGRP20BEJBB | Use and Care Manual - Page 8
Safety Instructions Operating Instructions Special features of your oven control. Your new touch pad control has additional features that you may choose to use. activate the cook and hold feature and leave the control set in this special features mode. Troubleshooting Tips Consumer Support 8 - GE JGRP20BEJBB | Use and Care Manual - Page 9
Instructions Operating Instructions clock, timer and oven light touch pads. Fahrenheit or Centigrade Temperature Selection Your oven control is set to display will show C (Centigrade). Touch the START pad. Troubleshooting Tips Consumer Support Changing the Speed of the +/- Pads As you use the - GE JGRP20BEJBB | Use and Care Manual - Page 10
Safety Instructions Operating Instructions Using the Sabbath Feature. (Designed for use on the Jewish Sabbath and Holidays.) (on some models) The Sabbath feature can be used for baking/roasting only. It cannot be used for broiling, self-cleaning, or Delay Start cooking. NOTE: The oven light comes - GE JGRP20BEJBB | Use and Care Manual - Page 11
Doing so may cause oven failure or fire. Operating Instructions Troubleshooting Tips Power Outage The oven burner will not light in the event of an electrical power outage. CAUTION: Do not attempt to light it manually with a match. Oven Light Touch the OVEN LIGHT pad to turn the light on or off - GE JGRP20BEJBB | Use and Care Manual - Page 12
or C Operating Instructions Troubleshooting Tips Preheating Preheat the oven if the recipe calls for it. Preheat means bringing the oven up to the necessary. For ovens without a preheat indicator light or tone, preheat 10 minutes. After the oven is preheated, place the food in the oven as quickly - GE JGRP20BEJBB | Use and Care Manual - Page 13
pale or light browning may occur. Do not use a cookie sheet so large that it touches the walls or the door of the oven. Never oven door frequently during cooking allows heat to escape and makes baking times longer. Your baking results may also be affected. Operating Instructions Troubleshooting - GE JGRP20BEJBB | Use and Care Manual - Page 14
Instructions Troubleshooting Tips How to Set Immediate Start and Automatic Stop CAUTION: To avoid possible burns, place the racks in the correct position before you turn the oven on. The oven oven the oven light turn the oven on. set the oven temperature. Touch oven turns oven will the oven light - GE JGRP20BEJBB | Use and Care Manual - Page 15
Safety Instructions Operating Instructions Adjust the oven thermostat-Do it yourself! GEAppliances.com You may find that your new oven cooks differently than the one it replaced. Use your new oven for a few weeks to become more familiar with it. If you still think your new oven is too hot or too - GE JGRP20BEJBB | Use and Care Manual - Page 16
Instructions Operating Instructions to the Broiling Guide. Turn the food, then use the times given for the second side as a guide to the preferred on one side of the pan, call for service. How to Set Your Oven for Broiling Touch the BROIL HI/LO pad. Troubleshooting Tips Consumer Support 16 - GE JGRP20BEJBB | Use and Care Manual - Page 17
Safety Instructions Operating Instructions Using the broiling feature. GEAppliances.com ■ For best results, use a pan designed for broiling. It is designed to minimize smoking and spattering by trapping the juices in the shielded lower part of the pan. NOTE: Always broil with the oven door - GE JGRP20BEJBB | Use and Care Manual - Page 18
. Make sure the oven light bulb cover is in place and the oven light is off. IMPORTANT: The health of some birds is extremely sensitive to the fumes given off during the self-cleaning cycle of any oven. Move birds to another well-ventilated room. Operating Instructions Troubleshooting Tips How to - GE JGRP20BEJBB | Use and Care Manual - Page 19
.com Be sure electrical power is off and all surfaces are cool before cleaning any part of the oven. How to Remove Protective Shipping Film and Packaging Tape Carefully grasp a corner of the protective shipping film with your fingers and slowly peel it from the appliance surface. Do not - GE JGRP20BEJBB | Use and Care Manual - Page 20
Instructions Care and cleaning of the oven. Wire cover holder Oven Light Replacement CAUTION: Before replacing your oven light bulb, disconnect the electrical power to the oven at the main fuse or circuit breaker panel. Be sure to let the light cover and bulb cool completely. The oven light - GE JGRP20BEJBB | Use and Care Manual - Page 21
cleaner instructions for cleaning the stainless steel surface. To inquire about purchasing stainless steel appliance cleaner or polish, or to find the location of a dealer nearest you, please call our toll-free number: National Parts Center 1.800.626.2002 GEAppliances.com Troubleshooting Tips - GE JGRP20BEJBB | Use and Care Manual - Page 22
will resettle. Visually check the color of the flames every 6 months. If they look like illustration (A) in the Troubleshooting Tips in this guide, call for service. When checking the flames, before and after adjustments, the oven door should be closed. Troubleshooting Tips Consumer Support - GE JGRP20BEJBB | Use and Care Manual - Page 23
Safety Instructions Operating Instructions Before you call for service... Troubleshooting Tips Save time and money! Review the charts on the following pages first and you may not need to call for service. GEAppliances.com Problem Oven will not work Control signals after entering cooking time or - GE JGRP20BEJBB | Use and Care Manual - Page 24
Before you call for service... Troubleshooting Tips Safety Instructions Operating Instructions Troubleshooting Tips Problem Oven will not self-clean "Crackling" or "popping" sound Excessive smoking Oven door will not open after a clean cycle Oven not clean after a clean cycle "LOCK DOOR" flashes - GE JGRP20BEJBB | Use and Care Manual - Page 25
flames should look like B or C, depending on the type of gas you use. With LP gas, some yellow tipping on outer cones is normal. A-Yellow flames Call for service B-Yellow tips C-Soft blue flames on outer cones Normal for natural Normal for LP gas gas Troubleshooting Tips Consumer Support 25 - GE JGRP20BEJBB | Use and Care Manual - Page 26
model number ready. Operating Instructions Troubleshooting Tips Grates Surface Burner Heads and Caps Surface Elements and Drip Pans Knobs or Oven Racks Oven Elements Light days of purchasing your GE cooking product. PM10X311 Small Large* U.S. Part # Canada Part # Dimensions WB48X10055 - GE JGRP20BEJBB | Use and Care Manual - Page 27
Instructions Operating Instructions GE Gas Oven Warranty. All warranty service provided by our Factory Service Centers, or an authorized Customer Care® technician. To schedule service on-line, visit us at GEAppliances.com, or call 800.GE.CARES (800.432.2737). Please have serial number and model - GE JGRP20BEJBB | Use and Care Manual - Page 28
Support. GE Appliances Website GEAppliances.com Have a question or need assistance with your appliance? Try the GE Appliances Website 24 hours a day, any day of the year! For greater convenience and faster service, you can now download Owner's Manuals, order parts or even schedule service
-
 1
1 -
 2
2 -
 3
3 -
 4
4 -
 5
5 -
 6
6 -
 7
7 -
8
-
9
-
10
-
11
-
12
-
13
-
14
-
15
-
16
-
17
-
18
-
19
-
20
-
21
-
22
-
23
-
24
-
25
-
26
-
27
-
28
 |
 |

Safety Instructions
. . . . . .2–5
Operating Instructions, Tips
Aluminum foil . . . . . . . .5, 12, 20
Baking feature . . . . . . . . . .12, 13
Broiling feature . . . . . . . . .16, 17
Clock and timer . . . . . . . . . . . . .7
Control features and settings . .6
Ignition
. . . . . . . . . . . . . . . . . .11
Light . . . . . . . . . . . . . . . . . . . . .11
Preheating . . . . . . . . . . . . . . . .12
Racks
. . . . . . . . . . . . . . . . .11, 12
Roasting feature
. . . . . . . . . . .13
Sabbath feature . . . . . . . . . . . .10
Self-cleaning
instructions
. . . . . . . . . . . .18, 19
Special features of your
oven control
. . . . . . . . . . . . .8, 9
Timed baking
. . . . . . . . . . . . .14
Type of margarine . . . . . . . . . .15
Vent
. . . . . . . . . . . . . . . . . . . . .11
Care and Cleaning
Burner air adjustment
shutters . . . . . . . . . . . . . . . . . . .22
Control panel
. . . . . . . . . . . . .21
Door removal . . . . . . . . . . . . . .21
Light replacement . . . . . . . . . .20
Orifice hood adjustment
. . . .22
Oven bottom . . . . . . . . . . . . . .20
Oven vents . . . . . . . . . . . . . . . .19
Racks
. . . . . . . . . . . . . . . . . . . .20
Self-cleaning
instructions
. . . . . . . . . . . .18, 19
Stainless Steel Surfaces . . . . . .21
Storage drawer . . . . . . . . . . . . .19
Before You Call For
Service
Thermostat adjustment —
do it yourself . . . . . . . . . . . . . .15
Troubleshooting tips . . . . .23–25
Consumer Support
Accessories . . . . . . . . . . . . . . . .26
Consumer Support . . .Back Cover
Warranty . . . . . . . . . . . . . . . . . .27
49-80557-1
03-09 JR
JGRP20
Owner’s Manual
GEAppliances.com
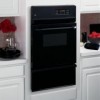
Built-In Gas
Wall Oven
Write the model and serial
numbers here:
Model #______________________
Serial # ______________________
You can find them on a label on the
front of the oven behind the door.