GE JGSP28DENWW Use and Care Manual
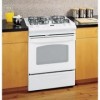
GE JGSP28DENWW - 30 Inch Slide-In Gas Range Manual
 |
UPC - 084691179979
View all GE JGSP28DENWW manuals
Add to My Manuals
Save this manual to your list of manuals |
GE JGSP28DENWW manual content summary:
- GE JGSP28DENWW | Use and Care Manual - Page 1
26 Knobs 22 Lift-Off Oven Door 25 Light Bulbs 23, 24 Oven Vent and Cooktop Air Inlet 26 Owner's Manual JGSP28 Packaging Tape 22 Painted Surfaces 26 Racks 24 Stainless Steel Surfaces 26 Storage Drawer 24 Vent 26 Troubleshooting Tips 27-30 Accessories 33 Consumer Support Consumer Support - GE JGSP28DENWW | Use and Care Manual - Page 2
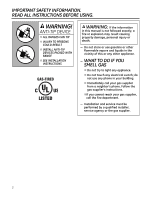
. n Do not touch any electrical switch; do not use any phone in your building. n Immediately call your gas supplier from a neighbor's phone. Follow the gas supplier's instructions. nIf you cannot reach your gas supplier, call the fire department. - Installation and service must be performed by - GE JGSP28DENWW | Use and Care Manual - Page 3
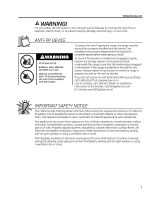
electric shock, or to prevent property damage, personal injury, or loss of life. ANTI-TIP DEVICE To reduce the risk of tipping the range, the range must be secured by a properly installed anti-tip bracket. See installation instructions insulation in self-clean ovens gives off a very small - GE JGSP28DENWW | Use and Care Manual - Page 4
to repair or replace any part of your range unless it is specifically recommended in this manual. All other service should be referred to a qualified technician. n Be sure your range is correctly adjusted by a qualified service technician or installer for the type of gas (natural or LP) that is - GE JGSP28DENWW | Use and Care Manual - Page 5
tile or linoleum that cannot withstand such type of use. Never install it directly over interior kitchen carpeting. n Do not allow anyone to climb, stand or hang on the oven door, storage drawer or cooktop. They could damage the range and even tip it over, causing severe personal injury. CAUTION - GE JGSP28DENWW | Use and Care Manual - Page 6
INSTRUCTIONS ring that is placed over the burner grate to support the wok. This ring acts as a heat trap n If you smell gas, turn off the gas to the range and call a qualified service technician. Never use operate the burner without all burner parts in place. line any part of the cooktop. Doing so - GE JGSP28DENWW | Use and Care Manual - Page 7
self-cleaning the oven, remove shiny, silver-colored oven racks (on some models) and all oven off and disconnect the power supply. Have it serviced by a qualified technician. n Clean only parts listed in this Owner's Manual. READ AND FOLLOW THIS SAFETY INFORMATION CAREFULLY. SAVE THESE INSTRUCTIONS - GE JGSP28DENWW | Use and Care Manual - Page 8
Throughout this manual, features and appearance may vary from your model. Push the control knob in and turn it to the LITE position. How to Light a Gas Surface Burner Push the control knob in and turn it to the LITE position. You will hear a little clicking noise-the sound of the electric spark - GE JGSP28DENWW | Use and Care Manual - Page 9
oven cooking. It conducts heat very slowly and cools very slowly. Check cookware manufacturer's directions to be sure it can be used on gas ranges. Stainless Steel Stove Top Grills Do not use stove top grills on your sealed gas burners. If you use the stove top grill on the sealed gas a support ring. - GE JGSP28DENWW | Use and Care Manual - Page 10
the oven controls. Throughout this manual, features and appearance may vary from your model. CONTROL PRESS + AND - AND HOLD FOR 3 SECONDS Oven oven to cool for one hour. Put the oven back into operation. If the function error code repeats, disconnect the power to the range and call for service. - GE JGSP28DENWW | Use and Care Manual - Page 11
Do not make any attempt to operate the electric ignition oven during an electrical power failure. The oven or broiler cannot be lit during a power failure. Gas will not flow unless the glow bar is hot. If the oven is in use when a power failure occurs, the oven burner shuts off and cannot be re-lit - GE JGSP28DENWW | Use and Care Manual - Page 12
turn the oven on. The oven has 7 rack positions. Before you begin... The racks have stops, so that when placed correctly on the supports, they oven. NOTE: A cooling fan will automatically turn on and off to cool internal parts. This is normal, and the fan may continue to run even after the oven - GE JGSP28DENWW | Use and Care Manual - Page 13
use of aluminum foil is not covered by the product warranty GEAppliances.com Baking results will be better if baking pans are centered in the oven as much as possible. If baking with more than one pan, place the pans so each has at least 1" to 11⁄2" of air space around - GE JGSP28DENWW | Use and Care Manual - Page 14
. Place the meat or fish on a broiler grid in a broiler pan designed for broiling. Follow suggested rack positions in the Broiling Guide. The oven door must be closed during broiling. Touch the BROIL HI/LO pad once for HI Broil. To change to LO Broil, touch the BROIL HI/ - GE JGSP28DENWW | Use and Care Manual - Page 15
Not all features are on all models. To Set the Clock The clock must be set to the correct time of day for the automatic oven timing functions to work properly. The you may wish to turn off the time of day clock display on your range. Touch the CLOCK pad once to turn off the time of day display. - GE JGSP28DENWW | Use and Care Manual - Page 16
timed baking and roasting features (on some models). Do not lock the oven door with the latch during timed cooking. The the oven temperature will be displayed instead). How to Set a Delayed Start and Automatic Stop The oven will turn on at the time of day you set, cook for a specific length of - GE JGSP28DENWW | Use and Care Manual - Page 17
are addressed separately in the following sections. 12 Hour Shut-Off With this feature, should you forget and leave the oven on, the control will automatically turn off the oven after 12 hours during baking functions or after 3 hours during a broil function. If you wish to turn OFF this feature - GE JGSP28DENWW | Use and Care Manual - Page 18
, self-cleaning or Start Time cooking. NOTE: The oven light comes on automatically (on some models) when the door is opened and goes off when After a random delay period of approximately 30 seconds to 1 minute, will appear in the display indicating that the oven is baking/roasting. If doesn't - GE JGSP28DENWW | Use and Care Manual - Page 19
GEAppliances.com How to Exit the Sabbath Feature Touch the CLEAR/OFF pad. If the oven is cooking, wait for a random delay period of approximately 30 seconds to 1 minute, until only is in the display. Touch and hold both the BAKE and BROIL HI/LO pads, at the same time, until - GE JGSP28DENWW | Use and Care Manual - Page 20
-colored oven racks (on some models) can be self-cleaned, but they will darken, lose their luster and become hard to slide. Soil on the front frame of the range and outside the gasket on the door will need to be cleaned by hand. Clean these areas with hot water, soap-filled steel wool pads - GE JGSP28DENWW | Use and Care Manual - Page 21
the start time set time. It will not be possible to unlatch the oven door until the temperature drops below the lock temperature and the clean light goes time between 3 and 5 hours, depending on the amount of soil in your oven. Touch the START TIME pad. The earliest start time you can set will appear - GE JGSP28DENWW | Use and Care Manual - Page 22
part of the range. WARNING: If your range is removed for cleaning, servicing or any reason, be sure the anti-tip device is reengaged properly when the range and water. Make sure the insides of the knobs are dry before replacing. Replace the knobs in the OFF position to ensure proper placement. - GE JGSP28DENWW | Use and Care Manual - Page 23
call our toll-free number: National Parts Center 800.626.2002 (U.S.) 800.661.1616 (Canada) Rubber Grate Feet WB02T10101 After cleaning, may offer a better grip. CAUTION: Before replacing your oven light bulb, disconnect the electrical power to the oven at the main fuse or circuit breaker panel. Be - GE JGSP28DENWW | Use and Care Manual - Page 24
and rotate clockwise to engage. Connect electrical power to the range. Rail Stop guide Storage Drawer Removal To remove the drawer guides. Lower the front of the drawer and push back until it closes. Oven rack Oven Racks All oven racks may be cleaned by hand with an abrasive cleaner or steel - GE JGSP28DENWW | Use and Care Manual - Page 25
has become displaced on the door, you should have it replaced. Cleaning the Oven Door To clean the inside of the door: n Because the area inside the n Use soap and water to thoroughly clean the top, sides and front of the oven door. Rinse well. You may also use a glass cleaner to clean the glass on - GE JGSP28DENWW | Use and Care Manual - Page 26
the range. Stainless Steel Surfaces (on some models) Do not use a steel wool pad; it will scratch the surface. To clean the stainless steel surface, use warm sudsy water or a stainless steel cleaner or polish. Always wipe the surface in the direction of the grain. Follow the cleaner instructions - GE JGSP28DENWW | Use and Care Manual - Page 27
to LP gas, check all steps in the Installation Instructions that came with your range. • Tighten or replace the bulb. • Call for service. • Make sure electrical plug is plugged into a live, properly grounded outlet. • Replace the fuse or reset the circuit breaker. • See the Using the oven section - GE JGSP28DENWW | Use and Care Manual - Page 28
removable, it sometimes gets out of position during installation. Remove and replace the oven door. See the Lift-Off Oven Door section. • Reposition the drawer. See the Storage Drawer Removal instructions in the Care and cleaning of your range section. • Reposition the drawer. See the Storage Drawer - GE JGSP28DENWW | Use and Care Manual - Page 29
longer period of time. • Touch the CLEAR/OFF pad. Put the oven back into operation. • Disconnect all power to the range for at least 30 seconds and then reconnect power. If the function error code repeats, call for service. • If a function error code appears during the selfcleaning cycle, check the - GE JGSP28DENWW | Use and Care Manual - Page 30
service... Troubleshooting Tips Problem Possible Causes The installed connection from the oven is normal for the first few times the oven is used. A cooling fan may automatically turn on and off. What To Do • Contact installer clock. If the oven was in use, oven section. • This is temporary. • - GE JGSP28DENWW | Use and Care Manual - Page 31
Please place in envelope and mail to: Veuillez mettre dans une enveloppe et envoyez à : OWNERSHIP REGISTRATION P.O. BOX 1780 MISSISSAUGA, ONTARIO L4Y 4G1 (FOR CANADIAN CONSUMERS ONLY) 31 - GE JGSP28DENWW | Use and Care Manual - Page 32
32 - GE JGSP28DENWW | Use and Care Manual - Page 33
Drip Pans Knobs or Oven Racks Oven Elements Light Bulbs Experience these other great products to keep your kitchen looking great! Ceramic Cooktop Cleaning Kit: Includes cleaner, scraper and pad Ceramic Cooktop Cleaning Wipes Stainless Steel Appliance Polish Wipes Stainless Steel Appliance - GE JGSP28DENWW | Use and Care Manual - Page 34
GE Gas Range 32. (For customers in the United States) All warranty service provided by our Factory Service Centers, or an authorized Customer Care® technician. To schedule service, visit us on-line at GEAppliances.com, or call 800.GE.CARES (800.432.2737). Please have serial number and model number - GE JGSP28DENWW | Use and Care Manual - Page 35
GE Gas Range Warranty. (For customers in Canada) All warranty service provided by our Factory Service Centres or an authorized Customer Care® technician. To schedule service, visit us on-line at www.GEAppliances.ca or call 1.800.561.3344. Please have serial number and model number available when - GE JGSP28DENWW | Use and Care Manual - Page 36
business hours. Instructions contained in this manual cover procedures to be performed by any user. Other servicing generally should be referred to qualified service personnel. Caution must be exercised, since improper servicing may cause unsafe operation. Customers in Canada should consult the
-
 1
1 -
 2
2 -
 3
3 -
 4
4 -
 5
5 -
 6
6 -
 7
7 -
8
-
9
-
10
-
11
-
12
-
13
-
14
-
15
-
16
-
17
-
18
-
19
-
20
-
21
-
22
-
23
-
24
-
25
-
26
-
27
-
28
-
29
-
30
-
31
-
32
-
33
-
34
-
35
-
36
 |
 |

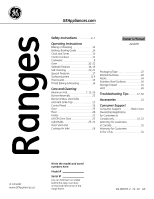
Safety Instructions
. . . . . . . . . . . . .2–7
Operating Instructions
Baking or Roasting . . . . . . . . . . . . . . . . . . .12
Broiling, Broiling Guide . . . . . . . . . . . . . . .14
Clock and Timer . . . . . . . . . . . . . . . . . . . . . .15
Control Lockout . . . . . . . . . . . . . . . . . . . . . .11
Cookware . . . . . . . . . . . . . . . . . . . . . . . . . . . . .9
Oven . . . . . . . . . . . . . . . . . . . . . . . . . . . . .10–21
Sabbath Feature . . . . . . . . . . . . . . . . .18, 19
Self-Cleaning . . . . . . . . . . . . . . . . . . . . .20, 21
Special Features . . . . . . . . . . . . . . . . . . . . .17
Surface Burners . . . . . . . . . . . . . . . . . . . . 8, 9
Thermostat . . . . . . . . . . . . . . . . . . . . . . . . . . .19
Timed Baking & Roasting . . . . . . . . . . . .16
Care and Cleaning
Aluminum Foil . . . . . . . . . . . . . . . . . .7, 13, 26
Burner Assembly . . . . . . . . . . . . . . . . . . . . 22
Burner Grates, Vent Grille
and Vent Grille Cap . . . . . . . . . . . . . . . . . . 23
Control Panel . . . . . . . . . . . . . . . . . . . . . . . . 26
Door . . . . . . . . . . . . . . . . . . . . . . . . . . . . . . . . . 25
Floor
. . . . . . . . . . . . . . . . . . . . . . . . . . . . . . . . .26
Knobs
. . . . . . . . . . . . . . . . . . . . . . . . . . . . . . . 22
Lift-Off Oven Door . . . . . . . . . . . . . . . . . . . .25
Light Bulbs
. . . . . . . . . . . . . . . . . . . . . . .23, 24
Oven Vent and
Cooktop Air Inlet . . . . . . . . . . . . . . . . . . . . .26
Packaging Tape . . . . . . . . . . . . . . . . . . . . . .22
Painted Surfaces . . . . . . . . . . . . . . . . . . . . .26
Racks . . . . . . . . . . . . . . . . . . . . . . . . . . . . . . . . 24
Stainless Steel Surfaces . . . . . . . . . . . . . .26
Storage Drawer
. . . . . . . . . . . . . . . . . . . . . 24
Vent . . . . . . . . . . . . . . . . . . . . . . . . . . . . . . . . . 26
Troubleshooting Tips
. . . . . . . 27–30
Accessories
. . . . . . . . . . . . . . . . . . . . . . . 33
Consumer Support
Consumer Support . . . . . . . . . Back Cover
Ownership Registration
for Customers in
Canada only . . . . . . . . . . . . . . . . . . . . . .31, 32
Warranty for Customers
in Canada . . . . . . . . . . . . . . . . . . . . . . . . . . . 35
Warranty for Customers
in the U.S.A. . . . . . . . . . . . . . . . . . . . . . . . . . . 34
GEAppliances.com
JGSP28
Owner’s Manual
49-80535-2 11-10 GE
Write the model and serial
numbers here:
Model
# ______________
Serial
# ______________
You can find them on a label
behind the open oven door
on the lower left corner of the
range frame.
Ranges
In Canada:
www.GEAppliances.ca