GE PD968 Installation Instructions
GE PD968 - Profile: 30'' Drop-In Electric Range Manual
 |
View all GE PD968 manuals
Add to My Manuals
Save this manual to your list of manuals |
GE PD968 manual content summary:
- GE PD968 | Installation Instructions - Page 1
-Keep these instructions for future reference. • Proper installation is the responsibility of the installer and product failure due to improper installation is NOT covered under the warranty. • NOTE-This appliance must be properly grounded. • ATTENTION INSTALLER All electric drop-in ranges must be - GE PD968 | Installation Instructions - Page 2
utilize a four-conductor connection to an electric range. When installing an electric range in new construction, a mobile home, recreational vehicle or an area where local codes prohibit grounding through the neutral conductor, follow the instructions in the section on NEW CONSTRUCTION AND - GE PD968 | Installation Instructions - Page 3
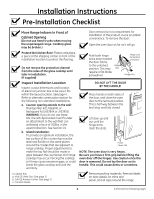
Installation Instructions Pre-Installation Checklist Move Range Indoors In Front of Cabinet Opening (Do not use hand trucks when moving the unpackaged range. Cooktop glass may be broken.) Door removal is not a requirement for installation a. Visit GE Web Site (See page 1) b. Call GE Answer Center - GE PD968 | Installation Instructions - Page 4
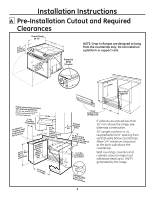
Installation Instructions A Pre-Installation Cutout and Required Clearances NOTE: Drop-In Ranges are designed to hang from the countertop only. Do not install on a platform or support rails. If cabinets are placed less than 30" min. above the range, see alternate construction. 30" ranges conform to - GE PD968 | Installation Instructions - Page 5
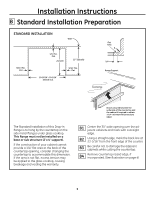
Installation Instructions B Standard Installation Preparation Standard Installation Wall 9/16" Min. Flat 1/4" Min. Flat 23-3/16" 25" Typically 9/16" Min. Flat 29-15/16"- 30-1/16" Smooth Cut Flat Area R 1/4" Range Support Countertop The Standard Installation of this Drop-In Range is to hang - GE PD968 | Installation Instructions - Page 6
Installation Instructions C Electrical the conduit from interfering with the back of the range. C4 Break open the selected knockout by placing electrical hazard or fire. Use only connectors designed for joining copper to aluminum and follow the manufacturer's recommended procedure closely. GENERAL - GE PD968 | Installation Instructions - Page 7
Installation Instructions C Electrical conductors, see "WARNING" note (See page 6). Black Range Conduit Snaps Into Box Branch Circuit Red Ground and Neutral in accordance with local code using wire nuts. C7b Attach the appliance grounding lead (green or bare copper) in accordance with local - GE PD968 | Installation Instructions - Page 8
Installation Instructions C Electrical Connections cont. C8 Reinstall Junction box cover. Do not within the junction box, do not install the oven until a clamp of the proper size is obtained. NOTE TO ELECTRICIAN: The 3 power leads supplied with this appliance are UL recognized for connection to - GE PD968 | Installation Instructions - Page 9
Installation Instructions D Standard Installation Instructions D1 Installing the Anti-Tip Bracket The anti-tip bracket is attached to the back of the Drop-In Range. It is designed to fit under the bottom of the countertop opening at the rear. Measure counter thickness at back of cutout to determine - GE PD968 | Installation Instructions - Page 10
Installation Instructions D Standard Installation Instructions cont. D2 Install Stop Screw These screws prevent the range from sliding out of position during operation. D3 Placing the Range into the Opening (Continued) Carefully slide the range toward the back of the opening. Stop pushing the - GE PD968 | Installation Instructions - Page 11
Installation Instructions D Standard Installation Instructions cont. D5 Attach the Lower Trim Attach the lower trim (supplied separately with the range) to the bottom of the vertical side trim with the 4 screws supplied. Side trim Lower trim Attach 2 screws each side Lower right end of front - GE PD968 | Installation Instructions - Page 12
Installation Instructions D Standard Installation Instructions cont. Replacing the Oven Door NOTE: Hinge Arm D13 Check for Proper Installation of Anti-Tip Bracket Lower the oven door and gently apply medium force at the handle end until movement of the range is detected. Continue pressing until - GE PD968 | Installation Instructions - Page 13
Installation Instructions Final Checklist Check to make sure the circuit breaker is closed (Reset) or the circuit fuses are replaced. Be sure power is in service If the glow is not detected within the time limit, recheck the range wiring connections. If change is required, retest again. If no change - GE PD968 | Installation Instructions - Page 14
Installation When installing in an island or other non-standard location, countertop cutout dimensions must be according to page 5. For the anti-tip bracket instructions, see page 9. In this application, do not use Backguard Kit (JXS36XX or JXS39SS). AC Cabinets Over The Range Less Than 30" If a 30 - GE PD968 | Installation Instructions - Page 15
NOTES 15 - GE PD968 | Installation Instructions - Page 16
NOTES 02-10 GE 16 31-10622-3
-
 1
1 -
 2
2 -
 3
3 -
 4
4 -
 5
5 -
 6
6 -
 7
7 -
8
-
9
-
10
-
11
-
12
-
13
-
14
-
15
-
16
 |
 |

1
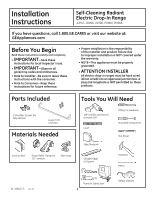
Before You Begin
Read these instructions carefully and completely.
•
IMPORTANT
—Save these
instructions for local inspector’s use.
•
IMPORTANT
—Observe all
governing codes and ordinances.
• Note to Installer—Be sure to leave these
instructions with the consumer.
• Note to Consumer—Keep these
instructions for future reference.
• Proper installation is the responsibility
of the installer and product failure due
to improper installation is NOT covered under
the warranty.
• NOTE—This appliance must be properly
grounded.
•
ATTENTION INSTALLER
All electric drop-in ranges must be hard wired
(direct wired) into an approved junction box. A
plug and receptacle is NOT permitted on these
products.
If you have questions, call 1.800.GE.CARES or visit our website at:
GEAppliances.com
Self-Cleaning Radiant
Electric Drop-In Range
Installation
Instructions
JDP47, JD968, JD900, PD900, PD968
Materials Needed
Junction Box
Wire Nuts
Strain Relief Clamp for
1/2” conduit
Parts Included
Lower Trim
4 Screws
2 Shoulder Screws (for
stop device)
Tools You Will Need
1/8” Drill Bit and Electric
or Hand Drill
Phillips Screwdriver
Nut Driver
Level
Tape Measure
Straight Edge
or Square
Hand or Sabre Saw
Standard Screwdriver
Pencil
Safety Glasses
Hammer
31-10622-3
02-10