GE PDWF2 Installation Instructions
GE PDWF2 - Profile 24 in. Dishwasher Manual
 |
View all GE PDWF2 manuals
Add to My Manuals
Save this manual to your list of manuals |
GE PDWF2 manual content summary:
- GE PDWF2 | Installation Instructions - Page 1
instructions with your Owner's Manual for future reference. • Skill Level - Installation of this dishwasher requires basic mechanical, electrical and plumbing skills. Proper installation is the responsibility of the installer. Product failure due to improper installation is not covered under the GE - GE PDWF2 | Installation Instructions - Page 2
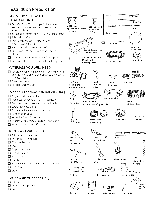
Installation Preparation PARTS SUPPLIED WITH INSTALLATION KIT: u Two #8-18 x 5/8" Phillips special head screws, to secure dishwasher to underside of countertop or sides of cabinets. u Junction box cover and #10-1/2" hex head screw u Side and top trim u Trim Panel Accessory Kit (not shown). Model - GE PDWF2 | Installation Instructions - Page 3
be fully enclosed on the top, sides, and back. • The dishwasher must not support any part of the enclosure. Clearances: Countertop In a corner installation, provide at least 2" clearance between the dishwasher and the adjacent Dishwasher cabinet, wall, or other appliance. Provide at least 28 - GE PDWF2 | Installation Instructions - Page 4
step. Special consideration for a dishwasher installed on a elevated platform If the dishwasher is installed on an elevated platform, a . Waste Tee Installation Figure D Disposer Installation Install waste tee or disposer and the air gap according to the manufacturer's instructions. ai A - GE PDWF2 | Installation Instructions - Page 5
risk of electric shock. Check with a qualified electrician or service representative if you are in doubt that the appliance is properly grounded. For models equipped with power cord: Do not modify the plug provided with the appliance; if it will not fit the outlet, have a proper outlet installed by - GE PDWF2 | Installation Instructions - Page 6
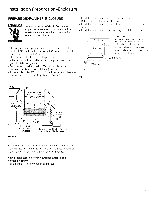
Installation Preparation-Hot Water Supply PREPARE HOT WATER SUPPLY Hot Water Line • The line may enter from either side, rear, or floor within the shaded area shown in Figure F. • The line may pass through the same hole as the electrical left side of the dishwasher. Install the hot water inlet - GE PDWF2 | Installation Instructions - Page 7
Manual - Step 19 and Step 24 • Hard Water test strip - Step 21 • Sound upgrade kit (selected models) - Step 22 • Product samples and/or coupons - Step 24 STEP 2 - INSTALL Trim Strip Figure G STEP 3 - CHECK DOOR BALANCE • With dishwasher on the wood skid, check the door balance by opening and closing - GE PDWF2 | Installation Instructions - Page 8
• Discard base. STEP 7 - INSTALL POWER CORD Skip this step if dishwasher will be permanently connected to the house electrical system. In this step you will REMOVE TOEKICK BRACE Skip this step if your model does not have a sound upgrade kit. If your model does have a sound upgrade kit, this brace - GE PDWF2 | Installation Instructions - Page 9
hose and tighten clamp. Note: Drain hose supplied with dishwasher is approximately 78" long. If a longer hose is needed, a 120" long hose 110 feet) may be purchased from an authorized GE appliance dealer. The 10' long hose is part number GPF1OL. Pump Outlet Hose Stops Hose Clamp Check Valve - GE PDWF2 | Installation Instructions - Page 10
Dishwasher Installation STEP 11- INSERT DRAIN HOSE THROUGH CABINET • Position dishwasher in front of cabinet opening. Insert drain hose into the hole in cabinet side. If a power cord is used, guide the end through a separate hole. Maximum Drain Hose Length 10' Insulation Blanket Water Line STEP - GE PDWF2 | Installation Instructions - Page 11
or decrease the amount of gap between the controls and the countertop. For flush installations of the PDW9700 Series models, it may be necessary to cut off the back panel of the tub insulation blanket so that the dishwasher door panel can be aligned with the kitchen cabinet panels. Door Fits and - GE PDWF2 | Installation Instructions - Page 12
Dishwasher Installation STEP 14 - LEVEL DISHWASHER IMPORTANT- Dishwasher must be level for proper dish rack operation and wash performance. • For Top Mount Control Models: Make sure 1/2" minimum gap is maintained. • For All Models: Place level on door to check that the dishwasher is level side-to - GE PDWF2 | Installation Instructions - Page 13
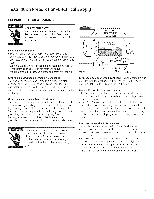
Waste Tee Installation Figure GG Disposer Installation Method 2 - High Drain Loop with the Waste Tee or Disposer Route the drain hose of the dishwasher to a been removed. DISHWASHER WILL NOT DRAIN IF PLUG IS LEFT IN PLACE. Remove Hopper Plug Tip: Avoid unnecessary service call charges. Always - GE PDWF2 | Installation Instructions - Page 14
list after installing your dishwasher to avoid charges for a service call that is not covered by your warranty. u Check to be sure power is OFF. u Open door and remove all foam and paper packaging. u Locate the Owner's Manual set aside in step 1. u Read the Owner's Manual for operating instructions - GE PDWF2 | Installation Instructions - Page 15
Also check drain line to be sure it is not kinked. u Run the dishwasher through another "Rinse Only" cycle. Check for leaks and correct if required. STEP 22 - INSTALL SOUND UPGRADE KIT IF EQUIPPED Skip this step if your model does not have the Sound Upgrade Kit. • Locate sound upgrade kit set aside - GE PDWF2 | Installation Instructions - Page 16
quiet dishwasher operation. STEP 24 - LITERATURE • Be sure to leave complete literature package, Installation Instructions and product samples with the consumer. SPECIFICATIONS SUBJECT TO CHANGE WITHOUT NOTICE GE Consumer & Industrial General Electric Company Louisville, Kentucky 40225 ge.com
-
 1
1 -
 2
2 -
 3
3 -
 4
4 -
 5
5 -
 6
6 -
 7
7 -
8
-
9
-
10
-
11
-
12
-
13
-
14
-
15
-
16
 |
 |

GE
Consumer
&
Industrial
Appliances
Installation
Instructions
Built
-In
Dishwasher
If
you
have
questions,
call
800.GE.CARES
(800.432.2737)
or
visit
our
website
at:
www.ge.com
In
Canada
call
1-800-561-3344
or
www.geappliances.ca
N
BEFORE
YOU
BEGIN
STOP
Read
these
instructions
completely
and
careful
ly.
IMPORTANT
-
Observe
al
l
governing
codes
and
ordinances.
•
Note
to
Installer
-
Be
sure
to
leave
these
instructions
for
the
consumer's
and
local
inspector's
use.
•
Note
to
Consumer
-
Keep
these
instructions
with
your
Owner's
Manual
for
future
reference.
•
Skill
Level
-
Instal
lation
of
this
dishwasher
requires
basic
mechanical,
electrical
and
plumbing
ski
l
ls.
Proper
installation
is
the
responsibility
of
the
installer.
Product
failure
due
to
improper
installation
is
not
covered
under
the
GE
Appliance
Warranty.
See
warranty
information.
•
Completion
Time
-1
to
3
Hours.
New
installations
require
more
time
than
replacement
instal
lations.
IMPORTANT
-
The
dishwasher
MUST
be
instal
led
to
al
low
for
future
removal
from
the
enclosure
if
service
is
required.
If
you
received
a
damaged
dishwasher,
you
should
immediately
contact
your
dealer
or
builder.
Optional
Accessories
-
See
the
Owner's
Manual
for
avai
lable
custom
panel
kits.
FOR
YOUR
SAFETY
Read
and
observe
all
CAUTIONS
and
WARNINGS
shown
throughout
these
instructions.
While
performing
installations
described
in
this
booklet,
gloves
and
either
safety
glasses
or
goggles
should
be
worn.
READ
CAREFULLY.
KEEP
THESE
INSTRUCTIONS.
Stainless
Steel
Tub
Models*
*Custom
front
panel
models
include
a
kit
that
contains
a
template,
hardware,
and
panel
instal
lation
instructions.
Refer
to
the
kit
instructions
when
instal
l
ing
the
custom
panel.
imagination
at
work