GE PHP900DMBB Installation Instructions
GE PHP900DMBB - 30" Induction Cooktop Manual
 |
UPC - 084691163671
View all GE PHP900DMBB manuals
Add to My Manuals
Save this manual to your list of manuals |
GE PHP900DMBB manual content summary:
- GE PHP900DMBB | Installation Instructions - Page 1
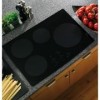
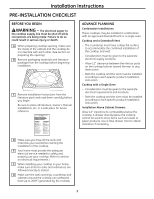
Installation 30″ Induction Cooktop Instructions PHP900, ZHU30 "If you have questions, call 800.GE.CARES or visit our website at: ge.com" "In Canada, call 800.561.3344 or visit our website at: geappliances.ca" BEFORE YOU BEGIN Read these instructions completely and carefully. • IMPORTANT - Save - GE PHP900DMBB | Installation Instructions - Page 2
installing a range hood that projects horizontally a minimum of 5″ beyond the bottom of the cabinets. Cabinet installation above the cooktop the electrical service to the cooktop before repairing or servicing the cooktop. This Canada, wiring must conform to Canadian Electrical Code (CEC). The cooktop - GE PHP900DMBB | Installation Instructions - Page 3
with a Single Oven - Consideration must be given to the separate electrical requirements and locations. - Both the cooktop and the oven must be installed according to each specific product installation instruction. Installation Above Cabinet Drawers Allow 12″ clearance to combustibles below the - GE PHP900DMBB | Installation Instructions - Page 4
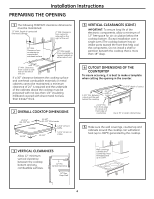
Installation Instructions PREPARING THE OPENING 1 The following MINIMUM clearance dimensions must be maintained. 13″ MAX. Depth of uprotected overhead cabinets 2″ MIN. Clearance from cutout to side wall on the right of the unit 30″ MIN. Clearance from countertop to unprotected overhead surface - GE PHP900DMBB | Installation Instructions - Page 5
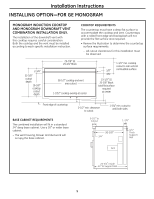
GE MONOGRAM MONOGRAM INDUCTION COOKTOP AND MONOGRAM DOWNDRAFT VENT COMBINATION INSTALLATION ONLY. The installation of the downdraft vent with this cooktop requires careful consideration. Both the cooktop and the vent must be installed according to each specific installation instruction. COOKTOP - GE PHP900DMBB | Installation Instructions - Page 6
Installation Instructions INSTALLING OPTIONS COOKTOP INSTALLATION OVER A GE OR GE MONOGRAM SINGLE OVEN These cooktops may be installed over a single oven. Both the cooktop and the oven must be installed according to each specific installation instruction. POWER SUPPLY The oven requires a separate, - GE PHP900DMBB | Installation Instructions - Page 7
Installation Instructions ELECTRICAL CONNECTIONS NEW CONSTRUCTION AND BRANCH CIRCUIT CONNECTION WARNING: Improper connection of aluminum house wiring to copper leads can result in an electrical length is 4 ft. With the cooktop in place, open the front of Install junction box so that it can be - GE PHP900DMBB | Installation Instructions - Page 8
Foam Tape Cloth under Cooktop Cooktop Glass NOTE: On stainless steel models, apply foam tape on the sides and rear. 2 INSTALL BAFFLE Secure the baffle to the cooktop with screws. NOTE: Do not install the baffle when the cooktop is installed over a single oven. 4 INSTALL HOLD-DOWN BRACKETS Start - GE PHP900DMBB | Installation Instructions - Page 9
Installation Instructions 5 INSERT COOKTOP INTO CUTOUT Insert the cooktop centered into the cutout opening. Make sure the front edge of the countertop is parallel to the cooktop. Make final check that all required clearances are met. Cooktop 6 ATTACH HOLD-DOWN BRACKETS TO CABINET Open the cabinet - GE PHP900DMBB | Installation Instructions - Page 10
CHECKLISTS Installation Instructions 1 PRE-TEST CHECKLIST A Remove all protective film, if present, and any stickers. B Check to be sure that all wiring is secure and not pinched or in contact with moving parts. C Check level of appliance. D Check that the cooktop is properly grounded. 2 - GE PHP900DMBB | Installation Instructions - Page 11
Table de cuisson à d'installation induction de 30″ PHP900, ZHU30 « Si vous avez des questions, appelez au 800.561.3344 ou visitez notre site web : electromenagersge.ca » AVANT DE COMMENCER Lisez attentivement la totalité de ces instructions. • IMPORTANT - Conservez ces instructions à l'usage de - GE PHP900DMBB | Installation Instructions - Page 12
installée par un installateur ou un technicien de service installation d'un placard au-dessus de la table de cuisson peut ne pas dépasser 33 cm (13″). • Assurez-vous que les placards et les revêtements muraux autour de la table de cuisson peuvent supporter Quincy, MA 02269 Au Canada, le câblage doit - GE PHP900DMBB | Installation Instructions - Page 13
électriques requises séparées. - La table de cuisson et le four doivent être installés conformément à leurs instructions d'installation respectives. Installation au-dessus de tiroirs de rangement Laissez un espace libre de 30 cm (12″) pour les combustibles sous la table de cuisson. Un tiroir situ - GE PHP900DMBB | Installation Instructions - Page 14
Instructions d'installation PRÉPARATION DE L'OUVERTURE 1 L'espace libre doit avoir AU MINIMUM les dimensions suivantes. 33 cm (13″) MAX de la découpe au bord avant du plan de travail Utilisez un meuble support d'au moins 76 cm (30") de large. 5 Assurez-vous que les revêtements muraux, le plan - GE PHP900DMBB | Installation Instructions - Page 15
Instructions d'installation OPTION D'INSTALLATION-POUR GE MONOGRAM INSTALLATION COMBINÉE DE LA TABLE DE CUISSON À INDUCTION MONOGRAM ET DE L'EXTRACTEUR MONOGRAM UNIQUEMENT L'installation de l'extracteur avec cette table de cuisson nécessite une réalisation soignée. La table de cuisson et l' - GE PHP900DMBB | Installation Instructions - Page 16
GE OU GE MONOGRAM Ces tables de cuisson peuvent être installées au-dessus d'un four simple. La table de cuisson et le four doivent être installés conformément à leurs instructions d'installation support requise DOIT POUVOIR SUPPORTER 90 KG (200 LB) Utilisez un meuble support d'au moins 76 cm (30″) - GE PHP900DMBB | Installation Instructions - Page 17
Instructions d'installation BRANCHEMENTS ÉLECTRIQUES CONSTRUCTION NEUVE ET RACCORDEMENT AU sauf si les normes locales l'exigent). La longueur de câble est de 1,2 m (4 pieds). Après avoir installé la table de Installez le boîtier de dérivation de manière à pouvoir l'atteindre par cuisson, ouvrez - GE PHP900DMBB | Installation Instructions - Page 18
Instructions d'installation INSTALLATION DE LA TABLE DE CUISSON 1 PROTÉGER LA SURFACE DE LA TABLE DE CUISSON Placez une serviette ou une nappe sur le plan de travail. - GE PHP900DMBB | Installation Instructions - Page 19
Instructions d'installation 5 INSÉREZ LA TABLE DE CUISSON DANS LA DÉCOUPE Insérez la table de cuisson centrée dans l'ouverture découpée. Assurez-vous que la bordure avant - GE PHP900DMBB | Installation Instructions - Page 20
CHECK-LISTS Instructions d'installation 1 CHECK-LIST DE PRÉTEST A Enlevez la totalité du film protecteur, si applicable, et tous les autocollants. B Assurez-vous que tout le câblage est bien - GE PHP900DMBB | Installation Instructions - Page 21
Instrucciones Anafe de inducción de 30″ de instalación PHP900, ZHU30 "Si tiene alguna pregunta, llame a 800.GE.CARES o visite nuestro sitio Web en: ge.com" ANTES DE COMENZAR Lea estas instrucciones por completo y con detenimiento. • IMPORTANTE - Guarde estas instrucciones para el uso de - GE PHP900DMBB | Installation Instructions - Page 22
de gabinetes, puede reducirse el riesgo mediante la instalación de una campana de cocina que sobresalga horizontalmente en 5″ como mínimo por la parte inferior de los gabinetes. La instalación de gabinetes por encima del anafe no debe superar una profundidad de 13″. • Verifique que los gabinetes - GE PHP900DMBB | Installation Instructions - Page 23
AND ORDIANCES. Note to Installer- Be sure to leave these instructions with the consumer. OWNER- Keep these instructions for future reference. Note un espacio de 12″ entre las tomas de aire de la parte inferior del anafe hacia la parte trasera y cualquier obstrucción. - El anafe y la ventilación deben - GE PHP900DMBB | Installation Instructions - Page 24
espacio de 30″ entre electrónicos, deje 12″ como mínimo de espacio libre para circulación de aire debajo de la parte inferior del anafe. (Excepto la instalación sobre un horno único). La parte inferior del anafe cuenta con tomas de aire hacia el frente que ayudan a enfriar los componentes. No instale - GE PHP900DMBB | Installation Instructions - Page 25
OPCIÓN DE INSTALACIÓN-PARA EL GE MONOGRAM SÓLO PARA LA INSTALACIÓN gabinete de base de 24″ de profundidad. Utilice un gabinete de base de 30″ o más. - La carcasa de la ventilación, el ventilador y los Rail VeVnetilnatción 22-3/4″ Parte interna 222″2h-3as/t4a"eIlnriseilddee 22" to aSpuopypoort Rail - GE PHP900DMBB | Installation Instructions - Page 26
UN HORNO GE O UN HORNO ÚNICO GE MONOGRAM Parte superior de gabinete Anafe 28-1/2″ 19-5/8″ 25″ 2-1/2″ min. 4″ min. 36″ Altura de la mesada A B 23-1/2″ min. Placa de protección de 4″ Plataforma de Zócalo típico 3/4" de soporte requerida DEBE SOPORTAR 200 LIBRAS Hornos Dim. A Dim. B 30 - GE PHP900DMBB | Installation Instructions - Page 27
códigos locales). La longitud del conducto es de 4 pies. Con el anafe en su lugar, abra el frente de la puerta del gabinete. 16″ Min. Instale la caja de conexiones de modo que pueda alcanzarse a través del frente del gabinete. Introduzca los cables del conducto a través de la abertura de la - GE PHP900DMBB | Installation Instructions - Page 28
de espuma Paño bajo el anafe Vidrio del anafe NOTA: En modelos de acero inoxidable, aplique cinta de espuma sobre los lados y parte trasera. 2 INSTALE EL DEFLECTOR Sujete el deflector al anafe con los tornillos. NOTA: No instale el deflector cuando el anafe está instalado sobre un horno único - GE PHP900DMBB | Installation Instructions - Page 29
LOS SOPORTES DE SUJECIÓN AL GABINETE Abra la puerta del gabinete. Instale el segundo tornillo a través del soporte y ajuste. Luego ajuste el primer tornillo. Instale el tornillo de mariposa hasta que toque la parte inferior de la mesada. Anafe Mesada IMPORTANTE: Gire el tornillo de mariposa - GE PHP900DMBB | Installation Instructions - Page 30
é seguro y que no haya sufrido pellizcos o esté en contacto con partes en movimiento. C Controle el nivel del artefacto. D Constate que el conducto esté bien sujeto a la caja de conexiones. E Ver el Manual de Propietario para la lista de detección de problemas. NOTA AL ELECTRICISTA locales. 30 - GE PHP900DMBB | Installation Instructions - Page 31
NOTAS Instrucciones de instalación - GE PHP900DMBB | Installation Instructions - Page 32
NOTAS Instrucciones de instalación
-
 1
1 -
 2
2 -
 3
3 -
 4
4 -
 5
5 -
 6
6 -
 7
7 -
8
-
9
-
10
-
11
-
12
-
13
-
14
-
15
-
16
-
17
-
18
-
19
-
20
-
21
-
22
-
23
-
24
-
25
-
26
-
27
-
28
-
29
-
30
-
31
-
32
 |
 |
1
Installation
30
″
Induction Cooktop
Instructions
PHP900, ZHU30
31-10667
(06-07 JR)
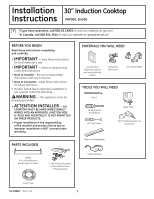
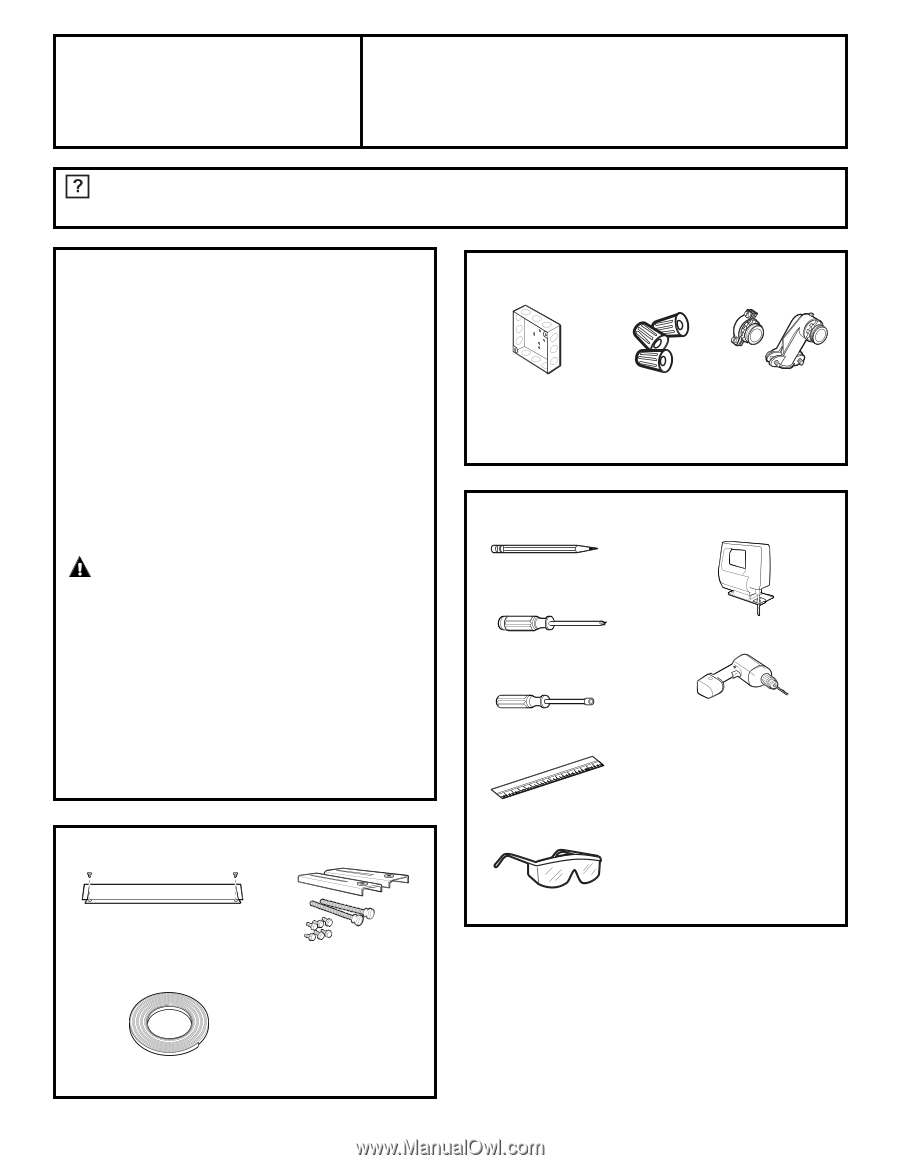
TOOLS YOU WILL NEED
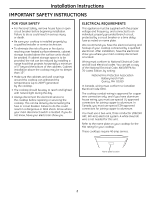
BEFORE YOU BEGIN
Read these instructions completely
and carefully.
•
IMPORTANT
—
Save these instructions
for local inspector’s use.
•
IMPORTANT
—
Observe all governing
codes and ordinances.
•
Note to Installer –
Be sure to leave these
instructions with the Consumer.
•
Note to Consumer –
Keep these instructions
for future reference.
•
Product failure due to improper installation is
not covered under the Warranty.
WARNING
—
This appliance must be
properly grounded.
•
ATTENTION INSTALLER
— ALL
COOKTOPS MUST BE HARD WIRED (DIRECT
WIRED) INTO AN APPROVED JUNCTION BOX.
A “PLUG AND RECEPTACLE” IS NOT PERMITTED
ON THESE PRODUCTS.
•
Proper installation is the responsibility
of the installer and product failure due to
improper installation is NOT covered under
warranty.
Saber Saw
Pencil
Safety Glasses
1/8
″
Drill Bit & Electric or
Hand Drill
Ruler or Straightedge
Phillips Head
Screwdriver
“If you have questions, call 800.GE.CARES
or visit our website at: ge.com”
“In Canada, call 800.561.3344
or visit our website at: geappliances.ca”
1/4
″
Nut Driver
MATERIALS YOU WILL NEED
Large Size
Wire Nuts
Junction Box
(Sized for conduit
per local electrical
codes.)
3/4” Strain Relief
PARTS INCLUDED
Baffle
(For all installations
except over an oven.)
2 Hold-Down Brackets
6 Hex-Head Screws
2 Thumbscrews
Foam Tape