GE PSB1000NWW Installation Instructions
GE PSB1000NWW - Profile Advantium: 120V Manual
 |
UPC - 084691188377
View all GE PSB1000NWW manuals
Add to My Manuals
Save this manual to your list of manuals |
GE PSB1000NWW manual content summary:
- GE PSB1000NWW | Installation Instructions - Page 1
Models Available 2 Product Dimensions and Clearances 2 Tools Required 2 Parts Supplied 2 Advance Planning 3 Installation Preparation Electrical Requirements 4 Prepare the Opening 5, 6 Remove the Packaging 6 Installation Instructions Step 1, Slide the Oven into the Cutout 7 Step 2, Install - GE PSB1000NWW | Installation Instructions - Page 2
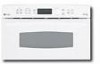
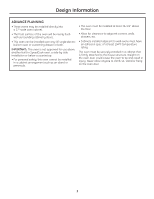
MODELS AVAILABLE Profile Models: PSB1000WW - White PSB1000BB - Black PSB1001SS - Stainless Steel Design Information PRODUCT DIMENSIONS AND CLEARANCES 22-9/ vary slightly by model. PARTS SUPPLIED • 6 Brass screws (3 required, 3 extra) • 5 Color-matched screws (4 required, 1 extra) • Bottom trim 2 - GE PSB1000NWW | Installation Instructions - Page 3
least 36-3/4" above the floor. • Allow for clearance to adjacent corners, walls, drawers, etc. • Cabinets installed adjacent to wall ovens must have an adhesion spec of at least 194ºF temperature rating. The oven must be securely installed in a cabinet that is firmly attached to the house structure - GE PSB1000NWW | Installation Instructions - Page 4
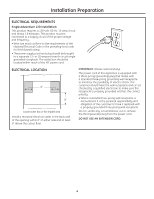
requirements of the National Electrical Code or the prevailing local code for this kilowatt rating. • The power ELECTRICAL LOCATION 6" 9" Locate outlet box in the shaded area Install a recessed electrical outlet in the back wall of the opening within 6" of either side and at least 9" above the cutout - GE PSB1000NWW | Installation Instructions - Page 5
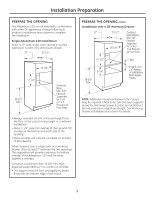
each product's Installation Instructions to complete the installation. Single Advantium 120 Installation: Order a 27"-wide single oven cabinet or cut the opening in a wall to the dimensions shown. 27" 23-1/2" 25-1/8" 17-1/2" 36-3/4" Min. Construct Base Min. 3/8" Plywood Supported by 2 x 4 or - GE PSB1000NWW | Installation Instructions - Page 6
Min. 3/8" Plywood Supported by 2 x 4 or 1 x 2 Runners all Four 25-1/8" Sides 17-1/2" 45-1/4" 9-1/4" 2" Min. Per Oven Requirement 2" Min. *If you are replacing a GE electric double oven with the combined installation of an Advantium 120 and a single oven, use the dimensions shown. The middle - GE PSB1000NWW | Installation Instructions - Page 7
TO LIFT THE OVEN. DAMAGE WILL OCCUR! 2 INSTALL BOTTOM TRIM • Align bottom trim tabs to slots in the bottom of the oven. • Lift and hold the oven at the front of the opening. Hold the oven at a 45º angle and plug in the power cord. • Carefully, slide the oven into the cabinet part way. Leave the - GE PSB1000NWW | Installation Instructions - Page 8
holes through the side flanges, 2 on each side. • Drive the color-matched screws into the side flange. 4 FINALIZE INSTALLATION • Turn the power on at the source. The interior light should come on when the door is opened. • Refer to the Owner's Manual for operating instructions. Printed in Korea - GE PSB1000NWW | Installation Instructions - Page 9
Instrucciones de instalación Profile Advantium™ 120 Hornos empotrados SpeedCook PSB1000 PSB1001 ¿Preguntas? Llame al 800.GE.CARES (800.432.2737) o bien visite nuestra página Web: GEAppliances.com ANTES DE INICIAR Lea estas instrucciones completa y cuidadosamente. • IMPORTANTE - Guarde estas - GE PSB1000NWW | Installation Instructions - Page 10
Información sobre el diseño MODELOS DISPONIBLES Modelos Profile: PSB1000WW - Blanco PSB1000BB - Negro PSB1001SS - Acero inoxidable DIMENSIONES de modelo a modelo. HERRAMIENTAS NECESARIAS • Destornillador Phillips N.°2 • Taladro manual • Broca para taladro de alta velocidad de 1/8" de diámetro • - GE PSB1000NWW | Installation Instructions - Page 11
• Estos hornos pueden instalarse directamente en alacenas para horno de 27" de ancho. • La superficie delantera del horno quedará casi alacenas circundantes. • Este horno puede instalarse sobre cualquier horno empotrado individual GE o sobre un cajón calentador, o ambos. IMPORTANTE: Este horno - GE PSB1000NWW | Installation Instructions - Page 12
Instalación única del Advantium 120: Este producto requiere los requisitos del Código Eléctrico Nacional (National Electrical Code) o el código local en vigencia para 9" Coloque la caja del tomacorriente en el área sombreada Instale un tomacorriente eléctrico empotrado en la pared posterior de la - GE PSB1000NWW | Installation Instructions - Page 13
puede instalarse en combinación con otros aparatos GE. Siempre siga las indicaciones de instalación de cada producto para realizar la instalación. Instalación única del Advantium 120: Pida una alacena para horno único de 27" de ancho o corte la abertura en la pared de acuerdo con las dimensiones - GE PSB1000NWW | Installation Instructions - Page 14
ABERTURA (CONT.) Instalación sobre un horno y un cajón calentador GE: Construya una base inferior 27" 23-1/2" sólida de mín. 3/8", sostenida por correderas de 2 Si está reemplazando un horno eléctrico doble GE por la instalación combinada de un Advantium 120 y un horno único, use las - GE PSB1000NWW | Installation Instructions - Page 15
por delante y por detrás. NO USE LA MANIJA PARA LEVANTAR EL HORNO. ¡PUEDE DAÑARSE! 2 INSTALE EL RECORTE INFERIOR • Alinee las lengüetas del recorte inferior con las ranuras de la parte inferior del horno. • Ajuste el recorte inferior del horno usando los 3 tornillos de metal incluidos. • Levante - GE PSB1000NWW | Installation Instructions - Page 16
Instalación 3 INSTALE LOS TORNILLOS DE MONTAJE • Realice orificios piloto con el taladro en los salientes laterales, energía en la fuente. La luz interior se encenderá al abrir la puerta. • Consulte el Manual del propietario para obtener instrucciones acerca de cómo operar el horno. Impreso en Corea
-
 1
1 -
 2
2 -
 3
3 -
 4
4 -
 5
5 -
 6
6 -
 7
7 -
8
-
9
-
10
-
11
-
12
-
13
-
14
-
15
-
16
 |
 |
For a Spanish version of this manual,
visit our Website at GEAppliances.com.
Para consultar una version en español
de este manual de instrucciones, visite
nuestro sitio de internet GEAppliances.com.
BEFORE YOU BEGIN
Read these instructions completely
and carefully.
•
IMPORTANT
—
Save these instructions
for local inspector’s use.
•
IMPORTANT
—
Observe all governing
codes and ordinances.
•
Note to Installer –
Be sure to leave these
instructions with the Consumer.
•
Note to Consumer –
Keep these instructions for
future reference.
•
Skill level –
Installation of this appliance requires
basic mechanical and electrical skills.
•
Completion time –
1 hour
•
Proper installation is the responsibility of the
installer.
•
Product failure due to improper installation is not
covered under the Warranty. See Owner’s
Manual for warranty information
.
IMPORTANT:
• Use this oven only for its intended purpose.
• Never use the oven for warming or heating a
room. Prolonged use of the oven without proper
ventilation can be hazardous.
Questions? Call 800.GE.CARES (800.432.2737) or visit our Website at: GEAppliances.com
Installation
Instructions
Profile Advantium
™
120 Built-In
SpeedCook Ovens
PSB1000
PSB1001
CAUTION:
For personal safety, remove house fuse or oven
circuit breaker before beginning installation to avoid
severe or fatal shock injury.
CAUTION:
For personal safety, the mounting surface must be
capable of supporting the cabinet load, in addition
to the added weight of the 75-pound product, plus
additional oven loads of up to 50 pounds or a total
weight of 125 pounds.
CAUTION:
For personal safety this product cannot be
installed in cabinet arrangements such as an island,
a peninsula or below a countertop.
CONTENTS
Design Information
Models Available
....................................................................
2
Product Dimensions and Clearances
..........................
2
Tools Required
........................................................................
2
Parts Supplied
........................................................................
2
Advance Planning
................................................................
3
Installation Preparation
Electrical Requirements
....................................................
4
Prepare the Opening
......................................................
5, 6
Remove the Packaging
......................................................
6
Installation Instructions
Step 1, Slide the Oven into the Cutout
........................
7
Step 2, Install Bottom Trim
................................................
7
Step 3, Install Mounting Screws
......................................
8
Step 4, Finalize Installation
................................................
8
MFL59060902
49-40607
02-09 JR