GE PTS25SHS Use and Care Manual
GE PTS25SHS - Profile 24.6 cu. Ft. Top Freezer Refrigerator Manual
 |
View all GE PTS25SHS manuals
Add to My Manuals
Save this manual to your list of manuals |
GE PTS25SHS manual content summary:
- GE PTS25SHS | Use and Care Manual - Page 1
Operating Sounds 23 Consumer Support Consumer Support Back Cover Performance Data Sheet 27 State of California Water Treatment Device Certificate 28 Warranty for Canadian Customers . . .29 Warranty for U.S. Customers 30 Owner's Manual & Installation Instructions Models 22, 25 Congélateur - GE PTS25SHS | Use and Care Manual - Page 2
Troubleshooting Tips Installation Instructions Operating Instructions Safety Instructions IMPORTANT SAFETY INFORMATION. READ ALL INSTRUCTIONS BEFORE USING. WARNING! Use this appliance only for its intended purpose as described in this Owner's Manual. SAFETY PRECAUTIONS When using electrical - GE PTS25SHS | Use and Care Manual - Page 3
Safety Instructions Operating Instructions Installation Instructions Troubleshooting Tips Consumer Support ge.com WARNING! HOW TO CONNECT ELECTRICITY Do not, refrigerator should always be plugged into its own individual electrical outlet which has a voltage rating that matches the rating plate - GE PTS25SHS | Use and Care Manual - Page 4
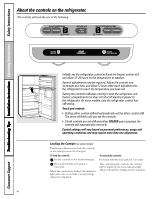
Troubleshooting Tips Installation Instructions Operating Instructions Safety Instructions About the controls on the refrigerator. The controls will look like one of the following: ADJUST FREEZER TEMP COLDER WARMER 9 IS COLDEST ACTIVATE LOCK HOLD 3 SECS ADJUST REFRIGERATOR TEMP COLDER WARMER 9 IS - GE PTS25SHS | Use and Care Manual - Page 5
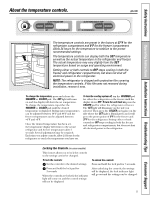
Safety Instructions Operating Instructions Installation Instructions Troubleshooting Tips Consumer Support About the temperature controls. ge.com The temperature controls are preset in the factory at 37°F for the refrigerator compartment and 0°F for the freezer compartment. Allow 24 hours for the - GE PTS25SHS | Use and Care Manual - Page 6
filter cartridges in the United States, visit our Website, ge.com, or call GE Parts and Accessories, 800.626.2002. Filter Model GSWF Suggested Retail Price $34.95 USD Customers in Canada should consult the yellow pages for the nearest Camco Service Center. CAUTION: If air has been trapped in the - GE PTS25SHS | Use and Care Manual - Page 7
Safety Instructions Operating Instructions Installation Instructions Troubleshooting Tips Consumer Support About the shelves and bins. Not all features are on all models. Rearranging the Shelves Shelves in the refrigerator and freezer compartments are adjustable. Refrigerator Compartment To - GE PTS25SHS | Use and Care Manual - Page 8
Troubleshooting Tips Installation Instructions Operating Instructions Safety Instructions About the shelves and bins. Slide-Out Spillproof Shelf (on some models shelf in the molded supports on the door and push down. It will lock in place. Freezer Tilt Out Bin (on some models) Push the button as - GE PTS25SHS | Use and Care Manual - Page 9
Safety Instructions Operating Instructions Installation Instructions Troubleshooting Tips Consumer Support About the additional features. ge.com Not all features are on all models. Shelf Saver Rack (on some models) Slide-out beverage rack holds 12 cans of soda or 2 wine/water bottles (lengthwise - GE PTS25SHS | Use and Care Manual - Page 10
Troubleshooting Tips Installation Instructions Operating Instructions Safety Instructions About crisper removal. Not all features are on all models. Crisper Removal To Remove: These drawers can be removed easily by lifting up slightly while pulling the drawer past the stop location. When the door - GE PTS25SHS | Use and Care Manual - Page 11
Instructions Operating Instructions Installation Instructions Troubleshooting Tips Consumer Support About the water dispenser. (on some models) ge.com The water dispenser is located on the left wall inside the refrigerator the refrigerator and freezer compartments. Unplug the refrigerator before - GE PTS25SHS | Use and Care Manual - Page 12
the light shield. Plug the refrigerator back in. Freezer Compartment Light (on some models) Light shield CAUTION: Light bulbs may be hot. Unplug the refrigerator. The bulb is located behind a light shield at the back of the freezer compartment. To remove, squeeze the top and bottom of the shield - GE PTS25SHS | Use and Care Manual - Page 13
installation is not covered under the Warranty. WATER SUPPLY TO THE ICEMAKER (ON SOME MODELS) If the refrigerator has an icemaker, it will have to be connected to a cold water line. A GE water supply kit (containing tubing, shutoff valve, fittings and instructions) is available at extra cost from - GE PTS25SHS | Use and Care Manual - Page 14
Installation Instructions INSTALLING THE WATER LINE (ON SOME MODELS) BEFORE YOU BEGIN Recommended copper water supply kits are WX8X2, WX8X3 or WX8X4, depending on the amount of tubing you need. Approved plastic water supply lines are GE SmartConnect™ Refrigerator Tubing (WX08X10002, WX08X10006, - GE PTS25SHS | Use and Care Manual - Page 15
Instructions WHAT YOU WILL NEED (CONT.) • A GE water supply kit (containing tubing, shutoff valve and fittings listed below) is available at extra cost from your dealer or from Parts make the connection to the top or side, rather than formed end from GE SmartConnect™ Refrigerator tubing. 3 DRILL - GE PTS25SHS | Use and Care Manual - Page 16
Installation Instructions INSTALLING THE WATER LINE (CONT.) 4 FASTEN THE SHUTOFF fully inserted into the valve. Tighten the compression nut securely. For plastic tubing from a GE SmartConnect™ Refrigerator Tubing kit, insert the molded end of the tubing into the shutoff valve and tighten - GE PTS25SHS | Use and Care Manual - Page 17
Instructions 9 CONNECT THE TUBING TO THE REFRIGERATOR NOTES: • Before making the connection to the refrigerator, be sure the refrigerator refrigerator. Icemaker Models without Water Dispenser 1/4″ Tubing Tubing Clamp SmartConnect™ Tubing Water Dispenser Models GE SmartConnect™ Refrigerator - GE PTS25SHS | Use and Care Manual - Page 18
model REVERSING THE DOOR SWING IMPORTANT NOTES When reversing the door swing: • Read the instructions all the way through before starting. • Handle parts side, follow these same instructions and reverse all references to left and right. Unplug the refrigerator from its electrical outlet. Empty all - GE PTS25SHS | Use and Care Manual - Page 19
Instructions 1 REMOVE THE FREEZER DOOR Tape the door shut with masking tape. Remove the hinge cover on top of the freezer door (on some models). Remove the two screws, then lift the hinge straight up to free the hinge pin from the socket in the top of the door. Top insert at the top left side of - GE PTS25SHS | Use and Care Manual - Page 20
Installation Instructions REVERSING THE DOOR SWING (CONT.) 5 TRANSFER CENTER HINGE BRACKET FRESH FOOD DOOR HANDLE TO THE RIGHT Stainless steel handle: Remove the two screws holding the handle to the top of the door. Loosen the set screw with the 3/32″ Allen wrench (supplied) and remove the handle - GE PTS25SHS | Use and Care Manual - Page 21
Instructions the handle with the screw holes in the top of the door and tighten the screws. 8 TRANSFER FREEZER DOOR HANDLE TO THE RIGHT Stainless steel handle: fastener to the right side and move the GE badge to the left side of the freezer door. Remove the paper covering on the adhesive - GE PTS25SHS | Use and Care Manual - Page 22
Instructions REVERSING THE DOOR SWING (CONT.) 9 REHANG THE FRESH FOOD DOOR Lower the fresh food door onto the bottom hinge pin. 10 REHANG THE FREEZER DOOR Lower the freezer Bracket Center Hinge Pin Lift the top hinge so the pin fits into the door socket. Support the door on the handle side and - GE PTS25SHS | Use and Care Manual - Page 23
Operating Instructions Installation Instructions Troubleshooting Tips Consumer Support Normal operating sounds. Newer refrigerators sound different from older refrigerators. Modern refrigerators have more features and use newer technology. Do you hear what I hear? These sounds are normal. ge.com - GE PTS25SHS | Use and Care Manual - Page 24
Tips Installation Instructions Operating Instructions Safety Instructions Before you call for service... Troubleshooting Tips Save time and money! Review the charts on the following pages first and you may not need to call for service. Problem Refrigerator does not operate Vibration - GE PTS25SHS | Use and Care Manual - Page 25
Safety Instructions Operating Instructions Installation Instructions Troubleshooting Tips Consumer Support ge.com Problem Ice cubes have odor/taste Slow ice cube freezing No ice cube production Refrigerator has odor Moisture collects inside (in humid weather, air carries moisture into refrigerator - GE PTS25SHS | Use and Care Manual - Page 26
Installation Instructions Operating Instructions Safety Instructions Before you call for service... Troubleshooting Tips Problem Water . • Dispense water until all water in system is replenished. Normal when refrigerator is first installed. Water dispenser has not been used for a long time. - GE PTS25SHS | Use and Care Manual - Page 27
rate: 0.5 gpm (1.9 lpm) General Installation/Operation/Maintenance Requirements Flush new cartridge at full flow for 3 minutes to purge out trapped air. Replace cartridge when flow becomes too slow. Special Notices Installation instructions, parts and service availability, and standard warranty - GE PTS25SHS | Use and Care Manual - Page 28
Services Water Treatment Device Certificate Number 03 - 1559 Date Issued: April 28, 2003 Trademark/Model Designation GE GSWF Manufacturer: General Electric 2,4-D Inorganic/Radiological Contaminants Asbestos Lead Rated Service Capacity: 750 gal Rated Service Flow: 0.5 gpm Conditions of - GE PTS25SHS | Use and Care Manual - Page 29
Other Brands: One (1) Year GE Profile: Five (5) Years GE and All Other Brands: One (1) Year One (1) Year TERMS AND CONDITIONS: This warranty applies only for single family domestic use in Canada when the Refrigerator has been properly installed according to the instructions supplied by Camco and is - GE PTS25SHS | Use and Care Manual - Page 30
here. Proof of the original purchase date is needed to obtain service under the warranty. For The Period Of: GE Will Replace: GE and GE PROFILE MODELS: One Year From the date of the original purchase Any part of the refrigerator which fails due to a defect in materials or workmanship. During - GE PTS25SHS | Use and Care Manual - Page 31
42 Filtre à eau 37 Machine à glaçons automatique . . . .41 Réglages 35, 36 Soins et nettoyage 42 Remplacement des ampoules électriques 43 Instructions d'installation Installation de la conduite d'eau 45-49 Inversion du sens d'ouverture des portes 50-54 Préparation à l'installation du réfrig - GE PTS25SHS | Use and Care Manual - Page 32
Vous devez bien installer et placer votre réfrigérateur, conformément aux Instructions d'installation avant de l'utiliser. I Ne permettez jamais aux enfants de NOTE : Nous vous recommandons fortement de faire accomplir tout service par un technicien qualifié. I Lorsque vous ajustez les réglages - GE PTS25SHS | Use and Care Manual - Page 33
www.electromenagersge.ca DANGER! RISQUE DE PRISE AU PIÈGE D'ENFANT BONNE MISE AU REBUT DE VOTRE RÉFRIGÉRATEUR «quelques jours». Si vous vous débarrassez de votre vieux réfrigérateur, suivez les instructions suivantes pour prévenir tout accident. Avant de jeter votre vieux réfrigérateur ou - GE PTS25SHS | Use and Care Manual - Page 34
IMPORTANTES DE SÉCURITÉ. LISEZ TOUTES LES INSTRUCTIONS AVANT D'UTILISER VOTRE RÉFRIGÉRATEUR. AVERTISSEMENT! BRANCHEMENT ÉLECTRIQUE Ne coupez ou n' . LISEZ ET SUIVEZ SOIGNEUSEMENT CES MESURES DE SÉCURITÉ. CONSERVEZ CES INSTRUCTIONS Installation Conseils de dépannage Soutien au consommateur 34 - GE PTS25SHS | Use and Care Manual - Page 35
boutons de réglage ressemblent à l'une des illustrations suivantes : www.electromenagersge.ca ADJUST FREEZER TEMP COLDER WARMER 9 IS COLDEST ACTIVATE LOCK HOLD 3 SECS ADJUST REFRIGERATOR TEMP COLDER WARMER 9 IS COLDEST Fonctionnement Installation Conseils de dépannage Initialement, réglez - GE PTS25SHS | Use and Care Manual - Page 36
Mesures de sécurité Les commandes. Fonctionnement Installation La temperature est pré-réglée à l'usine au numéro 37° F pour le compartiment réfrigérateur et 0° F pour le compartiment congélateur. Attendez 24 heures que la température se stabilise aux temperatures recommandées pré-réglées. Le ré - GE PTS25SHS | Use and Care Manual - Page 37
de remplacement Pour commander des cartouches de filtre supplémentaires aux États-Unis, visitez notre site Web, www.electromenagersge.ca, ou appelez le service de pièces et d'accessoires GE au numéro 888.261.3055. Modèle de filtre GSWF Prix de détail suggéré 34,95 US$ Au Canada, nos clients - GE PTS25SHS | Use and Care Manual - Page 38
Mesures de sécurité Fonctionnement Les clayettes et les bacs. Tous les modèles n'ont pas toutes ces caractéristiques. Disposition des clayettes Les clayettes du compartiment réfrigération et du compartiment congélation sont réglables. Certains modèles ont des clayettes métalliques grillagées - GE PTS25SHS | Use and Care Manual - Page 39
Mesures de sécurité Fonctionnement Installation www.electromenagersge.ca Clayette coulissante anti-déversement (sur certains modèles) Grâce à la clayette glissante antidéversement, vous pouvez atteindre des articles placés derrière d'autres. Ses bords spéciaux sont conçus pour empêcher tout dé - GE PTS25SHS | Use and Care Manual - Page 40
Mesures de sécurité Caractéristiques supplémentaires. Tous les modèles n'ont pas toutes ces caractéristiques. Panier sauve clayette (sur certains modèles) Le panier amovible à breuvages contient 12 boîtes de boisson gazeuse ou 2 bouteilles de vin (longitudinalement). On peut l'enlever pour - GE PTS25SHS | Use and Care Manual - Page 41
Mesures de sécurité Enlèvement du bac à légume. Tous les modèles n'ont pas toutes ces caractéristiques. Enlèvement des bacs à légumes Enlèvement : Vous pouvez enlever facilement ces tiroirs en les soulevant légèrement tout en dépassant leur position d'arrêt. www.electromenagersge.ca Si vous ne - GE PTS25SHS | Use and Care Manual - Page 42
du distributeur pendant au moins 2 minutes pour enlever l'air pris au piège dans la conduite d'eau et pour remplir d'eau le système du distributeur la machine à glaçons (sur certains modèles). Préparation de départ en vacances Pour de longues vacances ou absences, enlevez tous vos aliments et - GE PTS25SHS | Use and Care Manual - Page 43
Mesures de sécurité Fonctionnement Remplacement des ampoules électriques. www.electromenagersge.ca Vous ne débranchez pas votre réfrigérateur du circuit d'alimentation électrique en mettant le bouton de réglage en position 0 (arrêt). Compartiment réfrigération MISE EN GARDE : Les ampoules é - GE PTS25SHS | Use and Care Manual - Page 44
d'eau froide. Vous pouvez acheter une trousse d'alimentation d'eau GE (contenant la tuyauterie, le robinet d'arrêt, les joints et les instructions) chez votre revendeur ou en vous adressant à notre site Web à l'adresse www.electromenagersge.ca ou à notre service de Pièces et accessoires au numéro de - GE PTS25SHS | Use and Care Manual - Page 45
dont vous avez besoin. Nous approuvons les conduites d'eau en matière plastique GE SmartConnect™ Refrigerator Tubing (WX08X10002, WX08X10006, WX08X10015 et WX08X10025). Si vous installez un système d'eau GE Reverse Osmosis dans votre réfrigérateur, la seule installation approuvée est celle de - GE PTS25SHS | Use and Care Manual - Page 46
érateur du mur après l'installation. Les trousses GE SmartConnect™ Refrigerator Tubing sont disponibles dans les dimensions suivantes : 0,6 m (2 pi) - WX08X10002 GE (contenant un tuyau, un robinet d'arrêt et les joints énumérés ci-dessous) chez votre distributeur local ou en le commandant au service - GE PTS25SHS | Use and Care Manual - Page 47
Instructions d'installation Installez le robinet d'arrêt sur la canalisation d'eau potable la plus fréquemment utilisée. 1 FERMEZ L'ALIMENTATION PRINCIPALE D'EAU Ouvrez le robinet le plus proche - GE PTS25SHS | Use and Care Manual - Page 48
Instructions d'installation INSTALLATION DE LA CONDUITE D'EAU (SUITE) 7 BRANCHEZ LE TUYAU le robinet. Serrez fort l'écrou de compression. Pour le tuyau en matière plastique d'une trousse GE SmartConnect™ Refrigerator Tubing, insérez l'extrémité moulée du tuyau dans le robinet d'arrêt et serrez l'é - GE PTS25SHS | Use and Care Manual - Page 49
le plus loin que possible. Tout en tenant le tuyau, serrez le raccord. Si vous utilisez un tuyau en matière plastique d'une trousse GE SmartConnect™ Refrigerator Tubing, insérez l'extrémité moulée du tuyau dans le robinet d'arrêt et serrez l'écrou de compression à la main, puis serrez un autre tour - GE PTS25SHS | Use and Care Manual - Page 50
Instructions d'installation INVERSION DU SENS D'OUVERTURE DES PORTES NOTES IMPORTANTES Pour inverser le sens d'ouverture des portes : • Lisez toutes les directives avant de commencer. • Manipulez les - GE PTS25SHS | Use and Care Manual - Page 51
Instructions d'installation 2 ENLEVEZ LA PORTE DU COMPARTIMENT POUR ALIMENTS FRAIS Fermez la porte et attachez-la à l'aide de ruban-cache. À l'aide du tourne-écrou de 3/4 po, enlevez l'axe de charnière centrale. Axe de charnière 4 FAITES PASSER LE SUPPORT DE CHARNIÈRE INFÉRIEURE À GAUCHE Enlevez - GE PTS25SHS | Use and Care Manual - Page 52
Instructions d'installation INVERSION DU SENS D'OUVERTURE DES PORTES (SUITE) 5 FAITES PASSER LE SUPPORT DE CHARNIÈRE CENTRALE À GAUCHE Enlevez le support de charnière centrale en dévissant les trois vis. NOTE : Conservez ces vis avec le support du côté droit. Placez le support de charnière sur les - GE PTS25SHS | Use and Care Manual - Page 53
Instructions d'installation 7 FAITES PASSER LA POIGNÉE DE PORTE DU COMPARTIMENT POUR pans de 3/16 po (fournie). 1 Faites passer la fixation jusqu'au côté droit et amenez l'insigne GE jusqu'au côté gauche de la porte du compartiment congélation. Enlevez le papier qui recouvre l'envers adhésif - GE PTS25SHS | Use and Care Manual - Page 54
Instructions d'installation INVERSION DU SENS D'OUVERTURE DES PORTES (SUITE) 9 ACCROCHEZ À du compartiment congélation sur l'axe de la charnière centrale. Redressez la porte et alignez-la au support de la charnière centrale. Montez à nouveau l'axe de la charnière centrale avec le tourne-écrou - GE PTS25SHS | Use and Care Manual - Page 55
Mesures de sécurité Bruits normaux de fonctionnement. www.electromenagersge.ca Les réfrigérateurs plus récents font des bruits différents de ceux des anciens. Les réfrigérateurs modernes présentent plus de fonctions et sont plus avancés sur le plan technologique. Entendez-vous ce que j'entends ? - GE PTS25SHS | Use and Care Manual - Page 56
Mesures de sécurité Avant d'appeler un réparateur... En cas de panne Économisez votre temps et votre argent! Consultez les tableaux des pages suivantes, vous éviterez peut-être d'appeler un réparateur. Problème Votre réfrigérateur ne fonctionne pas Causes possibles Votre réfrigérateur se trouve - GE PTS25SHS | Use and Care Manual - Page 57
Mesures de sécurité www.electromenagersge.ca Fonctionnement Installation Problème La machine à glaçons automatique ne fonctionne pas (sur certains modèles) Bourdonnement fréquent Les glaçons ont une odeur ou un goût La formation des glaçons est lente Le réfrigérateur sent De l'humidité se forme - GE PTS25SHS | Use and Care Manual - Page 58
la température de réglage de compartiment réfrigération et attendez 24 heures. Si l'eau ne coule pas du distributeur près 24 heures, appelez le service. • Appelez un plombier. •Remplacez la cartouche du filtre avec une nouvelle cartouche ou installez le bouchon du filtre. • Retirez et réinstallez la - GE PTS25SHS | Use and Care Manual - Page 59
Notes. www.electromenagersge.ca Mesures de sécurité Fonctionnement Installation Conseils de dépannage Soutien au consommateur 59 - GE PTS25SHS | Use and Care Manual - Page 60
Cartouche GSWF du système de Filtration d'eau GE SmartWater Ce système a été essayé selon spéciaux Les directives d'installation, la disponibilité de pièces et de service ainsi que la garantie standard sont expédiées avec le produit. Ce pour : General Electric Company, Louisville, KY 40225 NSF® 60 - GE PTS25SHS | Use and Care Manual - Page 61
GE Profile : Cinq (5) ans GE et toutes autre marques : Un (1) an Un (1) an Un (1) an Un (1) an TERMES ET CONDITIONS : La présente garantie ne s'applique qu'à l'utilisation domestique par une seule famille au Canada, lorsque le réfrigérateur a été installé conformément aux instructions service - GE PTS25SHS | Use and Care Manual - Page 62
par Internet au site www.electromenagersge.ca 24 heures par jour, tous les jours de l'année. Service de réparations Service de réparations GE est tout près de vous. Pour faire réparer votre électroménager GE, il suffit de nous téléphoner. 1.800.361.3400 Studio de conception réaliste Sur demande - GE PTS25SHS | Use and Care Manual - Page 63
normales de operación . . . .85 Soporte al consumidor Garantía del refrigerator 90 Hoja de datos de funcionamiento . .89 Soporte al consumidor 91 Escriba aqu en el lado izquierdo, cerca de la parte superior del compartimiento del refrigerador. 63 Consejos para la solución de problemas - GE PTS25SHS | Use and Care Manual - Page 64
fin para el cual fue diseñado como se describe en este Manual del propietario. PRECAUCIONES DE SEGURIDAD Al usar aparatos eléctricos, evite el contacto con las partes en movimiento del mecanismo eyector, o con el elemento calefactor localizado en la parte inferior del dispositivo para hacer hielo - GE PTS25SHS | Use and Care Manual - Page 65
Información de seguridad Instrucciones de operación ge.com ¡ADVERTENCIA! CÓMO CONECTAR LA ELECTRICIDAD Bajo ninguna circunstancia, no corte ni retire la tercera pata (conexión a tierra) del cable de electricidad. Por seguridad personal, - GE PTS25SHS | Use and Care Manual - Page 66
del refrigerador. Los controles tendrán uno de los siguientes aspectos: ADJUST FREEZER TEMP COLDER WARMER 9 IS COLDEST ACTIVATE LOCK HOLD 3 SECS ADJUST REFRIGERATOR TEMP COLDER WARMER 9 IS COLDEST OpIenrsattroiupncegrcIianocsintróeunsctdieons Instrucciones para la instalación Consejos - GE PTS25SHS | Use and Care Manual - Page 67
Los controles del refrigerador. ge.com Información de seguridad Instrucciones de operación Instrucciones para la instalación Los controles de temperatura vienen preconfigurados de fábrica a 37° F tanto para el compartimento del - GE PTS25SHS | Use and Care Manual - Page 68
Una pequeña cantidad de agua podría gotearse. Filtros de reemplazo Para ordenar cartuchos en Estados Unidos, visite nuestra Web, ge.com, o llame al Departamento de partes y accesorios de GE al 800.626.2002. Modelo del filtro GSWF Precio al por menor sugerido $34.95 USD Los clientes en Canadá deben - GE PTS25SHS | Use and Care Manual - Page 69
Instrucciones para la instalación Sobre los estantes y compartimientos. ge.com No todas las características están presentes en los soportes del estante al mismo nivel. Descanse cada extremo del estante en la parte inferior de los soportes del estante. NOTA: Para los modelos con una máquina de - GE PTS25SHS | Use and Care Manual - Page 70
da, derramamiento o deslizamiento de elementos pequeños que se almacenen en el estante de la puerta. Agarre el retenedor del dedo cerca de la parte posterior del reborde y muévalo para ajustarlo a sus necesidades. Estantes no ajustables en la puerta Para retirarlos: Levante el estante recto y luego - GE PTS25SHS | Use and Care Manual - Page 71
Información de seguridad Sobre las características adicionales. No todas las características están presentes en todos los modelos. ge.com Bandeja metálica minimizadora (en algunos modelos) La bandeja deslizante para bebidas sostiene 12 latas de soda o 2 botellas de vino / agua (a lo largo). - GE PTS25SHS | Use and Care Manual - Page 72
Información de seguridad Sobre cómo retirar la gaveta preservadora. No todas las características están presentes en todos los modelos. Remoción de la gaveta preservadora Para retirarla: Estas gavetas se pueden retirar fácilmente levantándolas ligeramente mientras se hala la gaveta hasta que pase - GE PTS25SHS | Use and Care Manual - Page 73
ge.com Kit de accesorios de la máquina de hielos Si su refrigerador no viene ya equipado con una máquina de hielos automática, existe un kit accesorio para la máquina de hielos que está disponible por un costo adicional. Revise en la parte quiebre. No lave ninguna parte plástica del refrigerador - GE PTS25SHS | Use and Care Manual - Page 74
protector como se muestra. Apriete el protector y rótelo hacia la parte posterior del refrigerador. El protector se soltará. Reemplace la bombilla con . Desconecte el refrigerador. La bombilla está ubicada en la parte superior del compartimiento del congelador dentro del protector de luz del - GE PTS25SHS | Use and Care Manual - Page 75
lvula de cierre, accesorios e instrucciones) está disponible con un costo adicional a través de su proveedor, visitando nuestra página Web ge.com o bien a través de Partes y Accesorios, 800.626.2002. UBICACIÓN DEL REFRIGERADOR • No instale el refrigerador donde la temperatura baje de 60°F (16°C) ya - GE PTS25SHS | Use and Care Manual - Page 76
la tubería) en la tubería de la casa puede causar daños a las partes del refrigerador y conducir a un goteo o inundación por el agua. Llame a NECESITA • Kit de tubería de cobre para el refrigerador o SmartConnect™ de GE, 1/4″ de diámetro externo para conectar el refrigerador al suministro de agua. - GE PTS25SHS | Use and Care Manual - Page 77
para la instalación QUÉ NECESITA (CONT.) • Un kit de suministro de agua de GE (contiene tubería, válvula de cierre y accesorios enumerados abajo) está disponible a un costo adicional en su tienda o por medio de Partes y Accesorios, 800.626.2002. • Un suministro de agua fría. La presión del agua - GE PTS25SHS | Use and Care Manual - Page 78
en la válvula. Apriete la tuerca de compresión firmemente. Para tubería de plástico de un kit de tubería para el refrigerador SmartConnect™ de GE, inserte el extremo moldeado de la tubería en la válvula de cierre y apriete la tuerca de compresión hasta que esté firmemente apretada a mano, luego - GE PTS25SHS | Use and Care Manual - Page 79
instalar un filtro de agua si su suministro de agua tiene arena o partículas que podrían obstruir la malla de la válvula de agua del como se muestra. En el kit de tubería para el refrigerador SmartConnect™ de GE, las tuercas ya vienen armadas con la tubería. Inserte el extremo de la tubería - GE PTS25SHS | Use and Care Manual - Page 80
ón CÓMO INSTALAR LA TUBERÍA DEL AGUA (CONT.) 11 CONECTE EL REFRIGERADOR Organice el cable de la tubería de manera que no vibre contra la parte trasera del refrigerador o contra la pared. Empuje el refrigerador hacia la pared. INICIE LA MÁQUINA DE HIELOS (CONT.) En los modelos de brazo alimentador - GE PTS25SHS | Use and Care Manual - Page 81
con cinta de enmascarar. Retire el pasador de la bisagra del centro con un casquillo de 3/4″. Sujetador de la bisagra Retire el inserto en la parte superior izquierda de la rejilla de la base e instálelo en el lado derecho. Usted debe tirar hacia arriba sobre inserto para remover y abrochar hacia - GE PTS25SHS | Use and Care Manual - Page 82
puerta, retire el tope de la puerta en el lado derecho de la parte inferior de la puerta retirando los dos tornillos. Instale el tope de la plástica: Remueva los dos tornillos que sostienen 1 la manija en la parte 4 superior de la puerta. Deslice la manija 2 Sujetador hacia arriba en - GE PTS25SHS | Use and Care Manual - Page 83
plástica: Remueva los dos tornillos que sostienen la manija en la parte inferior de la puerta. Deslice la manija Sujetador hacia abajo en el (suministrado). Transfiera el sujetador al lado 1 derecho y mueva el emblema GE al lado izquierdo de la puerta del congelador. Remueva el papel que - GE PTS25SHS | Use and Care Manual - Page 84
, apriete los tornillos de la bisagra superior. 11 REINSTALE LA REJILLA DE LA BASE Reemplace la rejilla de la base alineando los dientes en la parte posterior de la rejilla con los orificios en el gabinete. Empuje hacia delante hasta que la rejilla encaje en su lugar. 84 - GE PTS25SHS | Use and Care Manual - Page 85
Los refrigeradores modernos tienen más funciones y usan tecnología más reciente. ge.com Instrucciones de operación ¿Usted escucha lo que yo escucho? que la presión se está estabilizando dentro del refrigerador. I Modelos electrónicos solamente: I A veces el refrigerador funciona por un período - GE PTS25SHS | Use and Care Manual - Page 86
Información de seguridad Antes de llamar a solicitar servicio... Consejos para la solución de problemas ¡Ahorre tiempo y dinero! Revise las tablas en las siguientes páginas primero y quizás no necesite llamar a solicitar el servicio. Instrucciones de operación Instrucciones para la instalación - GE PTS25SHS | Use and Care Manual - Page 87
ge.com Información de seguridad Instrucciones de operación Instrucciones para la instalación flujo del aire. En el proceso de refrigeración, es normal que salga calor de la parte inferior del refrigerador. Algunas cubiertas de piso son sensibles y se decolorarán ante estas temperaturas normales - GE PTS25SHS | Use and Care Manual - Page 88
Información de seguridad Instrucciones de operación Instrucciones para la instalación Antes de llamar a solicitar servicio... Problema El dispensador de agua no funciona El agua chorrea del dispensador El agua no es dispensada pero la máquina de hielos está trabajando No sale agua y el - GE PTS25SHS | Use and Care Manual - Page 89
Hoja de Datos de Funcionamiento Sistema de Filtración GE SmartWater Cartucho GSWF Este sistema se ha sometido a de cloro, sabor y olor, partículas Clase I, y contra norma 53 para la reducción de quistes, plomo, Lindane, Atrazine y turbidez. Hecho por General Electric, Appliance Park, Louisville, KY - GE PTS25SHS | Use and Care Manual - Page 90
garantía. Por el período de: GE reemplazará: MODELOS GE y GE PROFILE: Un año A partir de la fecha de la compra original Cualquier parte del enfriador de vinos que falle consumidor local o la oficina del Attorney General en su localidad. Garante: General Electric Company. Louisville, KY 40225 90 - GE PTS25SHS | Use and Care Manual - Page 91
durante horas normales de oficina. GE Consumer Home Services estará aún ahí cuando su garantía termine. Piezas y accesorios ge.com Aquellos individuos con la en este manual cubren los procedimientos a seguir por cualquier usuario. Cualquier otra reparación debería, por regla general, referirse a - GE PTS25SHS | Use and Care Manual - Page 92
800.626.2224 during normal business hours. GE Consumer Home Services will still be there after your warranty expires. In Canada, call 1.888.261.2133 Parts and Accessories In the U.S.: ge.com Individuals qualified to service their own appliances can have parts or accessories sent directly to their
-
 1
1 -
 2
2 -
 3
3 -
 4
4 -
 5
5 -
 6
6 -
 7
7 -
8
-
9
-
10
-
11
-
12
-
13
-
14
-
15
-
16
-
17
-
18
-
19
-
20
-
21
-
22
-
23
-
24
-
25
-
26
-
27
-
28
-
29
-
30
-
31
-
32
-
33
-
34
-
35
-
36
-
37
-
38
-
39
-
40
-
41
-
42
-
43
-
44
-
45
-
46
-
47
-
48
-
49
-
50
-
51
-
52
-
53
-
54
-
55
-
56
-
57
-
58
-
59
-
60
-
61
-
62
-
63
-
64
-
65
-
66
-
67
-
68
-
69
-
70
-
71
-
72
-
73
-
74
-
75
-
76
-
77
-
78
-
79
-
80
-
81
-
82
-
83
-
84
-
85
-
86
-
87
-
88
-
89
-
90
-
91
-
92
 |
 |
ge.com
Refrigerators
Top-Freezer
200D8221P001
49-60445
11-05 JR
Safety Instructions
Connect Electricity . . . . . . . . . . . . . . . .3
Extension Cords
. . . . . . . . . . . . . . . . . .2
Proper Disposal . . . . . . . . . . . . . . . . . . .2
Safety Precautions . . . . . . . . . . . . . . . . .2
Operating Instructions
Additional Features . . . . . . . . . . . . . . . .9
Automatic Icemaker . . . . . . . . . . . . . .10
Controls
. . . . . . . . . . . . . . . . . . . . . .4, 5
Crispers and Pans . . . . . . . . . . . . . .9, 10
Shelves and Bins . . . . . . . . . . . . . . . .7, 8
Water Dispenser
. . . . . . . . . . . . . . . . .11
Water Filter
. . . . . . . . . . . . . . . . . . . . . .6
Care and Cleaning
. . . . . . . . . . . . . .11
Replacing the Light Bulbs
. . . . . . . . .12
Installation Instructions
Preparing to Install
the Refrigerator . . . . . . . . . . . . . . . . . .13
Reversing the Door Swing
. . . . . .18–22
Water Line Installation . . . . . . . . .14–18
Troubleshooting Tips
. . . . . . . . .24–26
Normal Operating Sounds . . . . . . . . .23
Consumer Support
Consumer Support . . . . . . . .Back Cover
Performance Data Sheet . . . . . . . . . . .27
State of California Water
Treatment Device Certificate . . . . . . .28
Warranty for Canadian Customers . . .29
Warranty for U.S. Customers . . . . . . .30
Write the model and serial numbers here:
Model #
__________________________
Serial #
__________________________
Find these numbers on the gray label
on the left side, near the top of the
refrigerator compartment.
Réfrigérateurs
Congélateur supérieur
Manuel d’utilisation
et d’installation
La section française commence à la page 31
Refrigeradores
Congelador superior
Models
22, 25
Owner’s Manual &
Installation Instructions
Manual del propietario
e instalación
La sección en español empieza en la página 63