GE WPGT9360EWW Owners Manual
GE WPGT9360EWW - Profile Harmony 4.0 cu. Ft. Capacity King-Size Washer Manual
 |
UPC - 084691129226
View all GE WPGT9360EWW manuals
Add to My Manuals
Save this manual to your list of manuals |
GE WPGT9360EWW manual content summary:
- GE WPGT9360EWW | Owners Manual - Page 1
Begin 19-21 Step-by-Step Instructions . . . . . .21-24 Switching the Washer and Dryer Backsplashes 25-28 Troubleshooting Tips . . . . . .29-32 Consumer Support Consumer Support 34 Warranty 33 Owner's Manual and Installation Instructions WPGT9350 WPGT9360 Write the model and serial numbers here - GE WPGT9360EWW | Owners Manual - Page 2
flame or appliance during this process. PROPER INSTALLATION This washer must be properly installed and located in accordance with the Installation Instructions before it is used. Installation Instructions are included in the back of this manual. • Install or store where it will not be exposed - GE WPGT9360EWW | Owners Manual - Page 3
Before discarding a washer, or removing it from service, remove the washer lid to prevent children from hiding inside. • Do not attempt to repair or replace any part of this appliance unless specifically recommended in this Owner's Manual, or in published userrepair instructions that you understand - GE WPGT9360EWW | Owners Manual - Page 4
ge.com WARNING! To reduce the risk of fire, electric shock, or injury to persons, read the IMPORTANT SAFETY INSTRUCTIONS before operating this appliance. Throughout this manual, features and appearance may vary from your model. POWER MY CYCLES BACK HELP HOME START STOP Features of the washer - GE WPGT9360EWW | Owners Manual - Page 5
Quick Start ge.com Loosely load clothes no higher than the top row of holes in the washer tub. Overloading may reduce washer efficiency and specific wash cycle to match your load. Change any of the automatic settings, if desired, by pressing the Touch Screen and following the on-screen instructions. - GE WPGT9360EWW | Owners Manual - Page 6
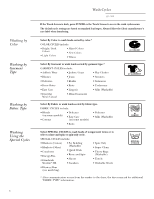
ge models) • Cottons • Delicates • Easy Care (on some models ) • Polyester • Silks (Washable) • Knits BY COLOR BY GARMENT BY FABRIC Select SPECIAL CYCLES to wash loads of nongarment items or to select a rinse and spin or spin Wash • Rinse and Spin • Sheets • Sneakers • Spin Only • Super - GE WPGT9360EWW | Owners Manual - Page 7
of stains. You select the specific stain, fabric type and color, and the washer creates the wash cycle for treating the stain. Example: Washing a chocolate-stained, white cotton shirt 1 Press STAIN INSPECTOR. STAIN INSPECTOR 2 Read and follow the instructions on the Touch Screen before treating - GE WPGT9360EWW | Owners Manual - Page 8
ge.com Below is a listing of the stain selections available on the washer Touch Screen. For additional information on handling these types of stains, visit the Tide® Stain Detective at www.tide.com/staindetective. Stain Selections (not all selections are available on all models , general • - GE WPGT9360EWW | Owners Manual - Page 9
the Summary Screen Changing the Soil Level Summary Screen ge.com After selecting a wash cycle, the Summary washer's internal heater which will extend the wash time. When using the VERY HOT temperature setting, do not put hands in the water. Changing the wash action changes the wash and spin speeds - GE WPGT9360EWW | Owners Manual - Page 10
to extract more water from your clothes. Press EXTENDED SPIN; then select EXTENDED SPIN from the OPTIONS menu. NOTE: After the wash cycle begins, you will not be able to change the Cycle Time or Delay Time. The washer will beep twice if you try to change the times after the cycle begins - GE WPGT9360EWW | Owners Manual - Page 11
About the "My Cycles" Feature Creating and Using a "My Cycle" "My Cycles" ge.com The "My Cycles" feature allows you to create, store and reuse up to 6 custom cycles. Create your own cycles from scratch, or adjust the - GE WPGT9360EWW | Owners Manual - Page 12
Modifying, Renaming or Deleting a "My Cycle" "My Cycles" ge.com To modify the settings of a "My Cycle" from the Home Screen: 1 Press the MY CYCLES button. 2 Select MODIFY from the Touch Screen menu. 3 Select - GE WPGT9360EWW | Owners Manual - Page 13
to exit Help. MACHINE PREFERENCES HOME SCREEN HELP TROUBLE SHOOTER Using the Troubleshooter Finding Help Using the Home Screen To locate Troubleshooting Tips for common washer problems: 1 Press the HELP button. 2 On the Touch Screen, select TROUBLE SHOOTER. 3 On the Touch Screen, select the - GE WPGT9360EWW | Owners Manual - Page 14
ge.com The machine settings on the Help feature allow you to control the volume of the button beep and end-of-cycle signal, and turn the washer reviewing, press START. If the dryer display screen is off and you want to use the "Washer setting. Language (on some models) The language button allows the - GE WPGT9360EWW | Owners Manual - Page 15
Washer Features ge.com Using the Liquid Bleach Dispenser The bleach dispenser automatically dilutes and dispenses liquid chlorine bleach at the proper time in the wash cycle. 1 Check clothing care labels for special instructions. 2 Measure liquid bleach carefully, following instructions on the - GE WPGT9360EWW | Owners Manual - Page 16
Detergent Adding Fabric Softener Adding Pretreat Additives 16 Washer Features ge.com NOTE: Use only low-sudsing, high- special Pretreat that soaks, drains and spins, then refills the washer for the main wash cycle. If ADDITIVES is not selected, the washer will not drain and refill after the - GE WPGT9360EWW | Owners Manual - Page 17
the Washer Fabric Care Labels Washer Temperature Ranges Loading and Using the Washer ge.com Always bleach (when needed) Do not bleach For Model WPGT9360 only Category Tap Cold Cold Warm Hot Always check garment label for recommended washing instructions. ** ATC stands for automatic temperature - GE WPGT9360EWW | Owners Manual - Page 18
of the Washer Loading and Using the Washer ge.com Using too much detergent is a common cause of laundry problems. Today's service technician to remove water from drain pump and hoses. For more information, visit www. GEAppliances.com or call 800.GE.CARES (800.432.2737). Do not store the washer - GE WPGT9360EWW | Owners Manual - Page 19
Installation Instructions Washer WPGT9350, WPGT9360 Questions? Call 800.GE.CARES (800.432.2737) or visit our Web site at: ge.com BEFORE YOU BEGIN Read these instructions completely and carefully. • IMPORTANT - Save these instructions for local electrical inspector's use. • IMPORTANT - Observe all - GE WPGT9360EWW | Owners Manual - Page 20
Installation Instructions WASHER LOCATION The washer must be installed on firm flooring to minimize vibration during the spin cycle. Concrete flooring is best, but a wood floor is sufficient, provided floor support meets FHA standards. The washer should not be installed on rugs or exposed to - GE WPGT9360EWW | Owners Manual - Page 21
Installation Instructions PARTS INCLUDED ❑ Water Hoses (2) 1 UNPACK THE WASHER (CONT.) Remove the Styrofoam block containing the Owner's Manual, parts, water hoses and laundry product samples. ❑ Cable Tie TOOLS YOU WILL NEED ❑ Adjustable Pliers ❑ Carpenter's Level 1 UNPACK THE WASHER After the - GE WPGT9360EWW | Owners Manual - Page 22
Installation Instructions 2 ATTACH WATER HOSES TO WASHER Thread the hot water hose onto the washer hot water connection (ORANGE) 3 MOVE WASHER CLOSE TO HOUSE UTILITIES Move the washer as close to the final location as possible, leaving enough room to make water, drain and electrical connections to - GE WPGT9360EWW | Owners Manual - Page 23
Installation Instructions 6 SET REAR LEGS Remove the level and tilt the washer forward (pivot on front legs) about 4 to 6 inches and gently lower the rear legs back onto the floor. This action will set rear leg adjustments to correspond to front settings. 8 ATTACH SERIAL CABLE FOR WASHER/DRYER - GE WPGT9360EWW | Owners Manual - Page 24
Installation Instructions 9 PLUG WASHER IN 10 WASHER STARTUP Press the POWER button. POWER SERVICING WARNING - Label all wires prior to disconnection when servicing controls. Wiring errors can cause improper and dangerous operation after servicing/installation. For replacement parts and other - GE WPGT9360EWW | Owners Manual - Page 25
Installation Instructions SWITCHING THE WASHER AND DRYER BACKSPLASHES (not required for most installations) When viewed from the front, the washer is shipped for installation on the left and the dryer is shipped for installation on the right. If your hose utility connections are arranged so that - GE WPGT9360EWW | Owners Manual - Page 26
Installation Instructions 3 DISCONNECT WASHER CONTROL BOARD Disconnect the ribbon at the the dryer backsplash. Rotate backsplash forward and lift off. Screws Rear of Washer 4 REMOVE CONTROL BOARD FROM WASHER BACKSPLASH Remove the four screws holding the control board to the backsplash. Remove - GE WPGT9360EWW | Owners Manual - Page 27
Installation Instructions 7 REMOVE CONTROL BOARD FROM DRYER BACKSPLASH Remove the four screws . Screws 8 SWITCH BACKSPLASHES Place the backsplash from the dryer on top of the washer and place the backsplash from the washer on top of the dryer. Place the ribbon and the wire from the rear - GE WPGT9360EWW | Owners Manual - Page 28
Installation Instructions 12 ATTACH WASHER CONTROL BOARD TO NEW BACKSPLASH Replace the four screws removed from the control board earlier. 14 ATTACH WASHER BACKSPLASH Using the two small screws removed earlier, screw the new washer backsplash onto the rear cover. Screws The control board will now - GE WPGT9360EWW | Owners Manual - Page 29
Problem Solver ge.com For a complete list of solutions to common washer problems, use the Troubleshooting Tips feature located by pressing the HELP button while on the washer Home Screen (see Using the Troubleshooter). If your washer will not operate, check the Problem Solver below: Problem Washer - GE WPGT9360EWW | Owners Manual - Page 30
Problem Solver ge.com For a complete list of solutions to common washer problems, use the Troubleshooting Tips feature located by pressing the HELP button while on the washer Home Screen (see Using the Troubleshooter). If your washer will not operate, check the Problem Solver below: Problem - GE WPGT9360EWW | Owners Manual - Page 31
Problem Solver ge.com Problem Incomplete or no dispensing of detergent (cont.) Premature dispensing of to he maximum fill line on the bin to avoid clogging. High efficiency detergent is recommended for this washer. • Make sure that the water supply is turned on. Make sure that the water faucets are - GE WPGT9360EWW | Owners Manual - Page 32
Problem Solver ge.com The following are normal sounds you may hear: Sound Description Repeated starting and stopping • The HydroWash™ action spins the wash basket in one direction, then pauses and spins in the opposite direction to clean your items. Sound of water being added after the washer - GE WPGT9360EWW | Owners Manual - Page 33
Washer Warranty ge.com All warranty service provided by our Factory Service Centers or an authorized Customer Care® technician. To schedule service, on-line, 24 hours a day, visit us at ge.com or call 800.GE.CARES (800.432.2737). Please have serial number and model number available when calling for - GE WPGT9360EWW | Owners Manual - Page 34
year! For greater convenience and faster service, you can now download Owner's Manuals, order parts, catalogs, or even schedule service on-line. You can also "Ask Our Team of Experts™" your questions, and so much more... Schedule Service ge.com Expert GE repair service is only one step away from - GE WPGT9360EWW | Owners Manual - Page 35
Lavadoras Profile ge.com Instrucciones de seguridad . . . . 2, 3 Instrucciones de operación Ayuda Solucionador de problemas 29-32 Servicio al consumidor Servicio al consumidor 34 Garantía 33 Manual del propietario e Instrucciones de instalación WPGT9350 WPGT9360 Escriba los números de modelo - GE WPGT9360EWW | Owners Manual - Page 36
se debe instalar correctamente de acuerdo con las Instrucciones de instalación. Las Instrucciones de instalación se incluyen en la parte posterior de este manual. • Instale o almacene donde no esté expuesta a temperaturas por debajo del punto de congelación o a la intemperie. • Conecte la lavadora - GE WPGT9360EWW | Owners Manual - Page 37
Inspeccione la condición de las mangueras las cuales deberán reemplazarse cada 5 años. • No intente reparar o remplazar parte alguna de la lavadora a no ser que se especifique en el Manual del propietario, o en alguna instrucción de reparación publicada que usted entienda y que pueda llevar a cabo - GE WPGT9360EWW | Owners Manual - Page 38
Panel de control de su lavadora ge.com ¡ADVERTENCIA! Para reducir el riesgo de incendio o lesiones personales, lea las INSTRUCCIONES IMPORTANTES DE SEGURIDAD antes de operar este electrodoméstico. A lo largo de este manual, las funciones y la apariencia podrían ser diferentes a su modelo. POWER MY - GE WPGT9360EWW | Owners Manual - Page 39
tacto está apagada, presione el botón POWER (ENCENDER) en la pantalla de tacto para tener acceso al menú de los ciclos de lavado. Comienzo rápido ge.com Introduzca la ropa sin sobrepasar la línea de agujeros en la tina de la lavadora. Llenar la lavadora en exceso podría reducir la eficiencia - GE WPGT9360EWW | Owners Manual - Page 40
Lavado por color Lavado por tipo de ropa Lavado por tipo de tela Lavado usando los ciclos especiales 6 Ciclos de lavado ge.com Si la pantalla de tacto está apagada, presione el botón POWER (ENCENDER) o la pantalla de tacto para accesar al menú de ciclos de lavado. - GE WPGT9360EWW | Owners Manual - Page 41
Cómo lavar usando el Inspector de manchas Inspector de manchas ge.com El inspector de manchas ofrece ideas para el tratamiento y lavado óptimos de tipos de manchas específicas. Usted selecciona el tipo de mancha, tela o - GE WPGT9360EWW | Owners Manual - Page 42
Selecciones de manchas Inspector de manchas ge.com A continuación hay una lista de las • Óxido / Hierro • Savia de árboles Personal • Enjuague bucal • Manchas de bebé • Medicamentos, general • Orina / heces fecales • Sangre • Sudor • Vómito Cosméticos • Chapstick® • Desodorante / antitranspirante - GE WPGT9360EWW | Owners Manual - Page 43
de la pantalla resumen Cómo cambiar el nivel de suciedad Cómo cambiar la temperatura de lavado Cómo cambiar la acción de lavado Pantalla resumen ge.com Después de seleccionar un ciclo de lavado, la pantalla resumen muestra las opciones automáticamente para el ciclo que usted escogió. Usted puede - GE WPGT9360EWW | Owners Manual - Page 44
Acerca de las opciones de lavado Cómo ajustar las opciones de tiempo Pantalla resumen ge.com Las opciones de lavado le permiten escoger ajustes para el ciclo de lavado actual solamente. Después de que usted haya hecho los cambios deseados, - GE WPGT9360EWW | Owners Manual - Page 45
Acerca de la función "My Cycles" (Mis ciclos) Cómo crear y usar "My Cycles" (Mis ciclos) "My Cycles" (Mis ciclos) ge.com La función "My Cycles" (Mis ciclos) le permite crear, guardar y reutilizar hasta 6 ciclos personalizados. Cree sus propios ciclos desde el comienzo o cambie los ajustes - GE WPGT9360EWW | Owners Manual - Page 46
Cómo cambiar, renombrar o borrar un "My Cycle" (Mi ciclo) "My Cycles" (Mis ciclos) ge.com Para cambiar los ajustes de un "My Cycle" (Mi ciclo) a partir de la pantalla inicial: 1 Presione el botón MY CYCLES (MIS CICLOS). 2 Seleccione CAMBIAR - GE WPGT9360EWW | Owners Manual - Page 47
el solucionador de problemas Cómo encontrar ayuda de la pantalla inicial Ayuda ge.com Presionar el botón HELP (AYUDA) en la pantalla inicial le la descripción del problema en la lista. Usted puede usar las flechas en la parte derecha de la pantalla para buscar hacia arriba o hacia abajo a través de - GE WPGT9360EWW | Owners Manual - Page 48
seleccionar las preferencias de la máquina 14 Ayuda ge.com Las preferencias de la máquina en la COMUNICACIÓN ENTRE LA LAVADORA Y LA SECADORA de la pantalla de tacto. 4 Toque el botón en la parte inferior de la pantalla de tacto para seleccionar ON (ENCENDIDO) u OFF (APAGADO). 5 Seleccione OK en - GE WPGT9360EWW | Owners Manual - Page 49
Cómo usar el dispensador de blanqueador líquido Cómo usar la gaveta dispensadora Otras funciones de la lavadora ge.com El dispensador de blanqueador diluye y dispensa automáticamente el cloro líquido en el momento preciso durante el ciclo de lavado. 1 Inspeccione las etiquetas de - GE WPGT9360EWW | Owners Manual - Page 50
Cómo agregar detergente Otras funciones de la lavadora ge.com NOTA: Solamente use detergente de alta eficiencia de baja producción de espuma como Tide® HE. Agregue detergente medido al compartimiento del detergente en la - GE WPGT9360EWW | Owners Manual - Page 51
clasificar la ropa Cómo llenar la lavadora Etiquetas del cuidado de la tela Gama de temperaturas de la lavadora Cómo llenar y usar su lavadora ge.com Siempre siga las instrucciones en las etiquetas del fabricante de la ropa cuando lave. Clasifique por color (blancos, claros, colores), por nivel de - GE WPGT9360EWW | Owners Manual - Page 52
Tide® HE. Tapa: Lave la tapa con un paño húmedo en la parte externa y en la parte interna y seque con un paño suave. 2 Remueva los insertos de los bomba de drenaje y de las mangueras. Para más información, visite ge.com o llame al 800.GE.CARES (800.432.2737). NO almacene la lavadora donde esté - GE WPGT9360EWW | Owners Manual - Page 53
, WPGT9360 ¿Preguntas? Llame a 800.GE.CARES (800.432.2737) o visite nuestra página Web: ge.com ANTES DE COMENZAR Lea estas instrucciones frecuencia indicados en la placa de especificaciones eléctricas (localizada en la parte posterior del tablero) y se debe conectar a un circuito individual que - GE WPGT9360EWW | Owners Manual - Page 54
aprobada para instalarse en huecos o armarios, como se establece en una etiqueta en la parte posterior de la máquina. Espacio mínimo entre la lavadora y las paredes adyacentes del aire se requieren sin obstrucción alguna cuando se instale una puerta. Una puerta apersianada con las aperturas de aire - GE WPGT9360EWW | Owners Manual - Page 55
INCLUIDAS ❑ Mangueras de agua (2) 1 DESEMPAQUE LA LAVADORA (CONT.) Remueva el bloque de espuma de poliestireno que contiene el Manual del propietario, las partes, las mangueras de agua y las muestras de productos de lavandería. ❑ Cinta de seguridad para el cable HERRAMIENTAS QUE USTED NECESITAR - GE WPGT9360EWW | Owners Manual - Page 56
Instrucciones de instalación 2 INSTALE LAS MANGUERAS DE AGUA EN LA LAVADORA Enrosque la manguera de espacio para hacer las conexiones de plomería, electricidad y drenaje. El espacio mínimo requerido en la parte posterior es de 3". 3" 5 CONECTE LA MANGUERA DE DRENAJE AL DRENAJE DE LA CASA Inserte - GE WPGT9360EWW | Owners Manual - Page 57
la comunicación de la lavadora y la secadora al puerto serial en la parte posterior de la lavadora. Puerto serial 7 NIVELE LA LAVADORA Mueva la lavadora de la lavadora, donde el lado del gabinete se encuentra con la tapa. Parte posterior de la lavadora Bajar Subir Si la lavadora no está nivelada, - GE WPGT9360EWW | Owners Manual - Page 58
. Los errores de cableado podrían causar un mal funcionamiento y ser peligrosos después de la instalación/servicio. Para obtener partes de repuesto y más información, busque en el Manual del propietario los números de servicio a los que debe llamar para solicitar servicio. NOTA: Si la lavadora se - GE WPGT9360EWW | Owners Manual - Page 59
una toalla encima de la tapa de la lavadora para evitar que se raye la superficie. Remueva los dos tornillos externos de la parte posterior del tablero de la lavadora. Gire el tablero hacia adelante y levántelo. Tornillo Tornillo HERRAMIENTAS QUE USTED NECESITARÁ ❑ Un destornillador de estrella - GE WPGT9360EWW | Owners Manual - Page 60
DEL TABLERO DE LA LAVADORA Remueva los cuatro tornillos que sostienen la tarjeta de control. Remueva la tarjeta de control y póngala a un lado. Tornillos Parte posterior de la secadora 6 DESCONECTE LA TARJETA DE CONTROL DE LA SECADORA Desconecte la cinta en el lado derecho de la tarjeta de control - GE WPGT9360EWW | Owners Manual - Page 61
Instrucciones de instalación 7 REMUEVA LA TARJETA DE CONTROL DEL TABLERO Remueva los cuatro tornillos que sostienen la tarjeta de control del tablero. Remueva la tarjeta de control y póngala a un lado. Tornillos 10 RECONECTE LA TARJETA DE CONTROL DE LA SECADORA Conecte la tarjeta de control de la - GE WPGT9360EWW | Owners Manual - Page 62
presión Inserte las orejillas del fondo frontal del tablero en las ranuras de la lavadora y gire el tablero en su lugar. Presione la parte posterior del tablero hacia abajo para asegurarse de que ajuste correctamente. Asegure el tablero nuevo a la lavadora usando los dos tornillos largos removidos - GE WPGT9360EWW | Owners Manual - Page 63
Solucionador de problemas ge.com Para obtener una lista completa de soluciones a problemas fusibles o reajuste los interruptores. La lavadora debería tener un tomacorriente separado. Los circuitos electrónicos necesitan • Desconecte la lavadora, espere 2 minutos, conéctela otra vez y reajustarse - GE WPGT9360EWW | Owners Manual - Page 64
Solucionador de problemas ge.com Para obtener una lista completa de soluciones a problemas en blanco después de que el ciclo ha terminado Han transcurrido 5 minutos de inactividad • Esto es parte de la operación normal. La pantalla está diseñada para apagarse automáticamente después de 5 minutos - GE WPGT9360EWW | Owners Manual - Page 65
Solucionador de problemas ge.com Problema Posible causa Qué hacer La distribución del detergente no se completa o no serealiza (cont.) Se usó demasiado detergente • Asegúrese de usar la - GE WPGT9360EWW | Owners Manual - Page 66
Solucionador de problemas ge.com Los siguientes son sonidos normales que usted podría escuchar: Sonido Descripción La lavadora arranca y se para repetidamente • La acción HydroWashMR hacer girar el canasto - GE WPGT9360EWW | Owners Manual - Page 67
y resorte y la tarjeta de control electrónico principal, si alguna de estas partes falla debido a defectos en los materiales o en la fabricación. GE también reemplazará la tapa o la póngase en contacto con la Oficina de su Procurador General. Garante: General Electric Company. Louisville, KY 40225 33 - GE WPGT9360EWW | Owners Manual - Page 68
asistencia con su electrodoméstico? ¡Visite la página de GE Appliances las 24 horas del día, cualquier día del año! Para un servicio conveniente más rápido, usted puede bajar de la página de Internet los Manuales del propietario, ordenar partes, catálogos, o hasta programar visitas de servicio por
-
 1
1 -
 2
2 -
 3
3 -
 4
4 -
 5
5 -
 6
6 -
 7
7 -
8
-
9
-
10
-
11
-
12
-
13
-
14
-
15
-
16
-
17
-
18
-
19
-
20
-
21
-
22
-
23
-
24
-
25
-
26
-
27
-
28
-
29
-
30
-
31
-
32
-
33
-
34
-
35
-
36
-
37
-
38
-
39
-
40
-
41
-
42
-
43
-
44
-
45
-
46
-
47
-
48
-
49
-
50
-
51
-
52
-
53
-
54
-
55
-
56
-
57
-
58
-
59
-
60
-
61
-
62
-
63
-
64
-
65
-
66
-
67
-
68
 |
 |

Safety Instructions
. . . . . . . . . . 2, 3
Operating Instructions
Controls . . . . . . . . . . . . . . . . . . . . . . . . . . .4
Cycle Options . . . . . . . . . . . . . . . . . . . . . .6
Help Feature . . . . . . . . . . . . . . . . . .13, 14
Troubleshooter . . . . . . . . . . . . . . . . . . .13
Loading and Using
the Washer . . . . . . . . . . . . . . . . . . .17, 18
“My Cycles” Feature . . . . . . . . . . .11, 12
Other Features . . . . . . . . . . . . . . . .15, 16
Quick Start Feature
. . . . . . . . . . . . . . . .5
Stain Inspector
. . . . . . . . . . . . . . . . . .7, 8
Summary Screen . . . . . . . . . . . . . . .9, 10
Installation Instructions
Before You Begin . . . . . . . . . . . . . .19–21
Step-by-Step Instructions . . . . . .21–24
Switching the Washer and
Dryer Backsplashes
. . . . . . . . . . .25–28
Troubleshooting Tips
. . . . . .29–32
Consumer Support
Consumer Support . . . . . . . . . . . . . . . 34
Warranty . . . . . . . . . . . . . . . . . . . . . . . . 33
ge.com
Washers
3828EA3023B
175D1807P530
49-90262
11-05 JR
Profile
Write the model and serial
numbers here:
Model #
______________
Serial #
______________
You can find them on the
rear cover of the washer
backsplash.
WPGT9350
WPGT9360
Owner’s Manual
and Installation
Instructions