GE WVSR1060GWW Owners Manual
GE WVSR1060GWW Manual
 |
UPC - 084691145967
View all GE WVSR1060GWW manuals
Add to My Manuals
Save this manual to your list of manuals |
GE WVSR1060GWW manual content summary:
- GE WVSR1060GWW | Owners Manual - Page 1
ge.com Safety Instructions 2, 3 Operating Instructions Care and Cleaning of the Washer 9 Control Panels 4, 6 Control Settings 4-7 Features 8 Loading and Using the Washer 9 Troubleshooting Tips . . . . .10-12 Consumer Support Consumer Support 16 Warranty 15 Owner's Manual Write the model - GE WVSR1060GWW | Owners Manual - Page 2
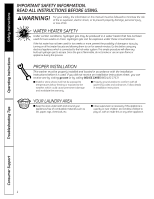
SAFETY INFORMATION. READ ALL INSTRUCTIONS BEFORE USING. WARNING! For your safety, the information in this manual must be followed to minimize the risk of fire or explosion, electric shock, or to prevent to play on, with or inside this or any other appliance. Troubleshooting Tips Consumer Support 2 - GE WVSR1060GWW | Owners Manual - Page 3
unless specifically recommended in this Owner's Manual, or in published user-repair instructions that you understand and have the skills to carry out. I Do not tamper with controls. READ AND FOLLOW THIS SAFETY INFORMATION CAREFULLY. SAVE THESE INSTRUCTIONS Troubleshooting Tips Consumer Support 3 - GE WVSR1060GWW | Owners Manual - Page 4
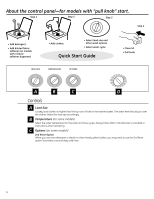
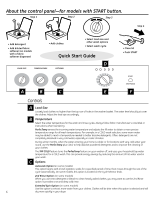
row of holes in the washer basket. The water level should just cover the clothes. Adjust the load size accordingly. B Temperature (on some models) Select the water temperature for the wash and rinse cycles. Always follow fabric manufacturer's care label or instructions when laundering. C Options (on - GE WVSR1060GWW | Owners Manual - Page 5
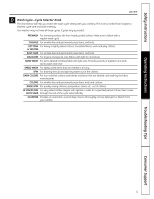
Instructions Operating Instructions ge.com D Wash Cycle-Cycle Selector Knob The chart below will help you match the wash cycle setting with your clothing. The chart is ranked from longest to shortest cycle time and wash intensity. Your washer may not have all these cycles. (Cycles vary by model - GE WVSR1060GWW | Owners Manual - Page 6
softener (on models with a fabric softener dispenser) • Add clothes • Select load size and other wash options • Select wash cycle Quick Start Guide D • Close lid • Push START A B C E F Controls A Load Size Loosely load clothes no higher than the top row of holes in the washer basket. The - GE WVSR1060GWW | Owners Manual - Page 7
To stop the cycle, hold the button for 3 seconds. If water remains in the machine, select the DRAIN & SPIN OR SPIN ONLY cycle to drain tub and spin water out of the washer tub. Raising the lid will stop agitation or spin action, but does not pause the cycle. 7 Troubleshooting Tips Consumer Support - GE WVSR1060GWW | Owners Manual - Page 8
or over-filling dispenser. If you prefer to use powdered bleach, add it into the wash basket with your detergent. I Do not mix chlorine bleach with ammonia or acids such as vinegar and/or rust remover. Mixing can produce a toxic gas which may cause death. Troubleshooting Tips Consumer Support 8 - GE WVSR1060GWW | Owners Manual - Page 9
more information, visit ge.com or call 800.GE.CARES (800.432.2737). Do not store the washer where it will be exposed to the weather. Long Vacations: Be sure water supply is shut off at faucets. Drain all water from hoses if weather will be below freezing. Troubleshooting Tips Consumer Support 9 - GE WVSR1060GWW | Owners Manual - Page 10
Safety Instructions Operating Instructions Before you call for service... Troubleshooting Tips Save time and money! Review the charts on the following pages, or visit ge.com. You may not need to call for service. WATER Too many suds Water leaks Water temperature seems incorrect Possible Causes - GE WVSR1060GWW | Owners Manual - Page 11
Use warmer water temperature. • Load clothes no higher than the top row of holes in the washer basket. • Make sure load size selected matches clothes load size. • Check fabric softener package for instructions and follow directions for using dispenser. 11 Troubleshooting Tips Consumer Support - GE WVSR1060GWW | Owners Manual - Page 12
for service... Troubleshooting Tips Operating Instructions Troubleshooting Tips PERFORMANCE (cont.) Pilling Snags, holes, tears, rips or excessive wear Wrinkling Possible Causes What To Do Result of normal wear on poly-cotton blends and fuzzy fabrics • While this is not caused by the washer - GE WVSR1060GWW | Owners Manual - Page 13
Notes. ge.com Safety Instructions Operating Instructions Troubleshooting Tips Consumer Support 13 - GE WVSR1060GWW | Owners Manual - Page 14
Notes. 14 Consumer Support Troubleshooting Tips Operating Instructions Safety Instructions - GE WVSR1060GWW | Owners Manual - Page 15
, and you may also have other rights which vary from state to state. To know what your legal rights are, consult your local or state consumer affairs office or your state's Attorney General. Warrantor: General Electric Company. Louisville, KY 40225 Troubleshooting Tips Consumer Support 15 - GE WVSR1060GWW | Owners Manual - Page 16
Consumer Support. GE Appliances Website ge.com Have a question or need assistance with your appliance? Try the GE Appliances Website 24 hours a day, any day of the year! For greater convenience and faster service, you can now download Owner's Manuals, order parts or even schedule service on-line. - GE WVSR1060GWW | Owners Manual - Page 17
Lavadoras ge.com Instrucciones de seguridad 2, 3 Instrucciones de operación Ajustes de control 4-7 Cómo cargar para la solución de problemas 10-12 Soporte al consumidor Garantía 15 Soporte al consumidor 16 Manual del propietario Escriba el número de modelo y de serie aquí: No. de modelo No. - GE WVSR1060GWW | Owners Manual - Page 18
¡ADVERTENCIA! Por su seguridad, debe seguir las indicaciones de este manual para minimizar el riesgo de incendio o explosión, descarga eléctrica, la hoja con instrucciones de instalación, puede obtener una visitando ge.com o llamando al 800.GE.CARES (800.432.2737). I Instale o almacene la lavadora - GE WVSR1060GWW | Owners Manual - Page 19
se describe gases tóxicos que pueden causar la muerte. en este manual del propietario. I No lave ni seque prendas que se hayan que se produzca una rotura o grieta. Compruebe el estado de las mangueras de llenado; GE recomienda el cambio de las mangueras cada 5 años. I Antes de deshacerse de una - GE WVSR1060GWW | Owners Manual - Page 20
Panel de control-para modelos que empieza con una perilla. Paso 1 Paso 2 Paso 3 Paso 4 • Agregue el detergente • Agregue el suavizante diluido (en modelos con dosificador para suavizante) • Agregue ropa • Seleccione el tamaño de carga y otras opciones de lavado • Seleccione el ciclo de lavado - GE WVSR1060GWW | Owners Manual - Page 21
Seguridad Operación ge.com D Ciclo de lavado-perilla selectora del ciclo El gráfico A MANO) agitación y remojo durante el lavado y el enjuague. SPEED WASH Para prendas poco sucias que se necesitan con urgencia. (LAVADO RÁPIDO) SPIN Para el desagüe del cesto metálico y el agua del centrifugado de - GE WVSR1060GWW | Owners Manual - Page 22
Panel de control-para modelos que empieza con botón de START. Paso 1 Paso 2 Paso 3 Paso 4 • Agregue el detergente • Agregue el suavizante diluido (en modelos con dosificador para suavizante) • Agregue ropa • Seleccione el tamaño de carga y otras opciones de lavado • Seleccione el ciclo de - GE WVSR1060GWW | Owners Manual - Page 23
Seguridad Operación ge.com D Status Indicator Lights (Luces indicadoras de estado) MANO) agitación y remojo durante el lavado y el enjuague. SPEED WASH Para prendas poco sucias que se necesitan con urgencia. (LAVADO RÁPIDO) DRAIN & SPIN Para el desagüe del cesto metálico y el agua del centrifugado - GE WVSR1060GWW | Owners Manual - Page 24
Operación Funciones de la lavadora. La tapa del agitador o dosificador del suavizante (dependiendo del modelo) La tapa del agitador entra en la parte superior del agitador. Si se sale accidentalmente, simplemente vuelva a colocarla en su lugar. 3 Agregue agua al dosificador hasta que llegue a la - GE WVSR1060GWW | Owners Manual - Page 25
varilla de embarque para mantener el cesto metálico estacionario cuando se cambie la lavadora de lugar. Para mayor información, visite ge.com o llame al 800.GE.CARES (800.432.2737). No guarde la lavadora donde pudiera quedar expuesta a las condiciones climáticas. Vacaciones prolongadas: Asegúrese de - GE WVSR1060GWW | Owners Manual - Page 26
! Consulte primero las tablas de las páginas siguientes o visite ge.com y quizás no necesite llamar al servicio. AGUA Causas Cierre la fuente de agua y retire las mangueras de conexión de agua de la parte superior trasera de la lavadora. Use un cepillo o mondadientes para limpiar los filtros de - GE WVSR1060GWW | Owners Manual - Page 27
ge.com Seguridad Operación Solucionar problemas OPERACIÓN Causas posibles Qué hacer los fusibles o reajuste el disyuntor. La lavadora debe tener un tomacorriente separado. Hay que reajustar la electrónica • Desenchufe la lavadora, espere 2 minutos, vuelva a enchufarla y oprima START. No se - GE WVSR1060GWW | Owners Manual - Page 28
Antes de llamar para solicitar servicio... Consejos para la solución de problemas Seguridad Operación Solucionar problemas RENDIMIENTO (cont.) Formación de bolitas Enganches, agujeros, desgarros, rasgones o desgaste excesivo Arrugas Causas posibles Qué hacer Resultado del desgaste normal • Si - GE WVSR1060GWW | Owners Manual - Page 29
Notas. ge.com Seguridad Operación Solucionar problemas Soporte al consumidor 13 - GE WVSR1060GWW | Owners Manual - Page 30
Notas. 14 Soporte al consumidor Solucionar problemas Operación Seguridad - GE WVSR1060GWW | Owners Manual - Page 31
está situado en un área que no dispone de servicio por parte de un proveedor de servicio autorizado de GE, podría tener que hacerse cargo de los costes de envío o con la Oficina de su Procurador General. Garante: General Electric Company. Louisville, KY 40225 Solucionar problemas Soporte al consumidor - GE WVSR1060GWW | Owners Manual - Page 32
normales de oficina. GE Consumer Home Services estará aún ahí cuando su garantía termine. Piezas y accesorios ge.com Aquellos individuos con escríbanos a: General Manager, Customer Relations GE Appliances, Appliance Park Louisville, KY 40225 Registre su electrodoméstico ge.com ¡Registre su
-
 1
1 -
 2
2 -
 3
3 -
 4
4 -
 5
5 -
 6
6 -
 7
7 -
8
-
9
-
10
-
11
-
12
-
13
-
14
-
15
-
16
-
17
-
18
-
19
-
20
-
21
-
22
-
23
-
24
-
25
-
26
-
27
-
28
-
29
-
30
-
31
-
32
 |
 |

ge.com
Owner’s Manual
Washers
175D1807P587
49-90319
02-07 JR
Safety Instructions
. . . . . . . . . .2, 3
Operating Instructions
Care and Cleaning
of the Washer . . . . . . . . . . . . . . . . . . . . 9
Control Panels
. . . . . . . . . . . . . . . . . .4, 6
Control Settings
. . . . . . . . . . . . . . . .4–7
Features . . . . . . . . . . . . . . . . . . . . . . . . . .8
Loading and Using
the Washer . . . . . . . . . . . . . . . . . . . . . . . 9
Troubleshooting Tips
. . . . .10–12
Consumer Support
Consumer Support . . . . . . . . . . . . . . .16
Warranty . . . . . . . . . . . . . . . . . . . . . . . .15
Write the model and serial
number here:
Model #
______________
Serial #
______________
You can find them
under the lid of
the washer.