GE A1456W User Manual (a1456w-usermanual-eng) - Page 64
Power Saver
 |
UPC - 846951000641
View all GE A1456W manuals
Add to My Manuals
Save this manual to your list of manuals |
Page 64 highlights
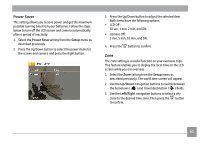
Power Saver This setting allows you to save power and get the maximum possible running time from your batteries. Follow the steps below to turn off the LCD screen and camera automatically after a period of inactivity. 1. Select the Power Save setting from the Setup menu as described previously. 2. Press the Up/Down button to select the power items for the screen and camera and press the Right button. 3. Press the Up/Down button to adjust the selected item. Both items have the following options: • LCD Off : 30 sec, 1 min, 2 min, and ON. • Camera Off : 3 min, 5 min, 10 min, and ON. 4. Press the button to confirm. Zone The Zone setting is a useful function on your overseas trips. This feature enables you to display the local time on the LCD screen while you are overseas. 1. Select the Zone setting from the Setup menu as described previously. The world time screen will appear. 2. Use the Up/Down navigation buttons to switch between the hometown ( ) and travel destination ( ) fields. 3. Use the Left/Right navigation buttons to select a city close to the desired time zone. Then press the button to confirm. 61
-
 1
1 -
2
-
3
-
4
-
5
-
6
-
7
-
8
-
9
-
10
-
11
-
12
-
13
-
14
-
15
-
16
-
17
-
18
-
19
-
20
-
21
-
22
-
23
-
24
-
25
-
26
-
27
-
28
-
29
-
30
-
31
-
32
-
33
-
34
-
35
-
36
-
37
-
38
-
39
-
40
-
41
-
42
-
43
-
44
-
45
-
46
-
47
-
48
-
49
-
50
-
51
-
52
-
53
-
54
-
55
-
56
-
57
-
58
-
 59
59 -
 60
60 -
 61
61 -
 62
62 -
 63
63 -
 64
64 -
 65
65 -
 66
66 -
 67
67 -
 68
68 -
 69
69 -
70
-
71
-
72
-
73
-
74
-
75
-
76
-
77
-
78
-
79
-
80
-
81
-
82
-
83
-
84
-
85
 |
 |
