GE E1680W User Manual (English) - Page 70
Connecting to a PC
 |
View all GE E1680W manuals
Add to My Manuals
Save this manual to your list of manuals |
Page 70 highlights
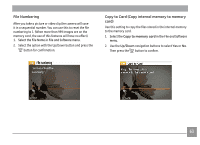
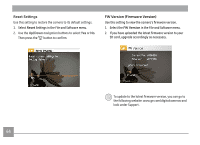
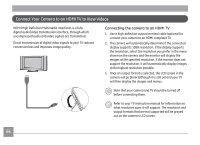
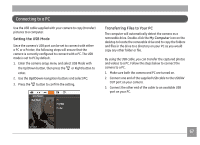
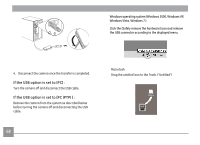
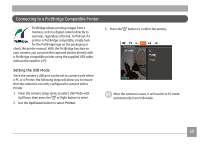
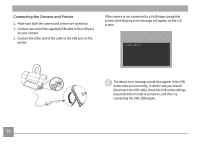
Connecting to a PC Use the USB cable supplied with your camera to copy (transfer) pictures to a computer. Setting the USB Mode Since the camera's USB port can be set to connect with either a PC or a Printer, the following steps will ensure that the camera is correctly configured to connect with a PC. The USB mode is set to PC by default. 1. Enter the camera setup menu and select USB Mode with the Up/Down button, then press the or Right button to enter. 2. Use the Up/Down navigation buttons and select PC. 3. Press the button to confirm the setting. Transferring Files to Your PC The computer will automatically detect the camera as a removable drive. Double-click the My Computer icon on the desktop to locate the removable drive and to copy the folders and files in the drive to a directory on your PC as you would copy any other folder or file. By using the USB cable, you can transfer the captured photos and videos to a PC. Follow the steps below to connect the camera to a PC. 1. Make sure both the camera and PC are turned on. 2. Connect one end of the supplied USB cable to the USB/AV OUT port on your camera. 3. Connect the other end of the cable to an available USB port on your PC. 67
-
 1
1 -
2
-
3
-
4
-
5
-
6
-
7
-
8
-
9
-
10
-
11
-
12
-
13
-
14
-
15
-
16
-
17
-
18
-
19
-
20
-
21
-
22
-
23
-
24
-
25
-
26
-
27
-
28
-
29
-
30
-
31
-
32
-
33
-
34
-
35
-
36
-
37
-
38
-
39
-
40
-
41
-
42
-
43
-
44
-
45
-
46
-
47
-
48
-
49
-
50
-
51
-
52
-
53
-
54
-
55
-
56
-
57
-
58
-
59
-
60
-
61
-
62
-
63
-
64
-
 65
65 -
 66
66 -
 67
67 -
 68
68 -
 69
69 -
 70
70 -
 71
71 -
 72
72 -
 73
73 -
 74
74 -
 75
75 -
76
-
77
-
78
-
79
-
80
-
81
-
82
-
83
-
84
-
85
-
86
 |
 |