GE PTS25SHS Use and Care Manual - Page 11
Water Dispenser, Care and Cleaning
 |
View all GE PTS25SHS manuals
Add to My Manuals
Save this manual to your list of manuals |
Page 11 highlights
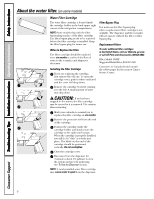
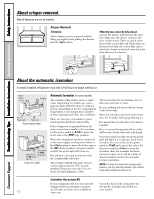
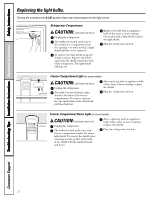
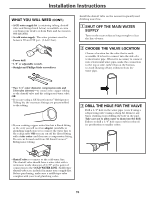
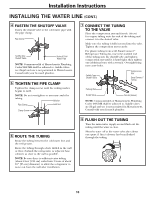
Safety Instructions Operating Instructions Installation Instructions Troubleshooting Tips Consumer Support About the water dispenser. (on some models) ge.com The water dispenser is located on the left wall inside the refrigerator compartment. To dispense water: Hold the glass against the recess. Push the water dispenser button. Hold the glass underneath the dispenser for 2-3 seconds after releasing the dispenser button. Water may continue to dispense after the button is released. If no water is dispensed when the refrigerator is first installed, there may be air in the water line system. Press the dispenser button for at least 2 minutes to remove trapped air from the water line and to fill the water system. During this process, the dispenser noise may be loud as the air is purged from the water line system. To flush out impurities in the water line, throw away the first 6 glassfuls of water. NOTE: To avoid water deposits, the dispenser should be cleaned periodically by wiping with a clean cloth or sponge. Care and cleaning of the refrigerator. Cleaning the Outside The door handles and trim. Clean with a cloth dampened with soapy water. Dry with a soft cloth. Keep the outside clean. Wipe with a clean cloth lightly dampened with mild liquid dish detergent. Dry with a clean, soft cloth. Do not wipe the refrigerator with a soiled dish cloth or wet towel. These may leave a residue that can erode the paint. Do not use scouring pads, powdered cleaners, bleach or cleaners containing bleach because these products can scratch and weaken the paint finish. Cleaning the Inside To help prevent odors, leave an open box of baking soda in the refrigerator and freezer compartments. Unplug the refrigerator before cleaning. If this is not practical, wring excess moisture out of sponge or cloth when cleaning around switches, lights or controls. Use warm water and baking soda solution- about a tablespoon (15 ml) of baking soda to a quart (1 liter) of water. This both cleans and neutralizes odors. Thoroughly rinse and wipe dry. Avoid cleaning cold glass shelves (on some models) with hot water because the extreme temperature difference may cause them to break. Handle glass shelves carefully. Bumping tempered glass can cause it to shatter. Do not wash any refrigerator parts in the dishwasher. Wash ice trays in lukewarm water only-do not put them in an automatic dishwasher. Behind the Refrigerator Be careful when moving the refrigerator away from the wall. All types of floor coverings can be damaged, particularly cushioned coverings and those with embossed surfaces. Pull the refrigerator straight out and return it to position by pushing it straight in. Moving the refrigerator in a side direction may result in damage to the floor covering or refrigerator. When pushing the refrigerator back, make sure you don't roll over the power cord or icemaker supply line (on some models). Preparing for Vacation For long vacations or absences, remove food and unplug the refrigerator. Move the freezer control to the 0 (off) position, and clean the interior with a baking soda solution of one tablespoon (15 ml) of baking soda to one quart (1 liter) of water. Leave the doors open. Set the icemaker power switch to the O (off) position and shut off the water supply to the refrigerator. If the temperature can drop below freezing, have a qualified servicer drain the water supply system (on some models) to prevent serious property damage due to flooding. Preparing to Move Secure all loose items such as base grille, shelves and drawers by taping them securely in place to prevent damage. Be sure the refrigerator stays in an upright position during moving. 11
-
 1
1 -
2
-
3
-
4
-
5
-
 6
6 -
 7
7 -
 8
8 -
 9
9 -
 10
10 -
 11
11 -
 12
12 -
 13
13 -
 14
14 -
 15
15 -
 16
16 -
17
-
18
-
19
-
20
-
21
-
22
-
23
-
24
-
25
-
26
-
27
-
28
-
29
-
30
-
31
-
32
-
33
-
34
-
35
-
36
-
37
-
38
-
39
-
40
-
41
-
42
-
43
-
44
-
45
-
46
-
47
-
48
-
49
-
50
-
51
-
52
-
53
-
54
-
55
-
56
-
57
-
58
-
59
-
60
-
61
-
62
-
63
-
64
-
65
-
66
-
67
-
68
-
69
-
70
-
71
-
72
-
73
-
74
-
75
-
76
-
77
-
78
-
79
-
80
-
81
-
82
-
83
-
84
-
85
-
86
-
87
-
88
-
89
-
90
-
91
-
92
 |
 |
