Genie ChainLift 800 Owner's Manual - Page 23
Fcc And Ic Certified - owners manual
 |
View all Genie ChainLift 800 manuals
Add to My Manuals
Save this manual to your list of manuals |
Page 23 highlights
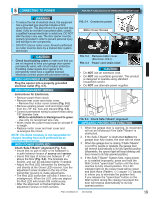
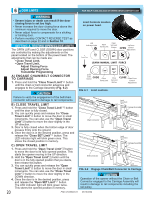
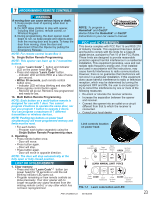
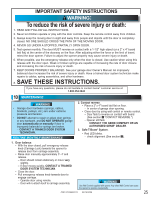
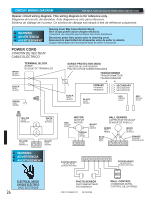
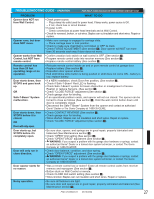
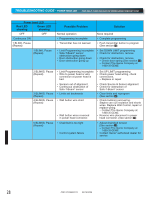
7 PROGRAMMING REMOTE CONTROLS WARNING A moving door can cause serious injury or death. 1. Keep people moving. clear of opening while door is 2. Do NOT allow children to play with opener, including Wall Control, remote control, or Wireless Keypad. 3. During programming, the door opener could begin to run, so keep people and objects away from the moving door and its parts. To keep the door from moving, close the door and disconnect it from the Opener by pulling the Emergency Release. NOTE: For remote control locate Box 3. 1a. Single Button Remote Programming. NOTE: This opener can learn up to 7 transmitter buttons. • Locate "Learn Code" LEARN button and indicator LED on the power headCODE (Fig. 7-1). • Press and release "Learn Code" button. - Indicator LED will blink RED at a rate of twice per second. • Within 30 seconds, push remote control button once. - Indicator LED will stop blinking and stay ON. • Press remote control button again. - Red LED will go out. Remote is now programmed and ready for use. 1b. Multi Button Remote Programming. NOTE: Each button on a multi-button remote is designed for use with 1 door. You cannot program 2 buttons to operate the same door, nor can you program 1 button to operate 2 doors. You can program a maximum of 7 different transmitters or wireless devices. NOTE: To program a Homelink® and Car2U® device follow the Homelink® or Car2U® instructions in your car owner's manual. FCC and IC CERTIFIED This device complies with FCC Part 15 and RSS 210 of Industry Canada. This equipment has been tested and found to comply with the limits for a Class B digital device, pursuant to Part 15 of the FCC Rules. These limits are designed to provide reasonable protection against harmful interference in a residential installation. This equipment generates, uses and can radiate radio frequency energy and, if not installed and used in accordance with the instructions, may cause harmful interference to radio communications. However, there is no guarantee that interference will not occur in a particular installation. If this equipment does cause harmful interference to radio or television reception, which may be determined by turning the equipment OFF and ON, the user is encouraged to try to correct the interference by one or more of the following measures: • Re-orient or relocate the receiver antenna. • Increase the separation between the opener and receiver. • Connect the opener into an outlet on a circuit different from that to which the receiver is connected. • Consult your local dealer. NOTE: Pushing two buttons on power head simultaneously will erase programmed memory and limits must be reset. • For each button. - Program each button separately using the Single Button Remote Programming steps. 2. Operating. • Press remote button once. - Door will move. • Press button again. - Door will stop. • Press button again. - Door will move in opposite direction. Limit controls location on power head. LED Indicator Light Open Open Set Limit Travel Limit Button Up Force OPEN Control Adjustment NOTE: The door will stop automatically at the fully open or fully closed position. To Garage Door SET LOST OR STOLEN REMOTE 1. Clear memory. • Press and hold "Learn Code" LEARN button (on power head) for 10 seconds or until CODE the red blinking indicator LED goes out. • Program remaining or new remote controls as done previously. Your door opener will no longer recognize any signal received from the missing remote control, or any other which has not been reprogrammed. LEARN MANUAL LIMIT FORCE SET Learn Code CODE Button Close Travel Limit Close CLOSE Down Force Set Limit Control Button Adjustment FIG. 7-1 Learn code button and LED PN# 37026500123 05/15/2009 23
-
 1
1 -
2
-
3
-
4
-
5
-
6
-
7
-
8
-
9
-
10
-
11
-
12
-
13
-
14
-
15
-
16
-
17
-
 18
18 -
 19
19 -
 20
20 -
 21
21 -
 22
22 -
 23
23 -
 24
24 -
 25
25 -
 26
26 -
 27
27 -
 28
28 -
29
-
30
 |
 |