Gigabyte GA-8I915G Duo Manual
Gigabyte GA-8I915G Duo Manual
 |
View all Gigabyte GA-8I915G Duo manuals
Add to My Manuals
Save this manual to your list of manuals |
Gigabyte GA-8I915G Duo manual content summary:
- Gigabyte GA-8I915G Duo | Manual - Page 1
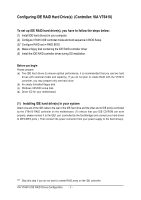
RAID Hard Drive(s) (Controller: VIA VT6410 2 (1) Installing IDE hard drive(s) in your system 2 (2) Configuring VT6410 IDE controller mode and boot sequence in BIOS Setup 3 (3) Configuring RAID set in RAID BIOS 5 (4) Making a IDE RAID controller driver disk 10 (5) Installing IDE RAID controller - Gigabyte GA-8I915G Duo | Manual - Page 2
BIOS Setup. (3)* Configure RAID set in RAID BIOS. (4) Make a floppy disk containing the IDE RAID controller driver (5) Install the IDE RAID controller driver An empty formatted floppy disk. (c) Windows XP/2000 setup disk. (d) Driver CD for your motherboard. (1) Installing IDE hard drive(s) in - Gigabyte GA-8I915G Duo | Manual - Page 3
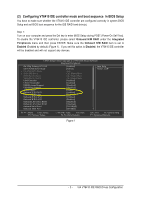
and press the Del key to enter BIOS Setup during POST (Power-On Self VT6410 IDE controller will be disabled and will not support any devices. CMOS Setup Utility-Copyright (C) 1984- Select F5: Previous Values +/-/PU/PD: Value F10: Save F6: Fail-Safe Defaults ESC: Exit F1: General Help F7: - Gigabyte GA-8I915G Duo | Manual - Page 4
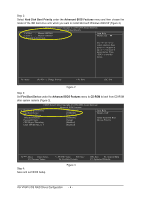
the Advanced BIOS Features menu and then choose the Åé model of the IDE hard drive onto which you want to install Microsoft Windows 2000/XP (Figure : Select F5: Previous Values Step 4: Save and exit BIOS Setup. +/-/PU/PD: Value F10: Save F6: Fail-Safe Defaults Figure 3 ESC: Exit F1: General - Gigabyte GA-8I915G Duo | Manual - Page 5
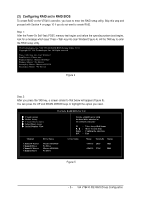
Self-Test (POST) memory test begins and before the operating system boot begins, look for a message which says "Press key into User Window"(Figure 4). Hit the DOWN ARROW keys to highlight the option you need. VIA Tech. RAID BIOS Ver 2.11 X Create Array X Delete Array X Create/Delete Spare - Gigabyte GA-8I915G Duo | Manual - Page 6
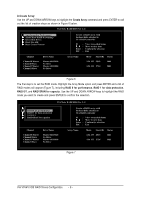
call out the list of creation steps as shown in Figure 6 below. VIA Tech. RAID BIOS Ver 2.11 X Auto Setup For Performance X Array Mode RAID 0 (Striping) X Select Disk press ENTER to confirm the selection. VIA Tech. RAID BIOS Ver 2.11 X Auto Setup For Data Security X ArRraAyIDM0odfeorRpAeIrDfo0rm - Gigabyte GA-8I915G Duo | Manual - Page 7
Auto Setup and the other is Select Disk Drives. Auto Setup lets BIOS select the disk drives and create array automatically but it does not duplicate keys to highlight the block size you need and press ENTER. VIA Tech. RAID BIOS Ver 2.11 X Auto Setup For Performance X Array Mode RAID 0 (Stri4pKing) - Gigabyte GA-8I915G Duo | Manual - Page 8
a disk array that has a boot mark (an asterisk) and press ENTER, then its boot setting will be cancelled (see Figure 11). VIA Tech. RAID BIOS Ver 2.11 X Create Array X Delete Array X Create/Delete Spare X Select Boot Array X Serial Number View The selected array will be destoried. Are you sure - Gigabyte GA-8I915G Duo | Manual - Page 9
. User can see the serial number of the selected drive at last column. Serial number is assigned by manufacturers of hard drives. VIA Tech. RAID BIOS Ver 2.11 X Create Array X Delete Array X Create/Delete Spare X Select Boot Array X Serial Number View View the serial number of hard disk, it is - Gigabyte GA-8I915G Duo | Manual - Page 10
, the hard disk may not be recognized during the Windows setup process. First of all, you have to copy the driver for the IDE RAID controller from the motherboard driver CD to ¤å a floppy disk. The instructions below explain how to copy the driver. Step 1: Find an available system and insert the - Gigabyte GA-8I915G Duo | Manual - Page 11
Step 4: Insert an empty floppy disk and press H to select VIA 6410 RAID. Then it will take about one minute to copy the IDE RAID driver from the motherboard driver CD to the floppy disk. Step 5: Press 0 to exit when the procedure is completed (Figure 17). You have copied the IDE RAID - Gigabyte GA-8I915G Duo | Manual - Page 12
with the IDE RAID driver and adjusted BIOS settings, you can begin to install Windows 2000/XP onto your IDE hard disk with the IDE RAID driver. This procedure ¤¤ assumes Windows XP installation. ¤å Step 1: Restart your system to boot from the Windows 2000/XP Setup disk and press F6 as soon as - Gigabyte GA-8I915G Duo | Manual - Page 13
floppy disk or copy the correct IDE RAID driver again from the motherboard driver CD. "*" Please select the driver according to which of the following operating systems you want to install: Windows 2003 IA32, Windows XP, Windows 2000, or Windows NT4. - 13 - VIA VT6410 IDE RAID Drives Configuration - Gigabyte GA-8I915G Duo | Manual - Page 14
, you should see a screen similar to Figure 22 below. It indicates that you have installed the IDE RAID driver successfully. You can proceed with the Windows Åé 2000/XP installation. ¤¤ ¤å WindowsXP Professional Setup Welcome to Setup. This port of the Setup program prepares Microsoft
-
 1
1 -
 2
2 -
 3
3 -
 4
4 -
 5
5 -
 6
6 -
 7
7 -
8
-
9
-
10
-
11
-
12
-
13
-
14
 |
 |

Table of Contents
Configuring IDE RAID Hard Drive(s)
(Controller: VIA VT6410)
....................................................
2
(1)
Installing IDE hard drive(s) in your system
................................................................................
2
(2)
Configuring VT6410 IDE controller mode and boot sequence
in BIOS Setup
.......................
3
(3)
Configuring RAID set in RAID BIOS
.............................................................................................
5
(4)
Making a IDE RAID controller driver disk
..................................................................................
10
(5)
Installing IDE RAID controller driver during OS installation
.....................................................
12