Gigabyte GA-8I955X Royal Manual
Gigabyte GA-8I955X Royal Manual
 |
View all Gigabyte GA-8I955X Royal manuals
Add to My Manuals
Save this manual to your list of manuals |
Gigabyte GA-8I955X Royal manual content summary:
- Gigabyte GA-8I955X Royal | Manual - Page 1
Image Sil3132 2 (1) Installing SATA hard drive(s) in your system 2 (2) Configuring SATA controller mode and boot sequence in BIOS Setup 3 (3) Configuring SATA hard drives in RAID BIOS 6 (4) Making a SATA controller driver disk 10 (5) Installing SATA controller driver during OS installation 12 - Gigabyte GA-8I955X Royal | Manual - Page 2
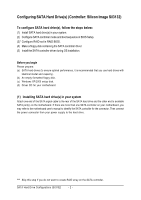
drive(s) in your system. ¤å (2) Configure SATA controller mode and boot sequence in BIOS Setup. (3)* Configure RAID set in RAID BIOS. (4) Make a floppy disk containing the SATA controller driver. (5) Install the SATA controller driver during OS installation. Before you begin Please prepare - Gigabyte GA-8I955X Royal | Manual - Page 3
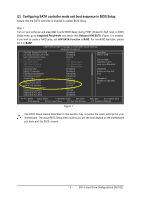
Help F7: Optimized Defaults Figure 1 The BIOS Setup menus described in this section may not show the exact settings for your motherboard. The actual BIOS Setup menu options you will see shall depend on the motherboard you have and the BIOS version . - 3 - SATA Hard Drive Configurations (Sil3132) - Gigabyte GA-8I955X Royal | Manual - Page 4
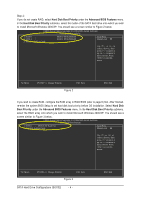
Ác Step 2: If you do not create RAID, select Hard Disk Boot Priority under the Advanced BIOS Features menu. In the Hard Disk Boot Priority submenu, select the model of the SATA hard drive onto which you wish to install Microsoft Windows 2000/XP. You should see a screen similar to Figure 2 below. - Gigabyte GA-8I955X Royal | Manual - Page 5
Award Software Advanced BIOS Features } Hard Disk Boot Priority First Boot Device Second Boot Device Third Boot Device Password Check CPU Hyper-Threading # Limit CPUID Max. to 3 No-Execute Memory Protect (Note) CPU Enhanced Halt (C1E) (Note) CPU Thermal Monitor 2(TM2) (Note) CPU EIST Function (Note - Gigabyte GA-8I955X Royal | Manual - Page 6
the POST memory test begins and before the operating system boot begins, look for a message ¤å which says "Press or to enter RAID utility"(Figure 5). Hit the CTRL+ S or F4 key to enter the RAID BIOS setup utility. If you cannot enter the RAID BIOS , assure that your SATA drives are - Gigabyte GA-8I955X Royal | Manual - Page 7
After the selection of RAID 0, select Auto configuration or Manual configuration (Figure 8). If Auto configuration is selected, BIOS will automatically assign RAID member drives and set the chunk ESC: Previous Menu Enter: Select Figure 8 Ctrl-E: Exit - 7 - SATA Hard Drive Configurations (Sil3132) - Gigabyte GA-8I955X Royal | Manual - Page 8
BIOS will set a default size for it and you can use the UP or DOWN ARROW key to change the size (Figure 9). RAID Configuration Utility - Silicon Image Inc. Copyright (C) 2005 MAIN MENU Auto configuration Manual Enter: Select Figure 10 Ctrl-E: Exit SATA Hard Drive Configurations (Sil3132) - 8 - - Gigabyte GA-8I955X Royal | Manual - Page 9
set item (Figure 11) in Main Menu. Press ENTER and follow the on-screen instructions to delete the RAID set. RAID Configuration Utility - Silicon Image Inc. Copyright (C) 2005 can proceed to the installation of the SATA driver and operating system. - 9 - SATA Hard Drive Configurations (Sil3132) - Gigabyte GA-8I955X Royal | Manual - Page 10
. ¤å First of all, you need to copy the driver for the SATA controller from the motherboard driver CD to a floppy disk. The instructions below explain how to copy the driver. Step 1: Find an available system and insert the motherboard driver CD into the CD-ROM drive. The installation utility - Gigabyte GA-8I955X Royal | Manual - Page 11
you do not want to create RAID array, press 9 to select 9)Si3132 BASE Driver. For RAID hard disks, please press A to select A)Si3132 RAID Driver. Then it will take about one minute to copy the SATA driver from the motherboard driver CD to the floppy disk. Figure 15 Step 6: Press 0 to exit when the - Gigabyte GA-8I955X Royal | Manual - Page 12
Now that you have prepared the SATA driver disk and configured BIOS settings, you are ready to install Windows 2000/XP onto your SATA hard drive with the SATA driver. The following is an example of ¤¤ Windows XP installation. ¤å Step 1: Restart your system to boot from the Windows 2000/XP Setup - Gigabyte GA-8I955X Royal | Manual - Page 13
, press ENTER to continue the SATA driver installation from the floppy disk. Windows Setup Setup will load support for the following mass storage device the floppy disk or copy the correct SATA driver again from the motherboard driver CD. (Note): For non-RAID driver, the items are Silicon Image SiI - Gigabyte GA-8I955X Royal | Manual - Page 14
is completed, you should see a screen similar to that below. It indicates that you have installed the SATA controller driver successfully. You can proceed with the Windows 2000/XP installation. WindowsXP Professional Setup The following list shows the existing partitions and unpartitioned
-
 1
1 -
 2
2 -
 3
3 -
 4
4 -
 5
5 -
 6
6 -
 7
7 -
8
-
9
-
10
-
11
-
12
-
13
-
14
 |
 |

T
a
b
l
e
o
f
C
o
n
t
e
n
t
s
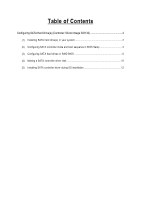
Configuring SATA Hard Drive(s) (Controller: Silicon Image Sil3132)
.................................................
2
(1)
Installing SATA hard drive(s) in your system
.........................................................................
2
(2)
Configuring SATA controller mode and boot sequence in BIOS Setup
..................................
3
(3)
Configuring SATA hard drives in RAID BIOS
..........................................................................
6
(4)
Making a SATA controller driver disk
...................................................................................
10
(5)
Installing SATA controller driver during OS installation
.........................................................
12