Gigabyte GA-M51GM-S2G Manual
Gigabyte GA-M51GM-S2G Manual
 |
UPC - 818313002914
View all Gigabyte GA-M51GM-S2G manuals
Add to My Manuals
Save this manual to your list of manuals |
Gigabyte GA-M51GM-S2G manual content summary:
- Gigabyte GA-M51GM-S2G | Manual - Page 1
2 (2) Configuring SATA controller mode and boot sequence in BIOS Setup 2 (3) Configuring RAID set in RAID BIOS 6 (4) Making a SATA controller driver disk 9 (5) Installing SATA controller driver during OS installation 11 (6) Configuring a bootable RAID array with Microsoft Windows 2000 14 - Gigabyte GA-M51GM-S2G | Manual - Page 2
drives with identical model and capacity). If you do not want to create RAID, you may prepare only one hard drive. (b) An empty formatted floppy disk. (c) Windows XP/2000 setup disk. (d) Driver CD for your motherboard. (1) Installing SATA hard drive(s) in your computer Attach one end of the SATA - Gigabyte GA-M51GM-S2G | Manual - Page 3
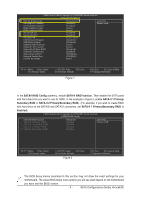
II 1 Serial-ATA-II 2 [Auto] [Enabled] [Enabled] On-Chip USB [V1.1+V2.0] USB Keyboard Support [Disabled] USB Mouse Support [Disabled] Onboard Audio Defaults The BIOS Setup menus described in this section may not show the exact settings for your motherboard. The actual BIOS Setup menu - Gigabyte GA-M51GM-S2G | Manual - Page 4
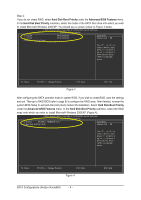
before OS installation. Select Hard Disk Boot Priority under the Advanced BIOS Features menu. In the Hard Disk Boot Priority submenu, select the RAID array onto which you wish to install Microsoft Windows 2000/XP (Figure 4). CMOS Setup Utility-Copyright (C) 1984-2005 Award Software Hard Disk - Gigabyte GA-M51GM-S2G | Manual - Page 5
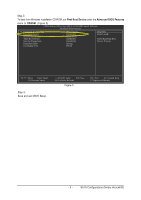
Step 3: To boot from Windows installation CD-ROM, set First Boot Device under the Advanced BIOS Features menu to CDROM (Figure 5). CMOS Setup Utility-Copyright (C) 1984-2005 Award Software Advanced BIOS Features } Hard Disk Boot Priority First Boot Device Second Boot Device Third Boot Device - Gigabyte GA-M51GM-S2G | Manual - Page 6
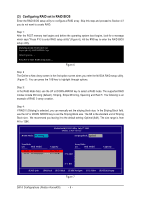
the UP or DOWN ARROW key to select a RAID mode. The supported RAID modes include Mirroring (default), Striping, Stripe Mirroring, Spanning and Raid 5. The following is an example of RAID 0 array creation. Step 4: If RAID 0 (Striping) is selected, you can manually set the striping block size. In the - Gigabyte GA-M51GM-S2G | Manual - Page 7
RIGHT ARROW key to add the hard drives to the Array Disks section (Figure 8). RAID Mode: Striping MediaShield RAID Utility July 27 2005 - Define a New Array - Striping Block: Optimal Free Disks Loc Disk Model Capacity Array Disks Loc Disk Model [g] Add 2.0.M ST3120026AS 2.1.M ST3120026AS - Gigabyte GA-M51GM-S2G | Manual - Page 8
The Boot section will show Yes. ¤¤ MediaShield RAID Utility July 27 2005 - Array List - more information about the RAID array, press ENTER to enter RAID mode, disk block size, disk model name, and disk capacity, etc. RAID To exit the Nvidia RAID utility, press ESC in the main - Gigabyte GA-M51GM-S2G | Manual - Page 9
controller during OS installation. Without the driver, the hard drive/RAID array may not be recognized during the Windows setup process. First of all, you need to copy the driver for the SATA controller from the motherboard driver CD to a floppy disk. The instructions below explain how to copy the - Gigabyte GA-M51GM-S2G | Manual - Page 10
14, press I to select nVIDIA C51 Series Raid (XP) if you wish to install Windows XP or press J to select nVIDIA C51 Series Raid (2K) if you wish to install Windows 2000). Then it will take about one minute to copy the SATA driver from the motherboard driver CD to the floppy disk. Step 6: Press - Gigabyte GA-M51GM-S2G | Manual - Page 11
that you have prepared the SATA driver disk and configured BIOS settings, you are ready to install Windows 2000/XP onto your SATA hard drive with the driver. The following is an example of Windows XP installation. Step 1: Restart your system to boot from the Windows 2000/XP Setup disk and press F6 - Gigabyte GA-M51GM-S2G | Manual - Page 12
Exit Figure 17 Windows Setup Setup will load support for the following mass storage device(s): NVIDIA RAID CLASS DRIVER (required) * copy the correct SATA driver again from the motherboard driver CD. "*" If you want to create RAID, select both NVIDIA RAID CLASS DRIVER and then NVIDIA nForce - Gigabyte GA-M51GM-S2G | Manual - Page 13
the next screen (Figure 19) appears, press ENTER to continue the SATA driver installation from the floppy disk. Windows Setup Setup will load support for the following mass storage device(s): NVIDIA RAID CLASS DRIVER (required) NVIDIA nForce Storage Controller (required) * To specify additional SCSI - Gigabyte GA-M51GM-S2G | Manual - Page 14
. Solutions 1: Use the NVRAID tool (nForce Driver Version 5.xx) to convert the boot volume to a RAID array. Here are the detailed step-by-step instructions: Step 1: Install Windows 2000 onto a selected hard drive. Download and install Windows 2000 Service Pack 4 from Microsoft's website. Step - Gigabyte GA-M51GM-S2G | Manual - Page 15
Figure 24), press N. Then press CTRL+X to exit the NVIDIA RAID BIOS. Restart the computer to boot into Windows 2000. RAID Mode: Striping MediaShield RAID Utility July 27 2005 - Define a New Array - Striping Block: Optimal Free Disks Loc Disk Model Capacity Clear disk daAtarr?ay Disks Loc Disk - Gigabyte GA-M51GM-S2G | Manual - Page 16
installation CD, refer to the following website: http://www.microsoft.com/windows2000/downloads/servicepacks/sp4/HFdeploy.htm Note: If users choose not to install Windows 2000 Service Pack 3 or 4, RAID is still supported on Windows 2000. However, users will not be able to create a bootable
-
 1
1 -
 2
2 -
 3
3 -
 4
4 -
 5
5 -
 6
6 -
 7
7 -
8
-
9
-
10
-
11
-
12
-
13
-
14
-
15
-
16
 |
 |

T
a
b
l
e
o
f
C
o
n
t
e
n
t
s
Configuring SATA Hard Drive(s) (Controller: Nvidia nForce 430)
......................................................
2
(1)
Installing SATA hard drive(s) in your computer
......................................................................
2
(2)
Configuring SATA controller mode and boot sequence in BIOS Setup
..................................
2
(3)
Configuring RAID set in RAID BIOS
........................................................................................
6
(4)
Making a SATA controller driver disk
.....................................................................................
9
(5)
Installing SATA controller driver during OS installation
.........................................................
11
(6)
Configuring a bootable RAID array with Microsoft Windows 2000
......................................
14