Gigabyte GA-MA790X-UD3P Manual - Page 19
Setup of ATI CrossFireX, Configuration
 |
View all Gigabyte GA-MA790X-UD3P manuals
Add to My Manuals
Save this manual to your list of manuals |
Page 19 highlights
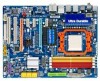
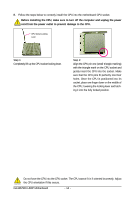
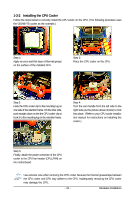
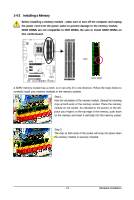
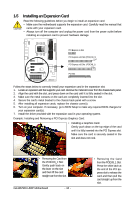
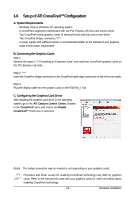
1-6 Setup of ATI CrossFireXTM Configuration A. System Requirements - Windows Vista or Windows XP operating system - A CrossFireX-supported motherboard with two PCI Express x16 slots and correct driver - Two CrossFireX-ready graphics cards of identical brand and chip and correct driver - Two CrossFire bridge connectors (Note) - A power supply with sufficient power is recommended (Refer to the manual of your graphics cards for the power requirement) B. Connecting the Graphics Cards Step 1: Observe the steps in "1-5 Installing an Expansion Card" and install two CrossFireX graphics cards on the PCI Express x16 slots. Step 2: (Note) Insert the CrossFire bridge connectors in the CrossFireX gold edge connectors on top of the two cards. Step 3: Plug the display cable into the graphics card on the PCIEX16_1 slot. C. Configuring the Graphics Card Driver After installing the graphics card driver in the operating system, go to the ATI Catalyst Control Center. Browse to the CrossFireX menu and ensure the Enable CrossFireXTM check box is selected. (Note) The bridge connectors may be needed or not depending on your graphics cards. Procedure and driver screen for enabling CrossFireX technology may differ by graphics cards. Refer to the manual that came with your graphics cards for more information about enabling CrossFireX technology. - 19 - Hardware Installation
-
 1
1 -
2
-
3
-
4
-
5
-
6
-
7
-
8
-
9
-
10
-
11
-
12
-
13
-
 14
14 -
 15
15 -
 16
16 -
 17
17 -
 18
18 -
 19
19 -
 20
20 -
 21
21 -
 22
22 -
 23
23 -
 24
24 -
25
-
26
-
27
-
28
-
29
-
30
-
31
-
32
-
33
-
34
-
35
-
36
-
37
-
38
-
39
-
40
-
41
-
42
-
43
-
44
-
45
-
46
-
47
-
48
-
49
-
50
-
51
-
52
-
53
-
54
-
55
-
56
-
57
-
58
-
59
-
60
-
61
-
62
-
63
-
64
-
65
-
66
-
67
-
68
-
69
-
70
-
71
-
72
-
73
-
74
-
75
-
76
-
77
-
78
-
79
-
80
-
81
-
82
-
83
-
84
-
85
-
86
-
87
-
88
-
89
-
90
-
91
-
92
-
93
-
94
-
95
-
96
-
97
-
98
-
99
-
100
-
101
-
102
-
103
-
104
-
105
-
106
-
107
-
108
-
109
-
110
-
111
-
112
 |
 |
