Gigabyte GA-MA790X-UD3P Manual - Page 94
Rebuilding in the operating system, Programs, Start, Rebuild Raid, Rebuild, Finish
 |
View all Gigabyte GA-MA790X-UD3P manuals
Add to My Manuals
Save this manual to your list of manuals |
Page 94 highlights
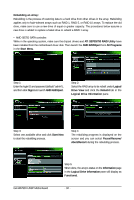
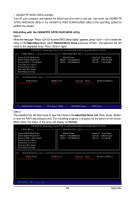
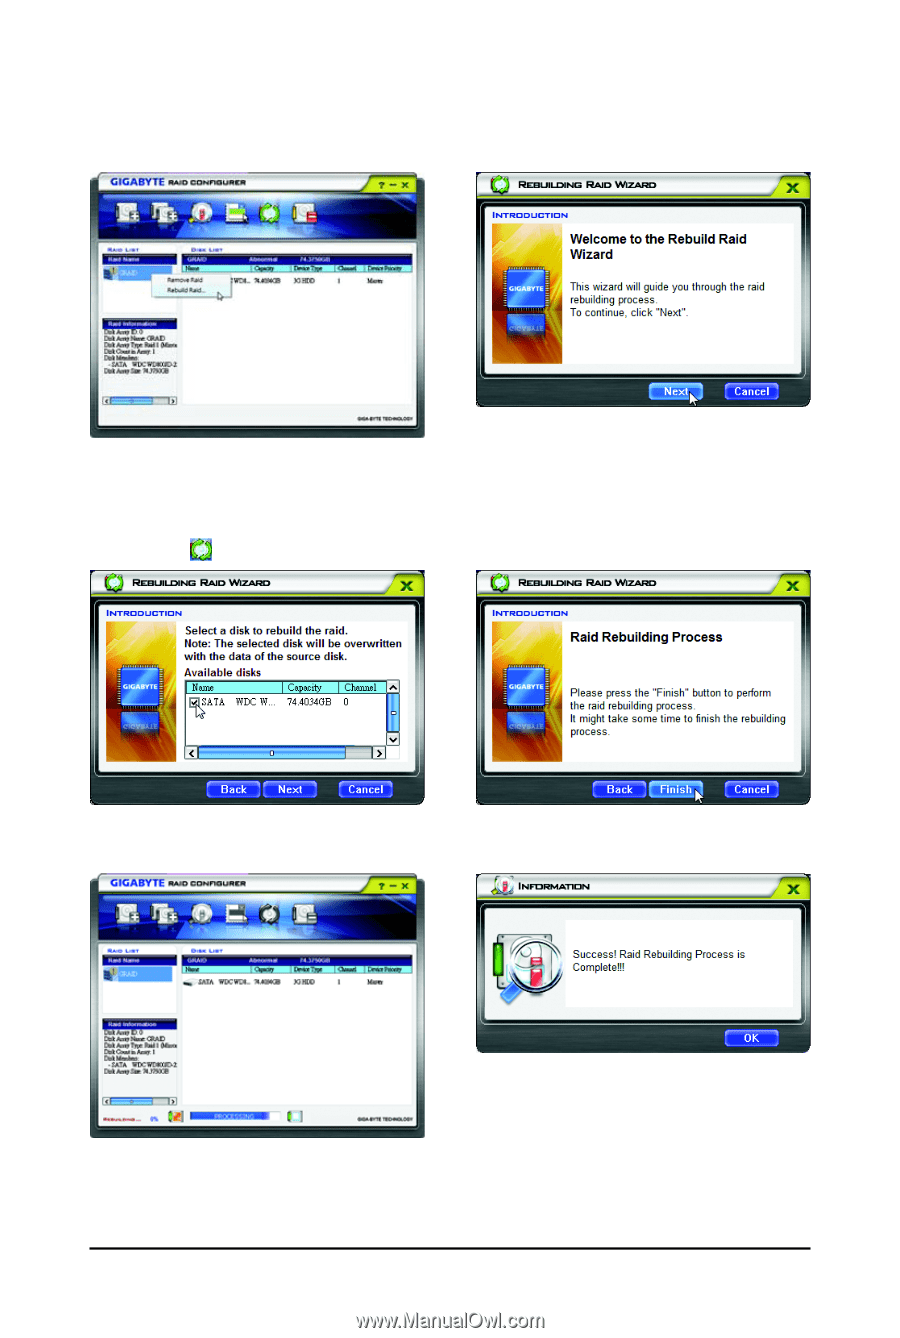
Rebuilding in the operating system Make sure the GIGABYTE SATA2 SATA controller driver has been installed from the motherboard driver disk. Launch the GIGABYTE RAID CONFIGURER from All Programs in the Start menu. Step 1: In the GIGABYTE RAID CONFIGURER screen, right-click on the array to be rebuilt in the RAID LIST block. Select Rebuild Raid. (Or click the Rebuild icon in the tool bar. Step 2: When the Rebuilding RAID Wizard appears, click Next. Step 3: Select a drive to rebuild the array and click Next. Step 4: Click Finish to start the RAID rebuilding process. Step 6: When finished, restart your system. Step 5: The rebuilding progress is displayed at the bottom of the screen. GA-MA790X-UD3P Motherboard - 94 -
-
 1
1 -
2
-
3
-
4
-
5
-
6
-
7
-
8
-
9
-
10
-
11
-
12
-
13
-
14
-
15
-
16
-
17
-
18
-
19
-
20
-
21
-
22
-
23
-
24
-
25
-
26
-
27
-
28
-
29
-
30
-
31
-
32
-
33
-
34
-
35
-
36
-
37
-
38
-
39
-
40
-
41
-
42
-
43
-
44
-
45
-
46
-
47
-
48
-
49
-
50
-
51
-
52
-
53
-
54
-
55
-
56
-
57
-
58
-
59
-
60
-
61
-
62
-
63
-
64
-
65
-
66
-
67
-
68
-
69
-
70
-
71
-
72
-
73
-
74
-
75
-
76
-
77
-
78
-
79
-
80
-
81
-
82
-
83
-
84
-
85
-
86
-
87
-
88
-
 89
89 -
 90
90 -
 91
91 -
 92
92 -
 93
93 -
 94
94 -
 95
95 -
 96
96 -
 97
97 -
 98
98 -
 99
99 -
100
-
101
-
102
-
103
-
104
-
105
-
106
-
107
-
108
-
109
-
110
-
111
-
112
 |
 |
GA-MA790X-UD3P Motherboard
- 94 -
Rebuilding in the operating system
Make sure the GIGABYTE SATA2 SATA controller driver has been installed from the motherboard driver
disk. Launch the GIGABYTE RAID CONFIGURER from
All
Programs
in the
Start
menu.
Step 1:
In the GIGABYTE RAID CONFIGURER screen,
right-click on the array to be rebuilt in the
RAID
LIST
block. Select
Rebuild Raid
. (Or click the
Rebuild
icon
in the tool bar.
Step 2:
When the Rebuilding RAID Wizard appears, click
Next
.
Step 3:
Select a drive to rebuild the array and click
Next
.
Step 4:
Click
Finish
to start the RAID rebuilding process.
Step 5:
The rebuilding progress is displayed at the bot-
tom of the screen.
Step 6:
When finished, restart your system.