Gigabyte GA-X58-USB3 Manual - Page 85
Select Disks, Continuous, On Request, Update Volume
 |
UPC - 818313011282
View all Gigabyte GA-X58-USB3 manuals
Add to My Manuals
Save this manual to your list of manuals |
Page 85 highlights
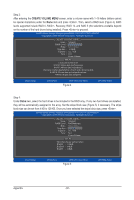
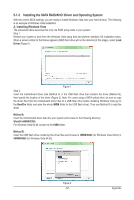
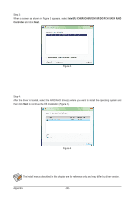
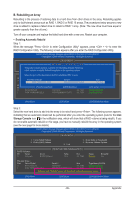
Step 3: Press under the Select Disks item. In the SELECT DISKS box, press on the hard drive you want to use for the master drive and press on the hard drive you want to use for the recovery drive. (Make sure the recovery drive has equal or larger capacity than the master drive.) Then press to confirm. (Figure 10) Intel(R) Matrix Storage Manager option ROM v8.9.0.1023 PCH-D wRAID5 Copyright(C) 2003-09 Intel Corporation. All Rights Reserved. [ CREATE VOLUME MENU ] Name : Volume0 RAID Level : Recovery D[ SisEkLs E: CTSeDleIcStKDSis]ks Strip Size : 128KB Capacity : 223.6 GB Port Drive Model Serial # CreaStiezeVolume M0 ST3120026AS 3JT354CP 111.7GB R1 ST3120026AS 3JT32[ 9HJEXLP ] 111.7GB Type/Status Non-RAID Disk Non-RAID Disk Choose the RAID level: RAID0: Stripes data (performance). Select 1 Master RanAdID1 1R:eMcoivrreorrys ddiastka t(orecdruenatdeavnocylu)m. e. Recovery: Copies data between a master and a recovery disk. [hi]-Prev/NeRxtAI[DT1AR0BA: ]MI-D(Mi5rr:)oaSrssttredipraet[asSdaPnaAtdaCsaEtnr]id-p(epRsa)rtehicteyo.vmeirryror[.ENTER]-Done [hi]-Change [TAB]-Next [ESC]-Previous Menu [ENTER]-Select Figure 10 Step 4: Under Sync, select Continuous or On Request (Figure 11). When set to Continuous, changes made to the data on the master drive will be automatically and continuously copied to the recovery drive when both hard drives are installed in the system. On Request allows users to update data from the master drive to the recovery drive manually using the Update Volume function of the Intel Matrix Storage Console in the operating system. On Request also allows users to restore the master drive to a previous state. Intel(R) Matrix Storage Manager option ROM v8.9.0.1023 PCH-D wRAID5 Copyright(C) 2003-09 Intel Corporation. All Rights Reserved. [ CREATE VOLUME MENU ] Name : Volume0 RAID Level : Recovery Disks : Select Disks Strip Size : N/A Capacity : 0.0 GB Sync : Continuous Create Volume [ HELP ] Select a sync option: On Request: volume is updated manually Continuous: volume is updated automatically [hi]-Change [TAB]-Next [ESC]-Previous Menu Figure 11 [ENTER]-Select Step 5: Finally press on the Create Volume item to begin creating the Recovery Volume and follow the onscreen instructions to complete. - 85 - Appendix
-
 1
1 -
2
-
3
-
4
-
5
-
6
-
7
-
8
-
9
-
10
-
11
-
12
-
13
-
14
-
15
-
16
-
17
-
18
-
19
-
20
-
21
-
22
-
23
-
24
-
25
-
26
-
27
-
28
-
29
-
30
-
31
-
32
-
33
-
34
-
35
-
36
-
37
-
38
-
39
-
40
-
41
-
42
-
43
-
44
-
45
-
46
-
47
-
48
-
49
-
50
-
51
-
52
-
53
-
54
-
55
-
56
-
57
-
58
-
59
-
60
-
61
-
62
-
63
-
64
-
65
-
66
-
67
-
68
-
69
-
70
-
71
-
72
-
73
-
74
-
75
-
76
-
77
-
78
-
79
-
 80
80 -
 81
81 -
 82
82 -
 83
83 -
 84
84 -
 85
85 -
 86
86 -
 87
87 -
 88
88 -
 89
89 -
 90
90 -
91
-
92
-
93
-
94
-
95
-
96
-
97
-
98
-
99
-
100
-
101
-
102
-
103
-
104
-
105
-
106
-
107
-
108
-
109
-
110
-
111
-
112
 |
 |
