Gigabyte GA-Z77X-UD5H Manual - Page 96
Create VD, RAID Level, Stripe Size, Quick Init, Cache Mode, VD Name
 |
View all Gigabyte GA-Z77X-UD5H manuals
Add to My Manuals
Save this manual to your list of manuals |
Page 96 highlights
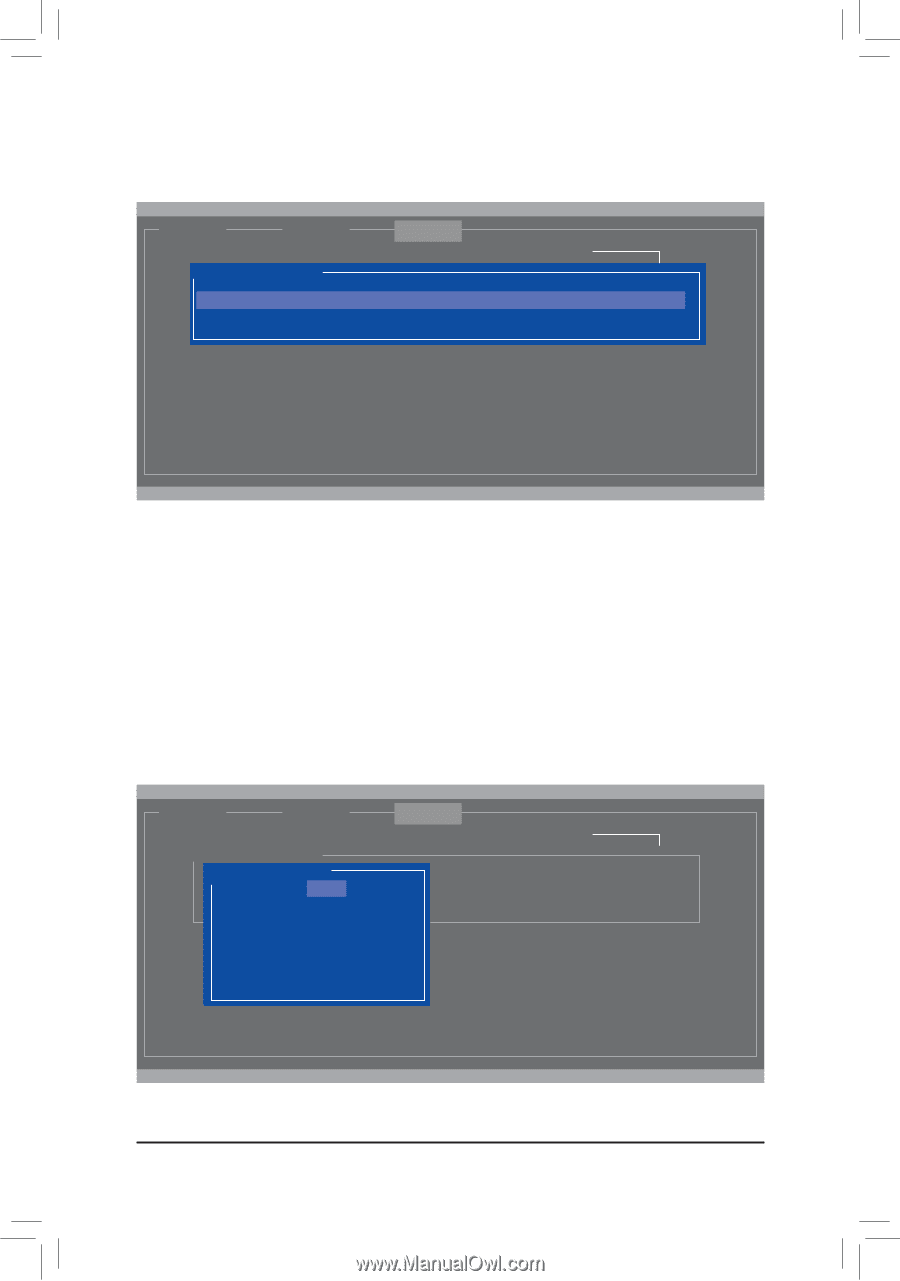
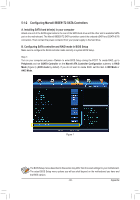
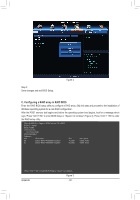
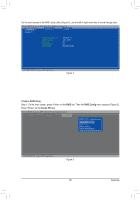
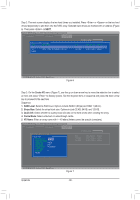
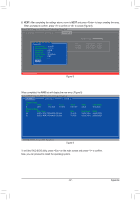
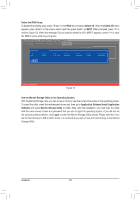
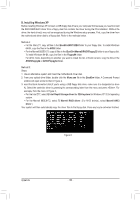
Step 2: The next screen displays the two hard drives you installed. Press or on the two hard drives respectively to add them into the RAID array. Selected hard drives are marked with an asterisk (Figure 6). Then press on NEXT. Marvell BIOS Setup (c) 2009 Marvell Technology Group Ltd. [ Adapter] [ Devices] [ RAID ] Select free disks to create Port Disk Name * S0 SATA: WDC WD800JD-22LSA0 * S1 SATA: WDC WD800JD-22LSA0 NEXT RAID Config Size 76.3GB 76.3GB Max Speed Status SATA 3Gb/s FREE SATA 3Gb/s FREE ENTER/SPACE: Select, ESC: Back/Exit Figure 6 Step 3: On the Create VD menu (Figure 7), use the up or down arrow key to move the selection bar to select an item and press to display options. Set the required items in sequence and press the down arrow key to proceed to the next item. Sequence: 1. RAID Level: Select a RAID level. Options include RAID 0 (Stripe) and RAID 1 (Mirror). 2. Stripe Size: Select the stripe block size. Options include 32 KB, 64 KB, and 128 KB. 3. Quick Init: Select whether to quickly erase old data on the hard drives when creating the array. 4. Cache Mode: Select write-back or write-through cache. 5. VD Name: Enter an array name with 1~10 letters (letters cannot be special characters). Marvell BIOS Setup (c) 2009 Marvell Technology Group Ltd. [ Adapter] [ Devices] [ RAID ] Select free disks to create PCorrteate VD Disk Name * S0 * S1 RMAaxIDSiLzeeSSv(AAeMTTl AAB::)::WW1R5DDA2CCI4D7WW08 DD880000JJDD--2222LLSSAA00 Stripe Size : 64KB Quick Init : NO Cache Mode : WriteBack VD Name : Disks ID : 01 NEXT RAID Config Size 76.3GB 76.3GB Max Speed Status SATA 3Gb/s FREE SATA 3Gb/s FREE ENTER/SPACE: Select, ESC: Back/Exit Appendix Figure 7 - 96 -
-
 1
1 -
2
-
3
-
4
-
5
-
6
-
7
-
8
-
9
-
10
-
11
-
12
-
13
-
14
-
15
-
16
-
17
-
18
-
19
-
20
-
21
-
22
-
23
-
24
-
25
-
26
-
27
-
28
-
29
-
30
-
31
-
32
-
33
-
34
-
35
-
36
-
37
-
38
-
39
-
40
-
41
-
42
-
43
-
44
-
45
-
46
-
47
-
48
-
49
-
50
-
51
-
52
-
53
-
54
-
55
-
56
-
57
-
58
-
59
-
60
-
61
-
62
-
63
-
64
-
65
-
66
-
67
-
68
-
69
-
70
-
71
-
72
-
73
-
74
-
75
-
76
-
77
-
78
-
79
-
80
-
81
-
82
-
83
-
84
-
85
-
86
-
87
-
88
-
89
-
90
-
 91
91 -
 92
92 -
 93
93 -
 94
94 -
 95
95 -
 96
96 -
 97
97 -
 98
98 -
 99
99 -
 100
100 -
 101
101 -
102
-
103
-
104
-
105
-
106
-
107
-
108
-
109
-
110
-
111
-
112
-
113
-
114
-
115
-
116
-
117
-
118
-
119
-
120
-
121
-
122
-
123
-
124
-
125
-
126
-
127
-
128
 |
 |