Gigabyte GV-N62128DP2-RH Manual
Gigabyte GV-N62128DP2-RH Manual
 |
View all Gigabyte GV-N62128DP2-RH manuals
Add to My Manuals
Save this manual to your list of manuals |
Gigabyte GV-N62128DP2-RH manual content summary:
- Gigabyte GV-N62128DP2-RH | Manual - Page 1
GV-N62128DP2-RH GeForce™ 6200 Graphics Accelerator User's Manual Rev. 101 12MD-N621DP2R-101R Copyright © 2006 GIGABYTE TECHNOLOGY CO., LTD Copyright by GIGA-BYTE TECHNOLOGY CO., LTD. ("GBT"). No part of this manual may be reproduced or transmitted in any form without the expressed, written - Gigabyte GV-N62128DP2-RH | Manual - Page 2
2000 Driver Installation 29 4. Troubleshooting Tips 30 5. Appendix 31 5.1. How to Reflash the BIOS 31 5.1.1. Reflash BIOS in MS-DOS mode 31 5.1.2. Reflash BIOS in Windows mode 31 5.2. Connecting to a HDTV 32 5.3. Resolutions and Color Depth Table (In Windows® XP 33 GV-N62128DP2-RH Graphics - Gigabyte GV-N62128DP2-RH | Manual - Page 3
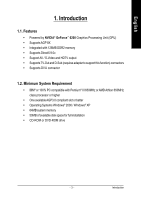
™ 6200 Graphics Processing Unit (GPU) • Supports AGP 8X • Integrated with 128MB DDR2 memory • Supports DirectX 9.0c • Support AV / S-Video and HDTV output • Supports TV-Out and D-Sub (requires adapter to support this function) connectors • Supports DVI-I connector 1.2. Minimum System Requirement - Gigabyte GV-N62128DP2-RH | Manual - Page 4
Projector Y Pr Pb/AV Output S-Video Output DVI Output Digital LCD Monitor DVI-I to D-Sub Connector Analog LCD Monitor VGA Output TV-Out DVI-I Connector GV-N62128DP2-RH Graphics Accelerator - 4 - - Gigabyte GV-N62128DP2-RH | Manual - Page 5
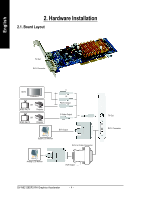
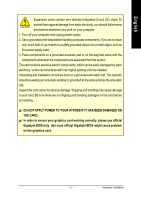
APPLY POWER TO YOUR SYSTEM IF IT HAS BEEN DAMAGED ON THE CARD. In order to ensure your graphics card working correctly, please use official Gigabyte BIOS only. Use none official Gigabyte BIOS might cause problem on the graphics card. - 5 - Hardware Installation - Gigabyte GV-N62128DP2-RH | Manual - Page 6
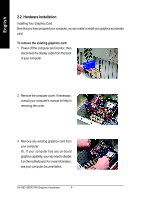
your computer's manual for help in removing the cover. 3. Remove any existing graphics card from your computer. Or, if your computer has any on-board graphics capability, you may need to disable it on the motherboard. For more information, see your computer documentation. GV-N62128DP2-RH Graphics - Gigabyte GV-N62128DP2-RH | Manual - Page 7
To TV or VCR Connect a VGA monitor via DVI-I to D-sub adapter You are now ready to proceed with the installation of the graphics card driver. For detailed instructions, select your operating system from the list below. - 7 - Hardware Installation - Gigabyte GV-N62128DP2-RH | Manual - Page 8
English GIGABYTE Component Video Adapter for Nvidia Graphics Cards (HDTV Cable) AV Out S-Video Out Connect to the TVOut port on the graphics has a Composite video connection, you can connect the RCA cable from your TV to the AV Out port on the adapter. GV-N62128DP2-RH Graphics Accelerator - 8 - - Gigabyte GV-N62128DP2-RH | Manual - Page 9
up, run "D:\setup.exe"). Then you can follow the guides to setup your graphics card driver. (Please follow the subsection 3.1.3 "Driver installation" to install the driver for your graphics accelerator.) 3.1. Windows® XP Driver and Utilities Installation 3.1.1. Operating System Requirement • When - Gigabyte GV-N62128DP2-RH | Manual - Page 10
who run Windows XP with Service Pack 2 or above do not need to install DirectX separately. Step 1. When autorun window show up, click the Install DirectX 9 item. Step 2. Choose I accept the agreement and Click "Next" button. Step 3. Click "Next" button. GV-N62128DP2-RH Graphics Accelerator - 10 - - Gigabyte GV-N62128DP2-RH | Manual - Page 11
English Installing the components. Step 4. Click "Finish" to restart computer. Then the DirectX 9 installation is completed. - 11 - Software Installation - Gigabyte GV-N62128DP2-RH | Manual - Page 12
the driver from AUTORUN window. Step 2: Found new hardware wizard: Searching and installing The wizard will search for the driver and install it automatically. Step 3: Found new hardware wizard: Finish Click the "Finish" button to finish the installation. GV-N62128DP2-RH Graphics Accelerator - Gigabyte GV-N62128DP2-RH | Manual - Page 13
you can see the AUTORUN window. If it does not show up, please run "D:\setup.exe". Step 1. When autorun window show up, click Install Display Driver item. Step 2. Click the "Next" button. Windows installs the driver components. Step 3. Click the "Finish" button and restart computer. Then the - Gigabyte GV-N62128DP2-RH | Manual - Page 14
1. When autorun window show up, please click the Utilities item. Then click the GIGABYTE Utility item. Step 2. Click the Next button. Step 3. Enter your name and company. GV-N62128DP2-RH Graphics Accelerator Step 4. Click the Finish button to restart computer. Then the utilities installation - Gigabyte GV-N62128DP2-RH | Manual - Page 15
English V-Tuner 2 V-Tuner 2 lets you monitor the working frequency of the graphic engine and video memory (Core Clock and Memory Clock). Displays core clock status Displays memory clock status Opens Help page Select choice of skin - 15 - Software Installation - Gigabyte GV-N62128DP2-RH | Manual - Page 16
your display settings. Right click the icon. Click the VGA Information item into the "VGA Info" and "Color Adjust" tabs. You can link to GIGABYTE website for updated information about the graphics accelerator, latest drivers, and other information. GV-N62128DP2-RH Graphics Accelerator - 16 - - Gigabyte GV-N62128DP2-RH | Manual - Page 17
English VGA Information VGA Info lists the relevant information about your card. Color Adjust Color Adjust allows you to make color adjustments, such as brightness, contrast and gamma values for each or all of RGB colors. - 17 - Software Installation - Gigabyte GV-N62128DP2-RH | Manual - Page 18
English After installation of the display drivers, you will find a NVIDIA icon in your system tray. Click this icon to open the control panel. Right click the icon. You can adjust the properties of the graphics accelertaor from here. GV-N62128DP2-RH Graphics Accelerator - 18 - - Gigabyte GV-N62128DP2-RH | Manual - Page 19
Properties pages To access Display Properties pages, right-click the GIGABYTE icon in your system tray and select Display Properties or page.) „ This page shows the Adapter, System and Driver versions information. You can select other properties from the pop-out menu. - 19 - Software - Gigabyte GV-N62128DP2-RH | Manual - Page 20
" followed by "OK". Dual-Monitor Setup: You can set the display to output from two monitors on the nView Display Settings page. The GV-N62128DP2-RH support the following modes. (1) Clone Mode: Clone mode indicates that both displays in the display pair show images of the same desktop. Select Clone - Gigabyte GV-N62128DP2-RH | Manual - Page 21
profiles: Select the application profile from the list of profiles. • Global Driver Settings: Select the Settings item and move the slider below to set are automatically activated during playback of any video file type that supports overlay adjustments. The "Adjust Colors" button will access "Color - Gigabyte GV-N62128DP2-RH | Manual - Page 22
Display Optimization Wizard to adjust your display(s) for optimal viewing and representation of colors. • Troubleshooting: If you have a TV connected and it is not being detected, select the check when GPU core temperature exceeds threshold check box. GV-N62128DP2-RH Graphics Accelerator - 22 - - Gigabyte GV-N62128DP2-RH | Manual - Page 23
English Screen Resolutions & Refresh Rates properties „ The Screen Resolutions & Refresh Rates Properties allows you to adjust the screen resolution, color quality and monitor settings (screen refresh rates). Or you can customize resolutions and refresh rates. Menu Editing properties „ The Menu - Gigabyte GV-N62128DP2-RH | Manual - Page 24
Properties>Settings>Advanced>GeForce 6200. Double-click Desktop Management item on the pop-up menu (Method B). Method A: Method B: Click the item to start nView Properties. GV-N62128DP2-RH Graphics Accelerator - 24 - Double-click Desktop Management to see more nView properties. - Gigabyte GV-N62128DP2-RH | Manual - Page 25
English nView Desktop Management properties „ ThistabcontainsinformationaboutthenViewDesktopManager. The setup wizard can also be accessed from this tab. nView Profile properties „ This tab contains a record all nView display settings for easy software setup. nView Windows properties „ This tab - Gigabyte GV-N62128DP2-RH | Manual - Page 26
properties „ This tab allows you to create up to 32 unique desktops. nView User Interface properties „ This tab allows customization of the nView user interface. GV-N62128DP2-RH Graphics Accelerator - 26 - - Gigabyte GV-N62128DP2-RH | Manual - Page 27
English nView Effects properties „ This tab provides special windows effects that you can apply to your applications. nView Zoom properties „ This tab provides dynamic zoom functionality on the desktop. Also enables full screen video playback via the video mirroring control button. nView Hot - Gigabyte GV-N62128DP2-RH | Manual - Page 28
English nView Mouse properties „ This tab can modify and extend mouse behavior with kinematic actions. nView Tools properties „ This tab can improve nView functionality for mobile and desktop users. GV-N62128DP2-RH Graphics Accelerator - 28 - - Gigabyte GV-N62128DP2-RH | Manual - Page 29
OK. 5. Click on Install Display Drivers to begin the Installation Wizard. 6. Click Next. 7. Click Yes to the license agreement. 8. Follow the Wizard's on-screen instructions to complete the installation. Please make sure the Windows® 2000 have installed Windows® 2000 Service Pack (or later) before - Gigabyte GV-N62128DP2-RH | Manual - Page 30
, use the Troubleshooting Guide located in the Windows® Help or contact your computer manufacturer. If necessary, adjust your monitor's setting by monitor's adjust panel to make the screen looks focused, crisp, and sharp. (Please refer to the monitor's manual.) GV-N62128DP2-RH Graphics Accelerator - Gigabyte GV-N62128DP2-RH | Manual - Page 31
mode 1. After installing the display drivers, you will find a GIGABYTE the Taskbar. Right-click to select automatically download the BIOS for your card from GIGABYTE @VGA server and do the update for you Download the BIOS ZIP file for your card from GIGABYTE website and extract it to your hard disk ( - Gigabyte GV-N62128DP2-RH | Manual - Page 32
the TV Out port on your graphics card. Step 2: After installation of the graphics card driver, right-click on Desktop and select Properties. When Display Properties dialog box appears, select the your HDTV. Then click Apply to complete the settings. GV-N62128DP2-RH Graphics Accelerator - 32 - - Gigabyte GV-N62128DP2-RH | Manual - Page 33
3 16bpp(65K color) High mode 3 3 3 3 3 3 3 3 3 3 3 3 3 3 3 3 3 3 3 3 3 3 3 3 3 3 3 3 3 3 3 3 32bpp(16.7M) True mode 3 3 3 3 3 3 3 3 3 3 3 3 3 X 3 X 3 X 3 X 3 X 3 X 3 X 3 X 3 X 3 X * This table is for reference only. The actual resolutions supported depend on the monitor you use. - 33 - Appendix - Gigabyte GV-N62128DP2-RH | Manual - Page 34
(bpp) 8bpp(256 color) Standard mode 3 3 3 3 3 3 3 3 16bpp (65K color) High mode 3 3 3 3 3 3 3 3 32bpp (16.7M) True mode 3 X 3 X 3 X 3 3 * This table is for reference only. The actual resolutions supported depend on the monitor you use. GV-N62128DP2-RH Graphics Accelerator - 34 -
-
 1
1 -
 2
2 -
 3
3 -
 4
4 -
 5
5 -
 6
6 -
 7
7 -
8
-
9
-
10
-
11
-
12
-
13
-
14
-
15
-
16
-
17
-
18
-
19
-
20
-
21
-
22
-
23
-
24
-
25
-
26
-
27
-
28
-
29
-
30
-
31
-
32
-
33
-
34
 |
 |

Copyright
© 2006 GIGABYTE TECHNOLOGY CO., LTD
Copyright by
GIGA-BYTE TECHNOLOGY CO., LTD.
("GBT").
No part of this manual may
be reproduced or transmitted in any form
without the expressed, written permission of
GBT
.
Trademarks
Third-party brands and names are the property of their respective owners.
Notice
Please do not remove any labels on VGA card, this may void the warranty of this VGA card.
Due to rapid change in technology, some of the specifications might be out of date before publication of this booklet.
The author assumes no responsibility for any errors or omissions that may appear in this document nor does the author make a
commitment to update the information contained herein.
GV-N62128DP2-RH
GeForce
™
6200 Graphics Accelerator
User's Manual
Rev. 101
12MD-N621DP2R-101R