Gigabyte GV-N66TOC-3GD Manual
Gigabyte GV-N66TOC-3GD Manual
 |
View all Gigabyte GV-N66TOC-3GD manuals
Add to My Manuals
Save this manual to your list of manuals |
Gigabyte GV-N66TOC-3GD manual content summary:
- Gigabyte GV-N66TOC-3GD | Manual - Page 1
NVIDIA® Graphics Accelerator User's Manual Rev. 101 Copyright © 2012 GIGABYTE TECHNOLOGY CO., LTD Copyright by GIGA-BYTE TECHNOLOGY CO., LTD. ("GBT"). No part of this manual may be reproduced or transmitted in any form without the expressed, written permission of GBT. Trademarks Third-party brands - Gigabyte GV-N66TOC-3GD | Manual - Page 2
3 2. Hardware Installation 5 2.1. SLI Technology...5 3. Software Installation...7 3.1. Driver and Utility Installation 7 3.1.1. Driver Installation...7 3.1.2. GIGABYTE Easy Boost on Driver Disk 9 3.2. Display Properties Pages 12 3.3. Accessing NVIDIA Control Panel 13 4. Troubleshooting Tips 21 - Gigabyte GV-N66TOC-3GD | Manual - Page 3
1. Introduction 1.1. Minimum System Requirements • Hardware - Intel® Pentium® 4 or AMD AthlonTM XP class - 2GB system memory (4GB recommended) - Optical drive for software installation (CD-ROM or DVD-ROM drive) • Operating System - Windows® 7 - Windows® Vista - Windows® XP - 3 - - Gigabyte GV-N66TOC-3GD | Manual - Page 4
on the card before proceeding. DO NOT APPLY POWER TO YOUR SYSTEM IF THE GRAPHICS CARD IS DAMAGED. In order to ensure that your graphics card can work correctly, please use official GIGABYTE BIOS only. Using non-official GIGABYTE BIOS might cause problem(s) on the graphics card. NVIDIA Series - Gigabyte GV-N66TOC-3GD | Manual - Page 5
of the graphics card is securely inserted. Step 2. Replace the screw to fasten the card in place, and replace the computer cover. Step 3. Connect the appropriate cable to the card and the display. To Flat Panel Display To Flat Panel Display To HDMI Monitor To Mini HDMI Monitor To D-sub Monitor To - Gigabyte GV-N66TOC-3GD | Manual - Page 6
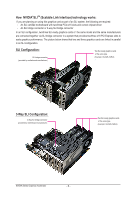
on using this graphics card as part of an SLI system, the following are required: - An SLI certified motherboard with two/three PCIe x16 slots and correct chipset driver - An SLI bridge connector or 3-way SLI bridge connector In an SLI configuration, two/three SLI-ready graphics cards of the same - Gigabyte GV-N66TOC-3GD | Manual - Page 7
and execute the setup.exe program.) Step 1: Click the Install Display Driver item. Step 2: Click the AGREE AND CONTINUE button. For software MPEG support in Windows XP, you must install DirectX first. Users who run Windows XP with Service Pack 2 or above do not need to install DirectX separately - Gigabyte GV-N66TOC-3GD | Manual - Page 8
NVIDIA Update then click the NEXT button. The system is installing the components. Step 5: Click the RESTART NOW button to restart the computer. Then the driver installation is completed. NVIDIA Series Graphics Accelerator - 8 - - Gigabyte GV-N66TOC-3GD | Manual - Page 9
Easy Boost on Driver Disk Step 1: Click the GIGABYTE Easy Boost item. Step 2: Choose the language for the installation and click the OK button. Step 3: Choose the Typical and click the Next button Step 4: Click the Finish button. Then the installation of the GIGABYTE Easy Boost is completed - Gigabyte GV-N66TOC-3GD | Manual - Page 10
GIGABYTE Easy Boost Easy Boost is a graphics card smart tuning tool, combined with Overclock, OSD Turning, BIOS Setting, Technical Support, Live Update function. Over Clock: User can adjust GPU clock, Memory clock, Shader clock and Fan speed here. User can also monitor graphics card current - Gigabyte GV-N66TOC-3GD | Manual - Page 11
Setting: User can back up current BIOS, flash BIOS from selected file and auto flash BIOS on-line. Technical Support: User can get information of VGA, CPU, motherboard, system memory and monitor. User also can press "Export" button to export all system information into .txt file. Live Update: Easy - Gigabyte GV-N66TOC-3GD | Manual - Page 12
the slider to change the resolution. You can click the item to change the color quality. Click the Advanced button for advanced settings. NVIDIA Series Graphics Accelerator - 12 - - Gigabyte GV-N66TOC-3GD | Manual - Page 13
3.3. Accessing NVIDIA Control Panel After installation of the display driver, right-click on the desktop and select NVIDIA Control Panel. The NVIDIA Control Panel is used to configure all your graphics card settings. Right-click on the desktop and select NVIDIA Control Panel. In the NVIDIA Control - Gigabyte GV-N66TOC-3GD | Manual - Page 14
with Preview If you are unfamiliar with 3D technology or not an advanced graphics user, use the Adjust Image Settings with Preview page to preview any Set PhysX confiquration NVIDIA® PhysX® is a powerful physics engine that can utilize GPU acceleration to provide amazing real-time physics - Gigabyte GV-N66TOC-3GD | Manual - Page 15
Display A variety of display features enable you to further manipulate and configure your display settings to optimize the use of your displays. Tasks in the Display pages allow you to do the following: • Move CRT screen position • Change resolution • Adjust desktop color settings • Rotate display • - Gigabyte GV-N66TOC-3GD | Manual - Page 16
rotate the desktop to match the orientation of your display. View HDCP status Use this page to check if your system is HDCPcapable. NVIDIA Series Graphics Accelerator - 16 - - Gigabyte GV-N66TOC-3GD | Manual - Page 17
desktop in one of several multi-display modes to make the best use of the displays (monitors) that are connected to your computer. Dual-Monitor Setup You can set the display to output from two monitors on the Set Up Multiple Displays page. Select your preferred nView display modes here. • Only use - Gigabyte GV-N66TOC-3GD | Manual - Page 18
desktop. The height of each display is half the height of the total virtual desktop height. Clone Mode Dualview Mode Horizontal Span Mode NVIDIA Series Graphics Accelerator Vertical Span Mode - 18 - - Gigabyte GV-N66TOC-3GD | Manual - Page 19
Stereoscopic 3D Tasks in the Stereoscopic 3D pages allow you to do the following: • Set up stereoscopic 3D • View compatibility with games Set Up Stereoscopic 3D You can enable stereoscopic 3D, set depth, and set your 3D displays and 3D glasses. (To enable stereoscopic 3D function, you will need - Gigabyte GV-N66TOC-3GD | Manual - Page 20
color settings for video content on your display. Select one of the test images to monitor your changes. For best results, play a video while you make Note: Support for some features under Windows Vista is in development and may not be available with your ForceWare graphics driver version. - Gigabyte GV-N66TOC-3GD | Manual - Page 21
Mode, in Device Manager check whether the driver for the graphics card is correct. For more assistance, use the Troubleshooting Guide located in the Windows Help or contact your computer manufacturer. If you are not able to find the desired monitor color/resolution settings: The color and screen - Gigabyte GV-N66TOC-3GD | Manual - Page 22
GIGABYTE GIGABYTE. Our Commitment to Preserving the Environment In addition to high-efficiency performance, all GIGABYTE , GIGABYTE provides RoHS) Directive Statement GIGABYTE products have not at GIGABYTE are GIGABYTE service manual and we will be glad to help you with your effort. NVIDIA - Gigabyte GV-N66TOC-3GD | Manual - Page 23
Finally, we suggest that you practice other environmentally friendly actions by understanding and using the energy-saving features of this product (where applicable), recycling the inner and outer packaging (including shipping containers) this product was delivered in, and by disposing of or - Gigabyte GV-N66TOC-3GD | Manual - Page 24
NVIDIA Series Graphics Accelerator - 24 - - Gigabyte GV-N66TOC-3GD | Manual - Page 25
- 25 - Appendix - Gigabyte GV-N66TOC-3GD | Manual - Page 26
NVIDIA Series Graphics Accelerator - 26 -
-
 1
1 -
 2
2 -
 3
3 -
 4
4 -
 5
5 -
 6
6 -
 7
7 -
8
-
9
-
10
-
11
-
12
-
13
-
14
-
15
-
16
-
17
-
18
-
19
-
20
-
21
-
22
-
23
-
24
-
25
-
26
 |
 |

NVIDIA
®
Graphics Accelerator
User's Manual
Rev. 101
Copyright
© 2012 GIGABYTE TECHNOLOGY CO., LTD
Copyright by
GIGA-BYTE TECHNOLOGY CO., LTD. (“GBT”)
. No part of this manual may be reproduced or trans-
mitted in any form without the expressed, written permission of
GBT
.
Trademarks
Third-party brands and names are the properties of their respective owners.
Notice
Please do not remove any labels on this graphics card. Doing so may void the warranty of this card.
Due to rapid change in technology, some of the specifications might be out of date before publication of this this
manual.The author assumes no responsibility for any errors or omissions that may appear in this document nor does
the author make a commitment to update the information contained herein.
Rovi Product Notice:
This product incorporates copyright protection technology that is protected by U.S. patents and other intellectual
property rights.Use of this copyright protection technology must be authorized by Rovi Corporation, and is intended
for home and other limited viewing uses only unless otherwise authorized by Rovi Corporation. Reverse engineering
or disassembly is prohibited.