Gigabyte GV-R92128TE Manual
Gigabyte GV-R92128TE Manual
 |
View all Gigabyte GV-R92128TE manuals
Add to My Manuals
Save this manual to your list of manuals |
Gigabyte GV-R92128TE manual content summary:
- Gigabyte GV-R92128TE | Manual - Page 1
Upgrade your Life GV-R92128TE Radeon 9200 Graphics Accelerator USER'S MANUAL Rev. 101 12MD-R92128TE-101 - Gigabyte GV-R92128TE | Manual - Page 2
manual may be reproduced or transmitted in any from without the expressed, written permission of GBT. Trademarks Third-party brands and names are the property of their respective owners. Notice Due to rapid change in technology, some of the specifications GV-R92128TE Graphics Accelerator - 2 - - Gigabyte GV-R92128TE | Manual - Page 3
SYSTEM REQUIREMENT 9 3.1.2. DIRECTX INSTALLATION 10 3.1.3. DRIVER INSTALLATION 12 3.1.4. UTILITIES ON DRIVER CD 15 3.1.5. TASKBAR ICON ...18 3.1.6. DISPLAY PROPERTIES PAGES 22 3.2. WINDOWS 2000 DRIVER INSTALLATION 30 3.3. BIOS FLASH UTILITY 30 4. TROUBLESHOOTING TIPS 31 5. APPENDIX 32 - Gigabyte GV-R92128TE | Manual - Page 4
in its class, optimized for today's most compelling gaming environments and applications. Driven by an advanced quad-pipe architecture, GV-R92128TE support the AGP 8X standard, doubling the bandwidth of competing products and enabling more engaging characters and effects. 1.2. KEY FEATURES - Gigabyte GV-R92128TE | Manual - Page 5
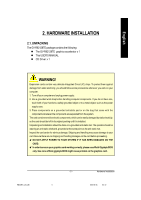
UNPACKING The GV-R92128TE package contains the following: l The GV-R92128TE graphics accelerator x 1 l This USER'S MANUAL l CD Driver x 1 WARNING correctly, please use official Gigabyte BIOS only. Use none official gigabyte BIOS might cause problem on the graphics card. - 5 - Hardware Installation - Gigabyte GV-R92128TE | Manual - Page 6
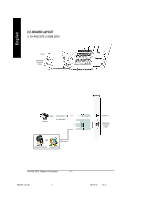
English 2.2. BOARD LAYOUT 1) GV-R92128TE (128MB DDR) TV-Out VGA Monitor Connector (15pin) Projector S-VideoOutput OR VGA Output Analog LCD Monitor Analog Monitor GV-R92128TE Graphics Accelerator - 6 - S-VID-OUT VGA Monitor Connector (15pin) - Gigabyte GV-R92128TE | Manual - Page 7
computer and monitor, then disconnect the display cable from the back of your computer. 2. Remove the computer cover. If necessary, consult your computer's manual for help in removing the cover. 3. Remove any existing graphics card from your computer. Or, if your computer has any on-board graphics - Gigabyte GV-R92128TE | Manual - Page 8
AGP slot, and press it in firmly until the card is fully eated. GV-R92128TE graphics card AGP slot 5. Replacethe screwtofasten thecard inplace, and replace the computer driver. For detailed instructions, select your operating system from the list below. GV-R92128TE Graphics Accelerator - 8 - - Gigabyte GV-R92128TE | Manual - Page 9
you can follow guides to setup your GV-R92128TE driver (Please follow the subsection 3.1.3 "Step By Step Installation" to install the driver for your GV-R92128TE graphics accelerator. 3.1.1. Operating system requirement l If your OS is Microsoft Windows, when loading the GV-R92128TE drivers for the - Gigabyte GV-R92128TE | Manual - Page 10
MPEG support in Windows® 98/ 98SE/ Windows® 2000 / Windows® ME or Windows® XP, you must install DirectX (or later version) first. 1. Install DirectX Driver: Click can support DirectX 8.1, updating with DirectX 9.0 can upgrade your operating system to the fullset of DirectX 8.1. GV-R92128TE Graphics - Gigabyte GV-R92128TE | Manual - Page 11
English 3.Click "Next" icon. 4.Click "Finish" item. Then the DirectX installation is completed. - 11 - Software Installation - Gigabyte GV-R92128TE | Manual - Page 12
Step 3: Update Device Driver Wizard: Finish At this time, system will ask for your Windows CD in order to complete the VGA driver installation. If you don't have the CD, you can press C:\Windows\System directory. Step 4: System Setting Change 2.Click "Finish" icon. GV-R92128TE Graphics Accelerator - Gigabyte GV-R92128TE | Manual - Page 13
has finished loading, insert the GV-R92128TE driver CD disk into your CDROM, and then you can see the AUTORUN window. If it does not show up, please run "D: \setup.exe". Step 5: Driver Setup (Pictures below are shown in Windows XP) 1. Click "Windows XP Drivers (Radeon 9200 Series)" item. 2.Click - Gigabyte GV-R92128TE | Manual - Page 14
English 3.Click "Yes". 4. Click "Express" or "Custom" icon. 5. Click "Finish" to restart computer. GV-R92128TE Graphics Accelerator - 14 - - Gigabyte GV-R92128TE | Manual - Page 15
English 3.1.4. Utilities on driver CD The utilities include Display Driver and V-Tuner utilities. Please follow the steps. l Install V-Tuner : 1. Click "V-Tuner" item. 2.Click "Next". 3. Enter your name and company. 4. Click "Finish" to restart computer. - 15 - Software Installation - Gigabyte GV-R92128TE | Manual - Page 16
English l Install Hydravision : 1. Click "Hydravision Install" item. 2.Click "Next". 3.Click "Yes". 4.Click "Next". GV-R92128TE Graphics Accelerator - 16 - - Gigabyte GV-R92128TE | Manual - Page 17
English 5.Click "Next". 6. Click "Finish" to restart computer. - 17 - Software Installation - Gigabyte GV-R92128TE | Manual - Page 18
English 3.1.5. Taskbar Icon After installation of the display drivers, you will find an GBT icon on the taskbar's status area. Right-clicking can link to GBT website for updated information about the graphics card, latest drivers, and other information. GV-R92128TE Graphics Accelerator - 18 - - Gigabyte GV-R92128TE | Manual - Page 19
English V-Tuner (Overclock Utility) V-Tuner lets you adjust the working frequency of the graphic engine and video memory (Core Clock and Memory Clock) Display & Adjust Core Min V-Tuner Clock Display Core Clock Close V-Tuner Display Memory Clock Display & Adjust Memory Clock Help Description - Gigabyte GV-R92128TE | Manual - Page 20
English VGA Information VGA Info lists the relevant information about your card. Color Adjust Color Adjust allows you to make color adjustments, such as brightness, contrast and gamma values for each or all of RGB colors. GV-R92128TE Graphics Accelerator - 20 - - Gigabyte GV-R92128TE | Manual - Page 21
After installation of the display drivers, you will find an ATi icon on the taskbar's status area. Clicking this icon open the ATi control panel. 1.Using Single Display HYDRAVISION™ HYDRAVISION™ and the Desktop Manager are activated whenever Windows® starts. Installing HYDRAVISION™ adds menu - Gigabyte GV-R92128TE | Manual - Page 22
(Resolutions and Color depth for windows) The Setting properties page allows details and driver information. n support. n Show ATI icon on taskbar adds or removes the ATI icon from the taskbar. n Disable quick resolution feature is accessible by left-clicking the ATI icon in the taskbar. GV-R92128TE - Gigabyte GV-R92128TE | Manual - Page 23
English OpenGL Properties: The OpenGL properties page gives you complete control of the OpenGL settings. n Main Settings slider Moving the slider to the left will maximize application performance, while moving the slider to the right will provide excellent 3D image quality. Moving this slider from - Gigabyte GV-R92128TE | Manual - Page 24
advanced settings that can solve compatibility issues for a few specific OpenGL applications. l Force Z-buffer depth allows you to when both dithering and alpha blending are enabled. l Support KTX buffer region extension Enabling this feature allows rapid . GV-R92128TE Graphics Accelerator - 24 - - Gigabyte GV-R92128TE | Manual - Page 25
English Direct 3D Properties: The Direct 3D properties page allows you to adjust the Direct 3D settings. n Main Settings slider Moving the slider to the left will maximize application performance, while moving the slider to the right will provide excellent 3D image quality. Moving this slider from - Gigabyte GV-R92128TE | Manual - Page 26
, or text that appears incorrect. However, this setting should only be used if you are experiencing the symptoms mentioned, as it maycause problems with other games. n Defaults button This button allows you to reset the Direct 3D Settings to default values. GV-R92128TE Graphics Accelerator - 26 - - Gigabyte GV-R92128TE | Manual - Page 27
to increase or decrease the color brightness of Direct 3D and OpenGL games played in fullscreen mode. (NOTE: Game Gamma is NOT supported in Windows NT4.0) n Gamma / Brightness/Contrast accesses Game Gamma properties. n Default resets the desktop brightness and color settings to the default values - Gigabyte GV-R92128TE | Manual - Page 28
card in your computer and installing the enhanced graphics driver, see the user's manual.) 3. Determine if your television (or VCR) activated during playback of any video file type that supports overlay adjustments. n Overlay Adjustments l Brightness allows GV-R92128TE Graphics Accelerator - 28 - - Gigabyte GV-R92128TE | Manual - Page 29
English SMARTGART(tm) Properties: The SMARTGART™ Properties ensures system stability by automatically performing a variety of bus tests that determine your optimal graphics accelerator settings. Changing these settings might result in system instability. - 29 - Software Installation - Gigabyte GV-R92128TE | Manual - Page 30
on "Windows XP Drivers (Radeon 9200 Series)" to begin the Installation Wizard. 7. Click "Next". 8. Click "Yes" to the license agreement. 9. Follow the Wizard's on-screen instructions to complete the installation. 3.3. BIOS FLASH UTILITY GV-R92128TE BIOS update procedure: MNote: Please download the - Gigabyte GV-R92128TE | Manual - Page 31
information, consult your computer's manual or manufacturer. (NOTE: driver. n If you have problems during bootup, start your computer in Safe Mode. In Windows® 98 SE and Windows® Me, press and hold the CTRL key until the Microsoft® Windows use the Troubleshooting Guide located in the Windows® Help or - Gigabyte GV-R92128TE | Manual - Page 32
your OS is Windows 2000 / Windows Me . / Windows XP. please use the bootable disk to MS-DOS mode) 3. Change the command path to the file location C:\> or A:\> 4. Reflash BIOS command as below : C:\> atiflash -p 0 5. Reboot your PC when it's done. GV-R92128TE Graphics Accelerator - 32
-
 1
1 -
 2
2 -
 3
3 -
 4
4 -
 5
5 -
 6
6 -
 7
7 -
8
-
9
-
10
-
11
-
12
-
13
-
14
-
15
-
16
-
17
-
18
-
19
-
20
-
21
-
22
-
23
-
24
-
25
-
26
-
27
-
28
-
29
-
30
-
31
-
32
 |
 |

GV-R92128TE
Radeon 9200 Graphics Accelerator
Rev. 101
12MD-R92128TE-101
USER'S MANUAL
Upgrade your Life
R92128TE_101.p65
2003/6/30,
04:10
1