Gigabyte GV-R96P128DE Manual
Gigabyte GV-R96P128DE Manual
 |
View all Gigabyte GV-R96P128DE manuals
Add to My Manuals
Save this manual to your list of manuals |
Gigabyte GV-R96P128DE manual content summary:
- Gigabyte GV-R96P128DE | Manual - Page 1
VGA Card GV-R96P256D / GV-R96P128DE Dec. 20, 2004 - Gigabyte GV-R96P128DE | Manual - Page 2
VGA Card GV-R96P256D / GV-R96P128DE Dec. 20, 2004 - Gigabyte GV-R96P128DE | Manual - Page 3
GV-R96P256D / GV-R96P128DE Radeon 9600 PRO Graphics Accelerator User's Manual Rev. 101 12MD-R96P256D-101 Copyright © 2004 GIGABYTE TECHNOLOGY CO., LTD Copyright by GIGA-BYTE TECHNOLOGY CO., LTD. ("GBT"). No part of this manual may be reproduced or transmitted in any from without the expressed, - Gigabyte GV-R96P128DE | Manual - Page 4
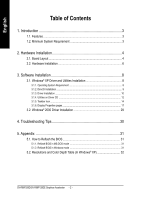
17 3.2. Windows® 2000 Driver Installation 29 4. Troubleshooting Tips 30 5. Appendix 31 5.1. How to Reflash the BIOS 31 5.1.1. Reflash BIOS in MS-DOS mode 31 5.1.2. Reflash BIOS in Windows mode 31 5.2. Resolutions and Color Depth Table (In Windows® XP 32 GV-R96P256D/GV-R96P128DE Graphics - Gigabyte GV-R96P128DE | Manual - Page 5
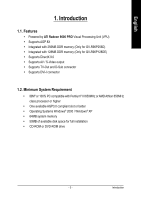
by ATI Radeon 9600 PRO Visual Processing Unit (VPU) • Supports AGP 8X • Integrated with 256MB DDR memory (Only for GV-R96P256D) • Integrated with 128MB DDR memory (Only for GV-R96P128DE) • Supports DirectX 9.0 • Supports AV / S-Video output • Supports TV-Out and D-Sub connector • Supports DVI - Gigabyte GV-R96P128DE | Manual - Page 6
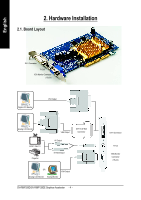
Output Analog LCD Monitor NTSC / PAL TV Projector VGA Output DVI-I to D-Sub Connector AV Output S-VideoOutput OR VGA Output Analog LCD Monitor Analog Monitor GV-R96P256D/GV-R96P128DE Graphics Accelerator - 4 - DVI-I Connector TV-out VGA Monitor Connector (15-pin) - Gigabyte GV-R96P128DE | Manual - Page 7
APPLY POWER TO YOUR SYSTEM IF IT HAS BEEN DAMAGED ON THE CARD. In order to ensure your graphics card working correctly, please use official Gigabyte BIOS only. Use none official Gigabyte BIOS might cause problem on the graphics card. - 5 - Hardware Installation - Gigabyte GV-R96P128DE | Manual - Page 8
computer's manual for help in removing the cover. 3. Remove any existing graphics card from your computer. Or, if your computer has any on-board graphics capability, you may need to disable it on the motherboard. For more information, see you computer documentation. GV-R96P256D/GV-R96P128DE Graphics - Gigabyte GV-R96P128DE | Manual - Page 9
remove the metal cover from this slot; then align your graphics card with the AGP slot, and press it in firmly until the card is fully seated. 5. ready to proceed with the installation of the graphics card drivers. Please refer to next chapter for detailed instructions. - 7 - Hardware Installation - Gigabyte GV-R96P128DE | Manual - Page 10
manual, we assume that your CD-ROM Drive letter to be Drive D: The installation of Windows® 2000 / Windows® XP drivers is very simple. When you insert the driver CD into your CD-ROM drive, you can see the AUTORUN window (if it does not show up, run "D:\setup.exe"). Then you can follow the guides - Gigabyte GV-R96P128DE | Manual - Page 11
Microsoft DirectX to enable 3D hardware acceleration support for Windows® 2000 or Windows® XP to achieve better 3D performence. 0 Note: For software MPEG support in Windows® 2000 or Windows® XP, you must install DirectX first. Step 1. When autorun window show up, click the Install DirectX 9 item - Gigabyte GV-R96P128DE | Manual - Page 12
the driver from AUTORUN window. Step 2: Found new hardware wizard: Searching and installing The wizard will search for the driver and install it automatically. Step 3: Found new hardware wizard: Finish Click the Finish button to finish the installation. GV-R96P256D/GV-R96P128DE Graphics Accelerator - Gigabyte GV-R96P128DE | Manual - Page 13
. If it does not show up, please run "D:\setup.exe". Step 1. When autorun window show up, click the Install Display Drivers (Radeon 9600 Series) item. Click the Install Display Drivers (Radeon 9600 Series) item. Step 2. Click Next button. Step 3. Click Yes button. Setp 4. Click Express or Custom - Gigabyte GV-R96P128DE | Manual - Page 14
setup.exe". z Install GIGABYTE Utility: Click the GIGABYTE Utility item. Step 2. Click the Next button. Step 3. Enter your name and company. Step 4. Click the Finish button to restart computer. Then the GIGABYTE Utility installation is completed. GV-R96P256D/GV-R96P128DE Graphics Accelerator - 12 - Gigabyte GV-R96P128DE | Manual - Page 15
Click the Hydravision Install item. Step 2. Click the Next button. Step 3. Click the Yes button. Step 4. Click the Next button. Windows installings the components. Step 5. Click the Next button. Step 6. Click the Finish button to restart computer. Then the Hydravision installation is completed - Gigabyte GV-R96P128DE | Manual - Page 16
display settings. Right-click the icon. Click the VGA Information item into the "VGA Info" and "Color Adjust" tabs. You can link to GIGABYTE website for updated information about the graphics accelerator, latest drivers, and other information. GV-R96P256D/GV-R96P128DE Graphics Accelerator - 14 - - Gigabyte GV-R96P128DE | Manual - Page 17
English VGA Information VGA Info lists the relevant information about your card. Color Adjust Color Adjust allows you to make color adjustments, such as brightness, contrast and gamma values for each or all of RGB colors. - 15 - Software Installation - Gigabyte GV-R96P128DE | Manual - Page 18
. • create up to 9 virtual desktops. • add special effects to windows and menus. You can right-click on ATI CATALYSTTM Control Center icon to select HYDRAVISIONTM> HYDRAVISIONTM Properties to set the HYDRAVISION (refer to Fig. 3). Fig. 3 GV-R96P256D/GV-R96P128DE Graphics Accelerator - 16 - - Gigabyte GV-R96P128DE | Manual - Page 19
Properties pages, right-click the GIGABYTE icon on the taskbar and , and the refresh rate. Settings (Resolutions and Color depth for Windows) You may adjust the screen resolution and color quality settings in GV-R96P256D Yes Yes Yes Yes GV-R96P128DE Yes Yes Yes Yes - 17 - Software Installation - Gigabyte GV-R96P128DE | Manual - Page 20
want to expose only the features they adjust most often or that their 3D application supports. Hotkeys Properties: The Hotkeys Manager allows you to create shortcut key combinations to such as Ctrl, Alt, or Shift, and any letter from the alphabet. GV-R96P256D/GV-R96P128DE Graphics Accelerator - 18 - - Gigabyte GV-R96P128DE | Manual - Page 21
create customized environments for your desktop, video, and 3D applications. Define and save your own personal video settings that can be quickly activated manually, through a Hotkey, or by file association. Note: A profile applies to a specific graphics card. If there is more than one graphics card - Gigabyte GV-R96P128DE | Manual - Page 22
generate a problem report should you require technical support. The CATALYST installed versions of Windows and Microsoft DirectX. driver versions and OpenGL version. „ The Graphics Hardware tab includes information such as the installed graphics ID, bus type, and BIOS version. GV-R96P256D/GV-R96P128DE - Gigabyte GV-R96P128DE | Manual - Page 23
English Display Manager : „ Display Manager Standard View Use Display Manager Standard View to set your desktop resolution, arrange your displays, enable secondary devices such as a TV, or use the Wizard to help you configure your display(s). „ Displays Manager Advanced View Use Display Manager - Gigabyte GV-R96P128DE | Manual - Page 24
for any type of 3D application. The slider enables you to adjust for overall system performance, overall 3D image quality, or a balance between the two. GV-R96P256D/GV-R96P128DE Graphics Accelerator - 22 - - Gigabyte GV-R96P128DE | Manual - Page 25
English „ Anti-Aliasing Anti-Aliasing is a technique used to smooth out the jagged edges of three-dimensional curved objects or objects with diagonal edges. Anti-aliasing can be set to favor either an increase in system processing performance or improved image quality: Setting for performance is - Gigabyte GV-R96P128DE | Manual - Page 26
important consideration. Setting for quality is best used when high surface detail is required, especially if the animated object rotates or moves into the background. GV-R96P256D/GV-R96P128DE Graphics Accelerator - 24 - - Gigabyte GV-R96P128DE | Manual - Page 27
„ TRUFORMTM TRUFORM is a technology developed by ATI that overcomes the bandwidth and memory constraints of which are small programs that execute on every pixel rendered to the display device. With support for up to six textures in a single rendering pass, the memory bandwidth constraints associated - Gigabyte GV-R96P128DE | Manual - Page 28
page combines all of the principal 3D features onto a single page, without any preview window, allowing for quick access and adjustment. You can change the settings for the following 3D uses, consult the documentation of your 3D application. GV-R96P256D/GV-R96P128DE Graphics Accelerator - 26 - - Gigabyte GV-R96P128DE | Manual - Page 29
are comprised of Home, Work, Theater, and Custom. Select a preset from the Video Presets drop down menu. „ Overlay/VIDEOVISION Use this page to manually set Gamma, Brightness, Contrast, Saturation, and Hue. „ Theater Mode Use Theater Mode to change the way you view streaming video. - 27 - Software - Gigabyte GV-R96P128DE | Manual - Page 30
normally, you do not need to adjust anything. You can manually adjust the AGP bus settings to meet the individual requirements of your computer. Once ATI display driver to detect when the graphics processor stops responding to display-driver instructions. When this happens, the display driver - Gigabyte GV-R96P128DE | Manual - Page 31
OK. 5. Click on Install Display Drivers to begin the Installation Wizard. 6. Click Next. 7. Click Yes to the license agreement. 8. Follow the Wizard's on-screen instructions to complete the installation. Please make sure the Windows® 2000 have installed Windows® 2000 Service Pack (or later) before - Gigabyte GV-R96P128DE | Manual - Page 32
, use the Troubleshooting Guide located in the Windows® Help or contact your computer manufacturer. If necessary, adjust your monitor's setting by monitor's adjust panel to make the screen looks focused, crisp, and sharp. (Please refer to the monitor's manual.) GV-R96P256D/GV-R96P128DE Graphics - Gigabyte GV-R96P128DE | Manual - Page 33
BIOS 5.1.1. Reflash BIOS in MS-DOS mode 1. Extract the downloaded Zip file to your hard disk or floppy disk. This procedure assumes drive A. 2. Restart the computer in MS-DOS mode. (For Windows 2000/XP Reflash BIOS in Windows mode 1. After installing the display drivers, you will find a GIGABYTE of - Gigabyte GV-R96P128DE | Manual - Page 34
Windows® XP) Display Screen Resolution 640 x 480 800 x 600 1024 x 768 1152 x 864 1280 x 768 1280 x 960 1280 x 1024 1600 x 1200 1792 x 1344 1800 x 1440 1856 x 1392 1920 x 1080 1920 x 1200 1920 x 1440 2048 x 1536 Radeon 9600 PRO supported depend on the monitor you use. GV-R96P256D/GV-R96P128DE - Gigabyte GV-R96P128DE | Manual - Page 35
- 33 - Appendix English - Gigabyte GV-R96P128DE | Manual - Page 36
English GV-R96P256D/GV-R96P128DE Graphics Accelerator - 34 -
-
 1
1 -
 2
2 -
 3
3 -
 4
4 -
 5
5 -
 6
6 -
 7
7 -
8
-
9
-
10
-
11
-
12
-
13
-
14
-
15
-
16
-
17
-
18
-
19
-
20
-
21
-
22
-
23
-
24
-
25
-
26
-
27
-
28
-
29
-
30
-
31
-
32
-
33
-
34
-
35
-
36
 |
 |
Dec. 20, 2004
VGA Card
GV-R96P256D / GV-R96P128DE