Gigabyte GV-RX13P256DE-RH Manual
Gigabyte GV-RX13P256DE-RH Manual
 |
View all Gigabyte GV-RX13P256DE-RH manuals
Add to My Manuals
Save this manual to your list of manuals |
Gigabyte GV-RX13P256DE-RH manual content summary:
- Gigabyte GV-RX13P256DE-RH | Manual - Page 1
AMD® Graphics Accelerator User's Manual Rev. 104 Copyright © 2012 GIGABYTE TECHNOLOGY CO., LTD Copyright by GIGA-BYTE TECHNOLOGY CO., LTD. ("GBT"). No part of this manual may be reproduced or transmitted in any form without the expressed, written permission of GBT. Trademarks Third-party brands and - Gigabyte GV-RX13P256DE-RH | Manual - Page 2
Requirements 3 2. Hardware Installation 4 2.1. Hardware Installation ...4 2.1.1. AMD Crossfire ...5 3. Software Installation ...7 3.1. Driver and Utility Installation 7 3.1.1. Driver Installation...7 3.1.2. GIGABYTE OC Guru II...9 3.2. Taskbar Icon ...19 3.3. Display Properties Pages 21 4. AMD - Gigabyte GV-RX13P256DE-RH | Manual - Page 3
system memory for best performance - Optical drive for software installation (CD-ROM or DVD-ROM drive) • Operating System - Windows ® 8 - Windows ® 7 - Windows ® Vista - Windows®XP with Service Pack 2 (SP2) - Windows®XP Professional x64 Edition - 3 - Introduction - Gigabyte GV-RX13P256DE-RH | Manual - Page 4
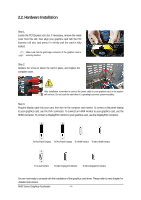
Monitor To D-sub Monitor To Mini DisplayPort Monitor To Mini DisplayPort Monitor You are now ready to proceed with the installation of the graphics card driver. Please refer to next chapter for detailed instructions. AMD Series Graphics Accelerator - 4 - - Gigabyte GV-RX13P256DE-RH | Manual - Page 5
cards of the same type. (Example: GV-RX195P256D-RH) Figure 1 Step 2: After installing graphics card driver in operating system, when an AMD CrossFireX configuration is detected for the first time by the AMD Catalyst display driver, AMD CrossFireX support is automatically enabled, and the best - Gigabyte GV-RX13P256DE-RH | Manual - Page 6
AMD Graphics Accelerator support HDMI output which can handle both audio and video signals. However, that your graphics card can work correctly, please use official GIGABYTE BIOS only. Using non-official GIGABYTE BIOS might cause problem(s) on the graphics card. AMD Series Graphics Accelerator - 6 - - Gigabyte GV-RX13P256DE-RH | Manual - Page 7
.exe program.) Step 1: Click the Install Display Driver item. Step 3: Click the Install button. Step 2: Select the displayed language and then click Next. For software MPEG support in Windows XP, you must install DirectX first. Users who run Windows XP with Service Pack 2 or above do not need to - Gigabyte GV-RX13P256DE-RH | Manual - Page 8
Setp 4: Click the Express or Custom icon and then click Next. Step 5: Click the Accept button. The system is installing the components. Step 6: Click the Finish button to restart the computer. Then the driver installation is completed. AMD Series Graphics Accelerator - 8 - - Gigabyte GV-RX13P256DE-RH | Manual - Page 9
installation and click the OK button. Step 3: Choose the Typical and click the Next button Step 4: Click the Finish button. Then the installation of the GIGABYTE OC Guru II is completed. The system is installing the components. - 9 - Software Installation - Gigabyte GV-RX13P256DE-RH | Manual - Page 10
these profiles This page indicates where users can set up MONITORING、GPU CLOCK、MEMORY CLOCK、FAN、 GPU VOLTAGE、MEMORY VOLTAGE、OSD、ONLINE SUPPORT. Function: When it's locked, GPU CLOCK / MEMORY CLOCK / GPU VOLTAGE / MEMORY VOLTAGE can not be changed. Function: When it's unlocked, GPU CLOCK / MEMORY - Gigabyte GV-RX13P256DE-RH | Manual - Page 11
MONITORING: Show real time GPU Clock/MEMORY Clock Click MORE to MONITORING PANEL MONITORING PANEL: Function: Monitoring Panel Settings. Function: Start recording. Function: Stop recording. - 11 - Software Installation - Gigabyte GV-RX13P256DE-RH | Manual - Page 12
Monitoring panel settings: Function: Show the chosen items on the MONITORING PANEL. Function: Set up a folder to save the recorded files. Function: Return to MONITORING Page. Function: Save the settings. Function: Restore the default setup. AMD Series Graphics Accelerator - 12 - - Gigabyte GV-RX13P256DE-RH | Manual - Page 13
GPU CLOCK: When changing DEFAULT CLOCK, represents PLUS and represents MINUS. Show GPU OFFSET, users can enter numbers directly to change GPU OFFSET. MEMORY CLOCK: MEMORY CLOCK is the combination of DEFAULT CLOCK and OFFSET. When changing MEMORY CLOCK, represents PLUS and represents MINUS. - Gigabyte GV-RX13P256DE-RH | Manual - Page 14
real time fan speed, it will show 0% if using a passive graphics card. MODE: show Auto mode or Manual mode, users can set up in SETTINGS SETTINGS: AUTO mode, fans will be controlled automatically. MANUAL mode, users can adjust fan behavior by adjusting the blue point on the fan graph. Return to - Gigabyte GV-RX13P256DE-RH | Manual - Page 15
GPU VOLTAGE Show and set up GPU VOLTAGE When changing GPU VOLTAGE, represents PLUS and represents MINUS. Users can enter numbers directly to change GPU VOLTAGE. MEMORY VOLTAGE Show and set up MEMORY VOLTAGE When changing MEMORY VOLTAGE, represents PLUS and represents MINUS. Show OSD HOT - Gigabyte GV-RX13P256DE-RH | Manual - Page 16
OSD settings: Function: Return to SETTINGS Page. Function: Set up where OSD will show during games through clicking on one of the 9 squares. Function: Setup a shortcut key for SOFTWARE On-Screen Display (OSD). Function: Setup shortcut keys and a folder to save screenshots. The settings can be - Gigabyte GV-RX13P256DE-RH | Manual - Page 17
SUPPORT 1.Update BIOS: The BIOS version of your VGA is shown in the page. By clicking the item while you are connected to the internet, the software detects if there is an updated BIOS version available. You can download the updated BIOS version and it installs automatically. 2.Update Driver - Gigabyte GV-RX13P256DE-RH | Manual - Page 18
version and it installs automatically. 4.PRODUCT INFO 5.CONTECT US When you are connected to the internet, clicking the item will link to the official GIGABYTE product page. 6.FAQ When you are connected to the internet, clicking the item will link to the official - Gigabyte GV-RX13P256DE-RH | Manual - Page 19
3.2. Taskbar Icon After installation of the display driver, you will find an ATI icon in the notification area. Right-click the icon to enter the ATI Catalyst Control Center. The ATI Catalyst - Gigabyte GV-RX13P256DE-RH | Manual - Page 20
Configuring Audio Output Configure the default audio output device based upon your needs. Step 1: Go to Start > Control Panel > Hardware and Sound > Manage audio devices. Figure 1 Figure 2 Figure 3 Step 2: In the Manage audio devices dialog box, click the Playback tab. Using the picture to the left - Gigabyte GV-RX13P256DE-RH | Manual - Page 21
3.3. Display Properties Pages Display Settings (Resolutions and Color Quality for Windows) To access Display Settings page, right-click on desktop and select Personalize, then the Personalization windows will show up. Select Display Settings to adjust the screen resolution and color quality settings - Gigabyte GV-RX13P256DE-RH | Manual - Page 22
AMD Catalyst®Control Center Basic View : The Basic View is the default view when AMD Catalyst Control Center is launched for the first time. This interface provides access to the basic settings and advanced features of your AMD graphics products. You can switch between Basic View and Advanced View at - Gigabyte GV-RX13P256DE-RH | Manual - Page 23
Step 4: In the Output Video Format list, select a file format for the new file. If you wish to change the name of the new file, enter the new name in the Output File area. Finally, click Next to start file conversion. The video file has been successfully converted. Setup my display configuration This - Gigabyte GV-RX13P256DE-RH | Manual - Page 24
and Advanced View provides hardware and software information about the installed graphics card. Graphics Software Provides software information including driver version, CATALYST version, Direct 3D version and so on. Graphics Hardware Provides hardware information including graphics chipset - Gigabyte GV-RX13P256DE-RH | Manual - Page 25
allows you to configure all of the many available settings of your ATI graphics card. View Properties: The CATALYST Control Center dashboard supports three types of views. Hotkeys Properties: The Hotkeys Manager allows you to create shortcut key combinations to quickly perform tasks such as changing - Gigabyte GV-RX13P256DE-RH | Manual - Page 26
customized environments for your desktop, video, and 3D applications. Define and save your own personal video settings that can be quickly activated manually, through a Hotkey, or by file association. Note: A profile applies to a specific graphics card. If there is more than one graphics card installed - Gigabyte GV-RX13P256DE-RH | Manual - Page 27
Catalyst Control Center Help feature allows you to access the comprehensive online help, register your product, or generate a problem report should you require technical support. The Catalyst Control Center Help feature offers the following options: Help for this Page Help Contents ... Go to - Gigabyte GV-RX13P256DE-RH | Manual - Page 28
change your display setup and arrange your desktop in a multi-monitor environment. Note: The stretch vertically and horizontally options are not supported on systems running Windows Vista. Display Options: The Display Options aspect gives you additional control to optimize performance of OpenGL and - Gigabyte GV-RX13P256DE-RH | Manual - Page 29
can also adjust the horizontal and vertical sync or enable composite sync. AvivoTM Colo Use AvivoTM Color for AMD graphics cards that support per-display color settings. Independently set the hue, saturation, and temperature for each attached and enabled display. - 29 - Software Installation - Gigabyte GV-RX13P256DE-RH | Manual - Page 30
rapidly configures your application. Anti-Aliasing Anti-Aliasing (AA) is a rendering technique designed to remove jagged edges, shimmering, and pixelation problems that are common in rendered 3D images. Rather than determining the color to display for each pixel by sampling a single location at the - Gigabyte GV-RX13P256DE-RH | Manual - Page 31
Anisotropic Filtering Anisotropic Filtering is a technique that preserves detail on surfaces that have three-dimensional perspective and fade away into the background. It works best when used in conjunction with Mipmapping. Anisotropic Filtering can be set to favor either an increase in system - Gigabyte GV-RX13P256DE-RH | Manual - Page 32
video settings choose one of the video presets. Note: These settings will only affect applications with video overlay support. Basic Color Use the Avivo Color: Basic option to manually set Gamma, Brightness, Contrast, Saturation, and Tint for video playback. Note: Certain video formats do not - Gigabyte GV-RX13P256DE-RH | Manual - Page 33
how the two interlaced video fields are converted into a non-interlaced form. Note: These settings will only affect applications with video overlay support. Theater Mode Use Theater Mode to change the way you view streaming video. Note: • These settings will only affect applications with video - Gigabyte GV-RX13P256DE-RH | Manual - Page 34
for the graphics processor clock and video memory clock. Alternatively, manually set these speeds to meet your specific requirements. Finally, Overdrive detected for the first time by the ATI Catalyst display driver, ATI CrossFireX support is automatically enabled. If ATI CrossFireX is not enabled, - Gigabyte GV-RX13P256DE-RH | Manual - Page 35
AMD Eyefinity setting: Select Create Eyefinity Display Group Select Display (3 x 1) Arrange the order of your displays then the setting is completed - 35 - Software Installation - Gigabyte GV-RX13P256DE-RH | Manual - Page 36
experience problems. Contact your dealer or GIGABYTE for more advanced troubleshooting . For more information, consult your computer's manual or manufacturer. (NOTE: Some manufacturers do the driver for the graphics card is correct. For more assistance, use the Troubleshooting Guide located - Gigabyte GV-RX13P256DE-RH | Manual - Page 37
" product. Restriction of Hazardous Substances (RoHS) Directive Statement GIGABYTE products have not intended to add and safe from hazardous government office, your household waste disposal service or where you purchased the product for manual and we will be glad to help you with your effort. - Gigabyte GV-RX13P256DE-RH | Manual - Page 38
Finally, we suggest that you practice other environmentally friendly actions by understanding and using the energy-saving features of this product (where applicable), recycling the inner and outer packaging (including shipping containers) this product was delivered in, and by disposing of or - Gigabyte GV-RX13P256DE-RH | Manual - Page 39
- 39 - Appendix
-
 1
1 -
 2
2 -
 3
3 -
 4
4 -
 5
5 -
 6
6 -
 7
7 -
8
-
9
-
10
-
11
-
12
-
13
-
14
-
15
-
16
-
17
-
18
-
19
-
20
-
21
-
22
-
23
-
24
-
25
-
26
-
27
-
28
-
29
-
30
-
31
-
32
-
33
-
34
-
35
-
36
-
37
-
38
-
39
 |
 |
AMD
®
Graphics Accelerator
User’s Manual
Rev. 104
Copyright
© 2012 GIGABYTE TECHNOLOGY CO., LTD
Copyright by
GIGA-BYTE TECHNOLOGY CO., LTD. (“GBT”).
No part of this manual may be reproduced or trans-
mitted in any form without the expressed, written permission of
GBT
.
Trademarks
Third-party brands and names are the properties of their respective owners.
Notice
Please do not remove any labels on this graphics card. Doing so may void the warranty of this card.
Due to rapid change in technology, some of the speci
fi
cations might be out of date before publication of this this
manual. The author assumes no responsibility for any errors or omissions that may appear in this document nor
does the author make a commitment to update the information contained herein.
Rovi Product Notice:
This product incorporates copyright protection technology that is protected by U.S. patents and other intellectual
property rights. Use of this copyright protection technology must be authorized by Rovi Corporation, and is intended
for home and other limited viewing uses only unless otherwise authorized by Rovi Corporation. Reverse engineering
or disassembly is prohibited.